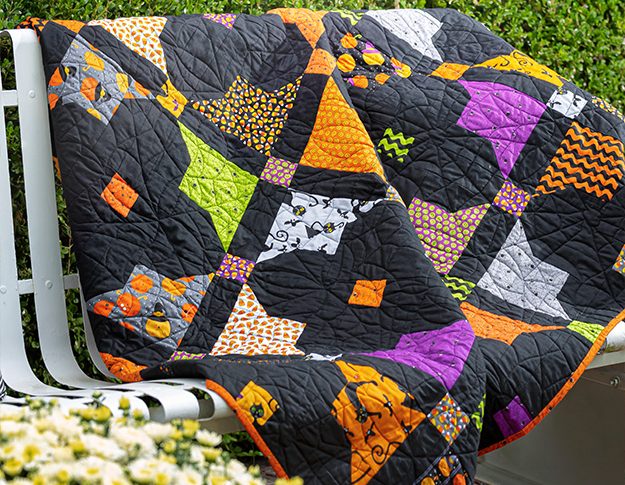
Sashed Double Star Quilt: A Step-by-Step Guide to a Stunning Quilt Pattern
Advertising
Creating a Sashed Double Star quilt is an exciting project for quilting enthusiasts who love working with dynamic quilt patterns. This pattern combines the elegance of the Double Star with the structured beauty of sashing, creating a striking visual effect that enhances any quilt collection. Whether you are an experienced quilter or just starting out, this guide will walk you through the entire process, from fabric selection to the final stitches.
In this tutorial, we will break down the process into manageable steps, covering fabric requirements, cutting measurements, and precise piecing techniques. Following this guide will help you achieve sharp points, clean sashing, and a well-balanced layout. Additionally, we will incorporate SEO best practices to ensure this guide is informative, well-structured, and easy to follow.
Advertising
Let’s get started with the essential materials and step-by-step instructions to create your own Sashed Double Star quilt!
Selecting the right fabrics is crucial for achieving a visually appealing quilt. For the Sashed Double Star quilt, a mix of light, medium, and dark tones works best to highlight the star pattern and sashing.
Choose a primary color for the star points, a secondary color for the background, and a contrasting fabric for the sashing strips. High-contrast fabrics enhance the design’s visibility and make the quilt pattern stand out.
Opt for high-quality 100% cotton fabric. This ensures durability and ease of handling during cutting and sewing.
Pre-wash and iron all fabrics before cutting. This helps prevent shrinkage and bleeding of colors after the quilt is completed.
The key materials required for this quilt pattern include:
Main fabric (for the stars): 1 yard
Background fabric: 1 ½ yards
Sashing fabric: 1 yard
Binding fabric: ½ yard
Backing fabric: 3 yards
Batting: Twin size or custom size as per your quilt dimensions
Proper preparation and cutting of materials will ensure smooth assembly and accurate piecing, reducing fabric wastage and errors.
Cutting the Fabric for Your Sashed Double Star Quilt
Accurate fabric cutting is essential for a well-proportioned quilt pattern. Follow these cutting guidelines:
Advertising
Star Points: Cut (16) 3 ½” x 3 ½” squares from the main fabric.
Background Squares: Cut (32) 3 ½” x 3 ½” squares from the background fabric.
Half-Square Triangle (HST) Units: Cut (16) 4” x 4” squares from both the star and background fabric. These will be used to create HSTs.
Sashing Strips: Cut (12) 2 ½” x 12 ½” strips from the sashing fabric.
Cornerstones: Cut (6) 2 ½” x 2 ½” squares from the background fabric.
Border Strips: Cut (4) 3” x 42” strips from the border fabric.
Using a rotary cutter, quilting ruler, and self-healing cutting mat ensures precision in all your fabric pieces. Labeling each fabric piece helps keep everything organized before sewing.
Piecing the Double Star Blocks
Now that your fabric is cut, let’s start assembling the star blocks.
Create Half-Square Triangles (HSTs): Pair each 4” x 4” star fabric square with a 4” x 4” background fabric square, draw a diagonal line on the back of the lighter fabric, and sew ¼” on both sides of the line. Cut along the line and press open.
Trim the HSTs to 3 ½” x 3 ½”. This ensures consistency in block size.
Layout the star block: Arrange (4) HSTs, (4) background squares, and (1) 3 ½” center star square into a 3×3 grid.
Sew the rows together using a ¼” seam allowance, pressing seams towards the darker fabric.
Repeat this process to create a total of 4 Double Star blocks.
Double-check measurements to ensure uniformity in all blocks before moving to the sashing assembly.
Precise piecing and consistent seam allowances are key to making each star block look sharp and symmetrical.
Assembling the Sashing and Finishing the Quilt Top
Adding sashing between the star blocks gives a structured, framed look to the Sashed Double Star quilt.
Layout the quilt top: Arrange the (4) star blocks with the sashing strips and cornerstones in between them.
Sew the horizontal sashing rows first: Attach a 2 ½” x 12 ½” sashing strip between each block, adding a 2 ½” x 2 ½” cornerstone square at the intersections.
Press the seams open to distribute bulk evenly and achieve a flat quilt top.
Join the sashed rows: Align the star block rows with the sashing rows, pin carefully, and sew together.
Attach the border strips: Sew the 3” x 42” strips around the quilt top, beginning with the top and bottom, then the sides.
Give the quilt top a final press before proceeding to quilting and binding.
Ensuring that the sashing strips and borders are straight and aligned will create a polished, professional look for your finished quilt.
Quilting and Binding Your Sashed Double Star Quilt
With the quilt top complete, it’s time to quilt and bind your project.
Layer the quilt sandwich: Place the backing fabric (right side down), batting, and quilt top (right side up) in layers.
Baste the layers together using pins, spray baste, or long basting stitches.
Choose a quilting design: Free-motion quilting, stitch-in-the-ditch, or straight-line quilting all work well for this pattern.
Quilt the layers together using a walking foot or free-motion foot on your sewing machine.
Prepare the binding: Cut (5) 2 ½” x 42” strips, join them end-to-end, and press in half lengthwise.
Attach the binding: Sew the binding to the quilt’s edge using a ¼” seam, fold it over, and hand-stitch or machine-stitch it in place.
Once the binding is attached, give your Sashed Double Star quilt a final press, and enjoy your beautiful finished creation!
By following this detailed step-by-step guide, you can confidently create a stunning Sashed Double Star quilt that showcases your quilting skills. Whether you choose vibrant fabrics for a bold look or softer hues for a traditional touch, this quilt pattern is a timeless addition to any quilt collection. Happy quilting!


