The Sawtooth Star Quilt Block Pattern is one of the most beloved and timeless designs in the quilting world, admired for its bold geometry and striking visual appeal.
From beginners to experienced quilters, this pattern offers a perfect balance between simplicity and sophistication. If you are looking to create a quilt that feels both classic and modern, the Sawtooth Star Quilt Block Pattern is an excellent choice to explore and master.
What makes the Sawtooth Star Quilt Block Pattern truly special is its versatility. Whether you are working with vibrant fabrics, soft pastels, or even scrap materials, this pattern adapts beautifully to different color schemes and styles. It can be used to create stunning quilts for beds, wall hangings, or even smaller decorative items, making it a favorite among quilting enthusiasts who love creative flexibility.Another reason why the Sawtooth Star Quilt Block Pattern stands out is its ability to teach essential quilting techniques. By practicing this pattern, you will improve your precision in cutting, piecing, and aligning seams. It also introduces you to working with half-square triangles and flying geese units, which are foundational skills in quilting. As you continue reading, you will discover everything you need to confidently create your own masterpiece.
Understanding the Basics of the Sawtooth Star Quilt Block Pattern
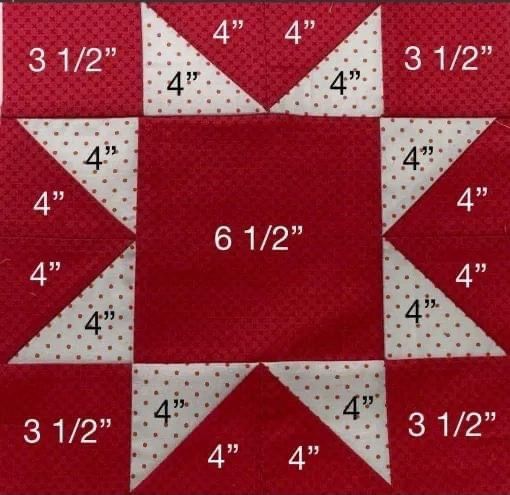
The Sawtooth Star Quilt Block Pattern is built around a central square surrounded by triangular points that form a star shape. These points are typically created using flying geese units, which give the block its distinctive “sawtooth” appearance. Understanding this structure is the first step toward mastering the pattern and achieving consistent results.
At its core, the block is usually arranged in a 3×3 grid. The center square acts as the focal point, while the surrounding units form the star points and background. This layout makes it easier to assemble the block step by step, ensuring accuracy and alignment throughout the process. Even beginners can follow this structure with confidence once they become familiar with the components.
Fabric selection plays a crucial role in highlighting the beauty of the Sawtooth Star Quilt Block Pattern. Choosing contrasting colors for the star points and the background will make the design stand out more clearly. On the other hand, using similar tones can create a softer, more subtle effect. The choice depends entirely on your personal style and the look you want to achieve.
Precision in cutting is essential when working with this pattern. Because the design relies heavily on geometric shapes, even small inaccuracies can affect the final result. Using a rotary cutter, a quilting ruler, and a cutting mat can help ensure clean and accurate cuts, which will make the assembly process smoother and more enjoyable.
Another important aspect to consider is seam allowance. Most quilt patterns, including the Sawtooth Star Quilt Block Pattern, use a standard ¼-inch seam allowance. Maintaining consistency in your seams will help all pieces fit together perfectly, preventing distortion in the block.
Pressing your seams correctly can also make a significant difference. Pressing seams open or to one side, depending on the pattern instructions, helps reduce bulk and improves the overall appearance of the block. Taking the time to press carefully will give your quilt a more polished and professional look.
Step-by-Step Construction Techniques
Creating the Sawtooth Star Quilt Block Pattern begins with preparing all your fabric pieces. Start by cutting squares and rectangles according to your desired block size. Organizing your pieces before sewing will help you stay efficient and avoid confusion during the assembly process.
The first step typically involves making the flying geese units. These units form the star points and are created by sewing smaller squares onto a larger rectangle. Precision is key here, as these pieces need to align perfectly to create sharp, clean points.
Next, you will assemble the rows of the block. The top and bottom rows usually consist of a combination of flying geese units and background squares. The middle row includes the central square, which serves as the focal point of the design. Carefully sewing these rows together ensures that the star shape emerges clearly.
Once the rows are complete, join them together to form the full block. Pay close attention to seam alignment, especially where the points meet. Pinning the pieces before sewing can help keep everything in place and prevent shifting during stitching.
After assembling the block, take time to inspect your work. Check for any misaligned seams or uneven edges. Making small adjustments at this stage can significantly improve the final result and ensure your quilt looks neat and balanced.
Finally, give your block a final press. This step helps set the seams and enhances the overall appearance of the Sawtooth Star Quilt Block Pattern. A well-pressed block not only looks better but is also easier to incorporate into a larger quilt project.
Creative Variations and Design Ideas
One of the most exciting aspects of the Sawtooth Star Quilt Block Pattern is its adaptability. You can experiment with different color combinations to create unique visual effects. For example, using a dark background with bright star points can create a dramatic and eye-catching design.
Another popular variation involves playing with scale. By making larger or smaller blocks, you can change the overall look of your quilt. Smaller blocks create a more intricate appearance, while larger blocks highlight the bold geometry of the star pattern.
You can also incorporate prints and textures to add depth to your design. Mixing solid fabrics with patterned ones can create interesting contrasts and make your quilt more visually engaging. This approach is especially effective when you want to showcase specific fabrics.
Rotating the blocks is another creative technique. By turning the Sawtooth Star Quilt Block Pattern in different directions, you can create secondary patterns within your quilt. This adds complexity and makes the final piece more dynamic and visually appealing.
Adding borders or sashing between blocks can further enhance your quilt. These elements provide separation and allow each block to stand out while also contributing to the overall design. Choosing complementary colors for these features can tie the entire quilt together beautifully.
Finally, consider combining the Sawtooth Star Quilt Block Pattern with other quilt blocks. This approach allows you to create a sampler quilt, showcasing a variety of designs while still maintaining a cohesive look. It’s a great way to expand your skills and explore new patterns.
Tips for Perfecting Your Sawtooth Star Quilt Block Pattern
Consistency is key when working on the Sawtooth Star Quilt Block Pattern. Taking the time to measure, cut, and sew accurately will ensure that all your blocks are uniform. This is especially important if you plan to create a large quilt with multiple blocks.
Using high-quality tools can make a big difference in your quilting experience. Sharp rotary cutters, precise rulers, and a reliable sewing machine all contribute to better results. Investing in good tools can save you time and frustration in the long run.
Practice is essential for improving your skills. If you are new to quilting, consider making a few practice blocks before starting your final project. This will help you become more comfortable with the techniques and build your confidence.
Pay attention to fabric grain and direction. Aligning your pieces correctly will prevent stretching and distortion, ensuring that your block maintains its shape over time. This is a small detail that can have a big impact on the final outcome.
Take breaks when needed. Quilting requires focus and patience, and working for long periods without rest can lead to mistakes. Stepping away for a short time can help you return with a fresh perspective and improved accuracy.
Lastly, enjoy the process. The Sawtooth Star Quilt Block Pattern is not just about the final product but also about the journey of creating something beautiful with your own hands. Embrace each step and take pride in your work.
FAQ About Sawtooth Star Quilt Block Pattern
What is the Sawtooth Star Quilt Block Pattern best used for?
The Sawtooth Star Quilt Block Pattern is ideal for creating quilts, wall hangings, and decorative pieces. Its bold design makes it suitable for both traditional and modern projects.
Is the Sawtooth Star Quilt Block Pattern beginner-friendly?
Yes, it is considered beginner-friendly, especially for those who want to learn essential quilting techniques like flying geese and accurate piecing.
What size should I make my Sawtooth Star blocks?
The size depends on your project. Common sizes range from 6 inches to 12 inches, but you can adjust the dimensions to suit your needs.
How do I ensure sharp star points?
Accurate cutting, consistent seam allowances, and careful pressing are key to achieving sharp and clean star points in your block.
Can I use scrap fabric for this pattern?
Absolutely. The Sawtooth Star Quilt Block Pattern works beautifully with scrap fabric, allowing you to create colorful and unique designs.
What fabrics work best for this pattern?
Cotton quilting fabric is the most popular choice due to its durability and ease of use. However, you can experiment with other fabrics for different effects.
Conclusion
The Sawtooth Star Quilt Block Pattern is a timeless and versatile design that offers endless creative possibilities. Throughout this article, you learned about its structure, construction techniques, creative variations, and essential tips for achieving professional results. By mastering this pattern, you not only create beautiful quilts but also develop valuable quilting skills that can be applied to many other projects.
Now it’s your turn to bring this pattern to life. Take what you’ve learned and start creating your own version of the Sawtooth Star Quilt Block Pattern. Feel free to experiment, make mistakes, and most importantly, enjoy the process. If you found this guide helpful, share your honest opinion and leave your suggestions—your feedback can inspire even more creative ideas!
