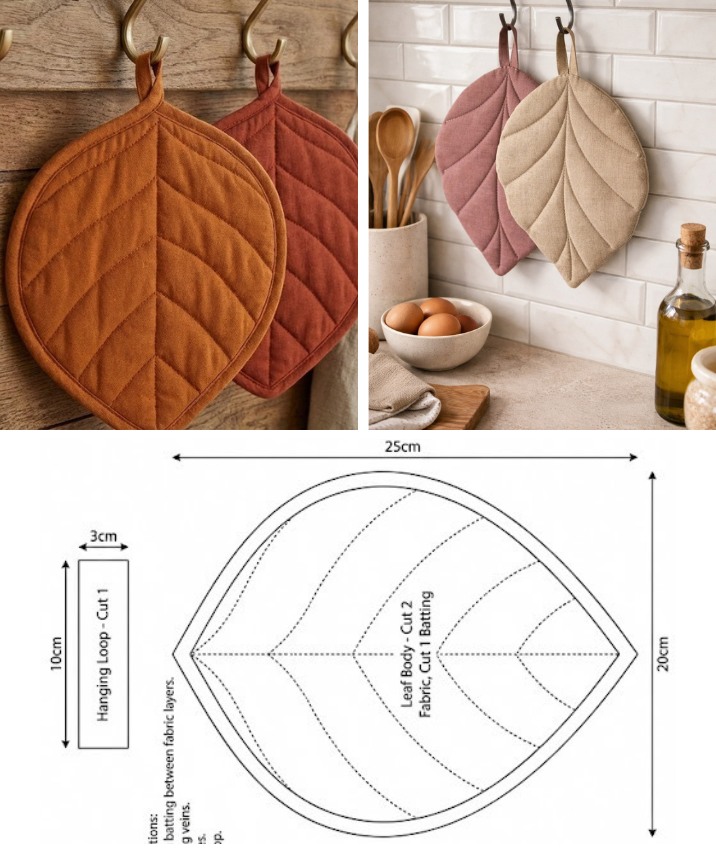
Padding leaf-shaped pot holder Pattern
The Scarecrow Pattern – Quilt Pattern is a charming and timeless design that brings a touch of rustic countryside warmth to your quilting projects. Inspired by the humble scarecrow, this pattern combines traditional quilting techniques with creative artistry, making it a delightful choice for both beginners and experienced quilters. By incorporating soft autumn tones, whimsical details, and classic patchwork methods, you can create a quilt that tells a story of harvest time, cozy barns, and crisp fall evenings.
One of the reasons the Scarecrow Pattern – Quilt Pattern remains so popular is its versatility. It can be adapted for wall hangings, bedspreads, table runners, or even seasonal decorations. Each quilt can be personalized by adjusting the colors, fabrics, and embellishments, allowing the maker to infuse their own personality into the design. Whether you’re creating a gift for a loved one or making a piece to decorate your own home, this pattern offers endless creative possibilities.
For quilters seeking both a fun project and a visually rewarding result, the Scarecrow Pattern – Quilt Pattern is a perfect match. The design typically features appliqué elements to form the scarecrow’s clothing, face, and background scenery. Patchwork blocks may be combined with embroidery to add texture and depth, creating a quilt that feels truly unique. In this guide, we’ll explore the steps to bring your scarecrow quilt to life, along with tips for fabric selection, cutting accuracy, stitching methods, and finishing touches that elevate the entire piece.

When working on the Scarecrow Pattern – Quilt Pattern, selecting the right fabrics is a crucial first step. The charm of this design lies in its autumn-inspired palette, often featuring earthy browns, golden yellows, rich oranges, and deep greens. These colors evoke the feeling of harvest season and complement the scarecrow theme beautifully. Cotton fabrics are typically the best choice due to their ease of sewing and durability.
Texture is another important consideration. Mixing solid fabrics with small floral prints, plaids, and textured weaves can make your quilt more visually interesting. For the scarecrow’s clothing, consider using patterned fabrics such as gingham for the shirt or denim-like cotton for the overalls. These little details make your quilt more lifelike and full of character.
It’s also important to choose a background fabric that contrasts well with the scarecrow figure so the main design stands out. A neutral tone, such as cream or light tan, often works well, especially if it has a subtle print to add depth without overwhelming the design.
Before cutting, always pre-wash and press your fabrics to prevent shrinkage and distortion. This step ensures that your final quilt remains smooth and maintains its shape after washing. It also allows you to see the true colors and patterns clearly before starting assembly.
When planning your fabric layout, consider the placement of each color in relation to the others. A well-balanced arrangement will help guide the viewer’s eye across the quilt, making the scarecrow the star of the show while still appreciating the surrounding elements.
Lastly, remember that you can personalize your Scarecrow Pattern – Quilt Pattern by incorporating scraps from past projects. This not only adds a sentimental touch but also makes your quilt a unique reflection of your quilting journey.
Once your fabrics are chosen, it’s time to prepare your materials for the Scarecrow Pattern – Quilt Pattern. Cutting accurately is essential to ensure that your quilt comes together smoothly and maintains a polished finish. Use a rotary cutter, a self-healing cutting mat, and a clear quilting ruler to achieve precise edges.
Begin by cutting the background squares or rectangles for the quilt blocks. These will serve as the canvas on which your scarecrow appliqué or patchwork will be placed. Depending on the size of your quilt, you may need multiple background pieces of the same size for uniformity.
For the scarecrow figure, cut individual shapes for the hat, face, shirt, overalls, and boots. If you are working with appliqué, use paper templates to trace and cut each piece accurately. Remember to add a small seam allowance if you plan to turn under the edges before stitching.
Small details such as buttons, patches, and stitched features can be added later, but it’s helpful to cut out any fabric accents at this stage so everything is ready when you start sewing. This keeps the assembly process organized and efficient.
If your quilt design includes pieced borders or sashing, cut these strips at the same time to maintain consistency in measurement. Keep each section labeled to avoid confusion during assembly.
Taking the time to carefully prepare your quilt pieces ensures that the Scarecrow Pattern – Quilt Pattern will have clean lines, balanced proportions, and a professional appearance when finished.
Now that your pieces are ready, it’s time to bring the Scarecrow Pattern – Quilt Pattern to life through sewing and assembly. Start by arranging the background blocks and placing your scarecrow appliqué pieces on top. This will give you a clear vision of how the finished quilt will look and allow you to make adjustments before sewing.
If you’re using fusible web for appliqué, position each scarecrow piece on the background and press it in place according to the manufacturer’s instructions. This method helps secure the pieces for easier stitching. If you prefer traditional needle-turn appliqué, pin or baste each piece before stitching it down.
Use a blanket stitch, zigzag stitch, or a straight stitch close to the edge to attach the appliqué pieces. Matching or contrasting thread can be chosen depending on the desired effect—matching for a subtle look, or contrasting for a bold, outlined appearance.
Once the scarecrow figure is complete, assemble the quilt blocks by sewing them together with accurate ¼-inch seams. Press each seam to one side, alternating directions for each row to reduce bulk. This step is vital for ensuring the quilt lies flat.
If your design includes pieced borders, sew them to the quilt top next. A border not only frames your quilt beautifully but also adds stability to the edges. Once the top is complete, you’re ready for quilting.
Quilt the layers together using straight-line quilting for a clean, classic look, or free-motion quilting for added texture and artistry. Whichever method you choose, make sure the quilting complements the scarecrow design rather than overwhelming it.
The final step in completing your Scarecrow Pattern – Quilt Pattern is adding the binding and finishing details. The binding is the fabric strip that wraps around the raw edges of the quilt, giving it a neat and polished finish. Choose a binding fabric that coordinates with your quilt colors, or use a bold contrasting color for an eye-catching frame.
Hand-stitching the binding to the back of the quilt often gives the most professional result, though machine stitching can be faster and equally durable. Whichever method you choose, ensure your corners are mitered neatly for a crisp appearance.
Adding embellishments can bring your scarecrow to life. Buttons for eyes, embroidered stitches for facial features, or small fabric patches on the clothing can make your design more playful and detailed. Just remember to secure any loose embellishments firmly, especially if the quilt will be used by children.
If you plan to hang the quilt as a wall decoration, consider adding a hanging sleeve to the back before attaching the binding. This makes it easy to display your quilt without damaging the fabric.
Another creative idea is to make matching quilted pillows, table runners, or placemats using smaller versions of the Scarecrow Pattern – Quilt Pattern. This creates a coordinated seasonal décor theme for your home.
By the time you reach this stage, your scarecrow quilt will not only be a work of art but also a meaningful creation that reflects your quilting skills, creativity, and dedication.
1. What skill level is required for the Scarecrow Pattern – Quilt Pattern?
This pattern is suitable for confident beginners and intermediate quilters. Basic knowledge of sewing, cutting, and assembling quilt blocks is recommended.
2. Can I make the Scarecrow Pattern in different sizes?
Yes. You can adjust the pattern size by scaling your templates or changing the number of blocks in your quilt.
3. What fabrics work best for a scarecrow quilt?
Cotton is the most popular choice because it’s easy to work with and durable. Mixing solids, prints, and textured fabrics adds visual interest.
4. Do I need special tools for this quilt?
A rotary cutter, quilting ruler, self-healing cutting mat, and an iron are essential. If you’re doing appliqué, fusible web can make the process easier.
5. How do I wash and care for my scarecrow quilt?
Wash gently in cold water with mild detergent and air-dry or tumble dry on low heat to preserve colors and fabrics.
Creating a Scarecrow Pattern – Quilt Pattern is a rewarding project that blends creativity, tradition, and personal expression. From selecting autumn-inspired fabrics to carefully assembling and adding decorative details, every step brings you closer to a finished quilt that captures the warmth of the harvest season. Whether you keep it as a cherished piece for your home or gift it to someone special, this quilt will hold memories stitched into every seam. I’d love to hear your honest opinion about this pattern and any suggestions you might have for future quilting ideas—share your thoughts and keep the creative conversation going!


