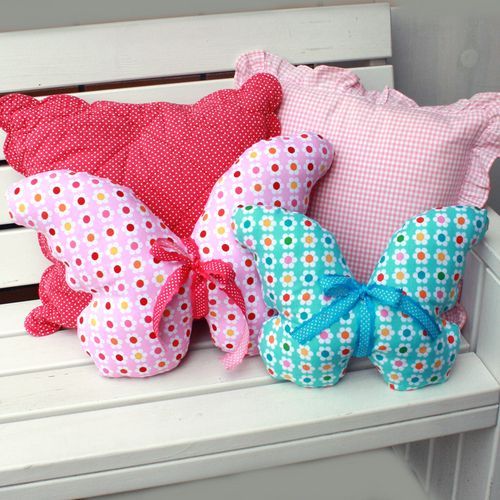
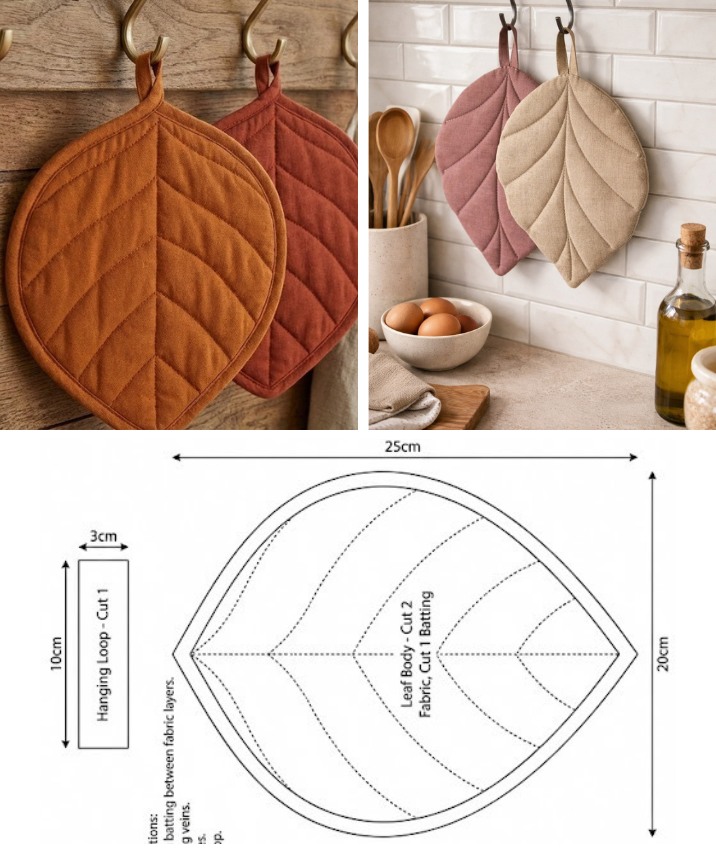
Butterfly Shaped Cushion Pattern
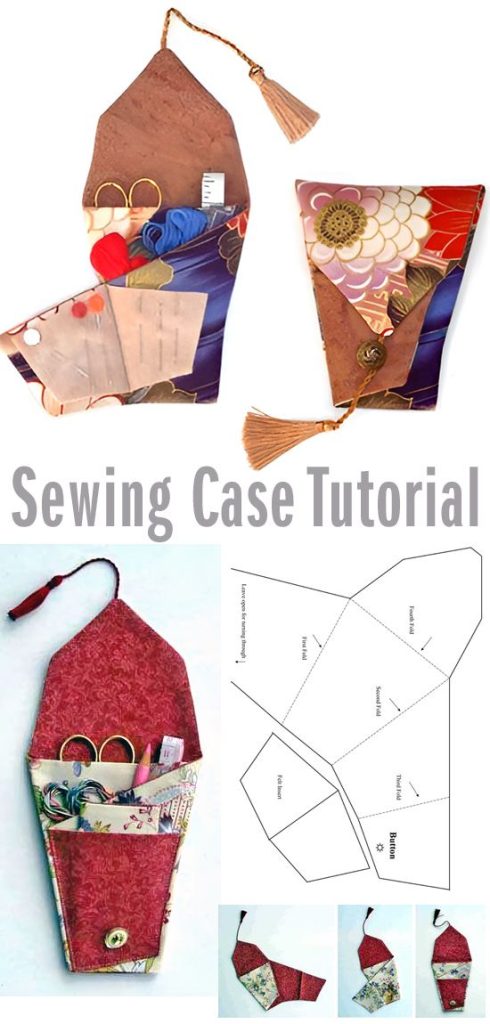
If you have ever dreamed of creating a beautiful, functional, and personalized sewing accessory, this Sewing Case Tutorial – Quilt Pattern is the perfect project for you. Whether you’re a beginner quilter or an experienced crafter, making your own sewing case allows you to showcase your quilting skills while designing a piece that keeps your tools organized. In this guide, we will walk you through the process step-by-step, explaining techniques, fabric choices, and assembly tips so you can enjoy both the creative and practical benefits of quilting.
The Sewing Case Tutorial – Quilt Pattern combines the artistry of quilting with the practicality of sewing storage. The finished product is not only a stylish case for keeping needles, threads, scissors, and other small tools but also a display of your craftsmanship. Because quilting involves sewing together layers of fabric with decorative stitching, you can easily adapt this project to match your personal style or the décor of your sewing space.
Quilting a sewing case has another advantage: it provides structure and durability that simple fabric pouches often lack. This Sewing Case Tutorial – Quilt Pattern focuses on creating a quilted surface that protects your sewing supplies, while also allowing you to experiment with patchwork designs, color combinations, and embellishments. The result is a sewing accessory that feels both luxurious and handmade, making it a wonderful gift for yourself or for fellow crafters.
When starting your Sewing Case Tutorial – Quilt Pattern, one of the first steps is selecting the right materials. Your choice of fabric will greatly influence the durability, look, and feel of the final case. Cotton is the most common choice for quilting, as it is easy to work with, available in countless patterns, and durable enough to hold its shape. For the lining, you might choose a smooth cotton or even a wipeable fabric to make cleaning easier.
You will also need batting, which is the inner layer that gives your sewing case its quilted texture and cushioning. Batting comes in various thicknesses, and for a sewing case, a low- to medium-loft batting works best, providing enough padding without making the case too bulky. You can use either cotton or polyester batting, depending on your preference for softness or resilience.
Thread is another important consideration. A high-quality cotton thread is recommended for piecing the fabric and quilting the layers together. If you plan to use decorative stitching, consider a slightly thicker thread to make the stitches stand out. Matching your thread color to your fabric can give a subtle finish, while contrasting thread creates a bold design element.
For the case closure, you can choose between zippers, buttons, snaps, or Velcro. Zippers offer secure closure and a neat finish, while snaps or Velcro can make the project quicker and easier to complete. Decorative buttons can also add a charming touch, especially if they match your quilting theme.
Other necessary materials include quilting rulers, rotary cutters, cutting mats, and sewing pins or clips. These tools will help you achieve precise cuts and accurate seams, which are crucial for a professional-looking sewing case. Preparing all your materials before you begin ensures a smooth workflow.
Finally, consider whether you want to embellish your sewing case. Decorative elements such as appliqué, embroidery, or fabric paint can personalize your project even further. This Sewing Case Tutorial – Quilt Pattern can be as simple or as detailed as you like, depending on your time, skill level, and creativity.
The first step in this Sewing Case Tutorial – Quilt Pattern is cutting your fabric pieces. You will need two rectangles for the exterior, two for the lining, and one layer of batting for each panel. A typical size for a sewing case is around 12 inches by 8 inches when folded, but you can adjust the dimensions to suit your needs. Always remember to add a seam allowance to your measurements.
Once you have your pieces cut, layer them in the following order: exterior fabric (right side out), batting, and lining fabric (right side in). Pin the layers together or use quilting clips to hold them securely in place. This step ensures that your layers stay aligned during stitching.
Next, quilt the exterior panels. You can use straight-line quilting, diagonal crosshatch, or free-motion quilting, depending on your preference. Quilting not only adds decorative texture but also reinforces the structure of your case, ensuring it lasts for years.
After quilting the panels, assemble the case by sewing the exterior pieces together with the lining, leaving an opening for turning the case right side out. Trim the seam allowances and clip the corners to reduce bulk. Turn the case right side out and press it flat for a crisp, professional finish.
If your case includes pockets, now is the time to sew them in place. You can add slip pockets, zippered compartments, or elastic bands to hold tools securely. This Sewing Case Tutorial – Quilt Pattern is highly customizable, so feel free to design your interior layout based on your sewing habits.
Finally, attach your chosen closure method. Install the zipper, sew on buttons, or attach snaps as desired. Make sure the closure is secure and easy to use. Your finished sewing case should open and close smoothly, protecting your tools while providing quick access when you need them.
A major advantage of following a Sewing Case Tutorial – Quilt Pattern is the opportunity to express your creativity through fabric choices and quilting designs. Patchwork quilting, for example, allows you to combine small fabric scraps into a vibrant mosaic, perfect for a colorful sewing case.
You might also explore appliqué techniques, where decorative fabric shapes are sewn onto the base fabric. Appliqué can add whimsical motifs like flowers, sewing tools, or geometric designs to your sewing case, making it truly unique.
Color coordination plays a big role in the overall appearance. Choosing complementary or contrasting colors can set the mood of your design. Soft pastels give a vintage, delicate feel, while bold, bright colors create a cheerful, modern look.
Experimenting with quilting patterns is another way to customize your case. Traditional straight lines offer a clean and minimalistic look, while free-motion quilting allows you to create swirls, leaves, or other intricate motifs.
If you enjoy hand sewing, consider adding hand-stitched embellishments. This extra detail can make your case feel even more personal and artisanal. Embroidery stitches like running stitch, backstitch, or French knots can be used to outline shapes or add small decorative accents.
Lastly, think about using themed fabrics to make your sewing case suit a specific occasion or recipient. For example, you could make a holiday-themed case or one featuring sewing-related prints, which ties perfectly with the function of the case.
Once your Sewing Case Tutorial – Quilt Pattern project is complete, it’s important to take care of your case to keep it looking its best. Quilted fabric can be delicate, so gentle handling is key. Avoid overloading the case, as excessive weight can strain the seams and cause the fabric to warp.
If your sewing case becomes dusty or dirty, spot clean it with a damp cloth and mild soap. Avoid harsh detergents, which can fade the colors and weaken the fibers. For deeper cleaning, hand washing in cold water is safest, though some quilted items can be machine washed on a gentle cycle.
Drying is equally important. Air drying is recommended, as high heat from a dryer can shrink the fabric or distort the batting. Lay your case flat to dry, reshaping it as needed to maintain its form.
Regular inspection of your sewing case helps ensure it stays in good condition. Check for loose threads, worn spots, or weakened seams. A quick repair now can prevent bigger problems later.
If you use your sewing case frequently, consider rotating it with another handmade case. This not only reduces wear and tear but also gives you the fun of switching designs.
With proper care, your quilted sewing case will serve you for many years, becoming both a useful tool and a cherished handmade item.
What is the best fabric for a Sewing Case Tutorial – Quilt Pattern?
Cotton quilting fabric is the most popular choice because it is durable, easy to work with, and available in many patterns.
Do I need a sewing machine for this project?
While it is possible to sew by hand, using a sewing machine will speed up the process and provide stronger seams.
How can I make my sewing case more durable?
Use high-quality materials, reinforce seams, and consider adding interfacing for extra structure.
Can I resize the pattern to make a larger or smaller case?
Yes, you can adjust the dimensions as long as you keep the proportions consistent.
What type of batting should I use?
Low- to medium-loft cotton or polyester batting works best for a balance of structure and softness.
Is this project beginner-friendly?
Yes, especially if you keep the design simple. Beginners can practice basic quilting techniques while making a functional item.
In this article, we explored the Sewing Case Tutorial – Quilt Pattern from start to finish, covering material selection, step-by-step assembly, creative design ideas, and maintenance tips. By following these guidelines, you can create a sewing case that is both functional and a reflection of your personal style. Now that you’ve seen how fun and rewarding this project can be, we’d love to hear your thoughts. Share your honest opinion about this tutorial and let us know any suggestions you have for future quilting guides.


