
Bird Quilt Block Pattern
If you are passionate about quilting and love the idea of combining creativity with precision, then exploring a Sewing Machine Quilt Block pattern is an excellent project to try. This type of quilt block pays tribute to one of the most important tools in the craft of sewing — the sewing machine itself. Whether you are an experienced quilter or just beginning your quilting journey, this block offers a mix of artistic design and traditional quilting techniques that can elevate your work. It’s not just a pattern; it’s a statement piece that celebrates your love for the art of sewing.
The Sewing Machine Quilt Block pattern has become increasingly popular among modern quilters because of its symbolic meaning and creative potential. With a variety of fabric choices and color combinations, this block allows quilters to personalize their creations in endless ways. It represents both craftsmanship and nostalgia, reminding us of the joy of handmade art. Making this block can be a rewarding experience, offering a balance between detail-oriented stitching and imaginative fabric selection.
In addition to its visual appeal, the Sewing Machine Quilt Block pattern provides a wonderful opportunity to practice key quilting skills, such as piecing, pressing, and precision cutting. As you work through each section of the block, you’ll gain confidence in your quilting abilities while producing a unique and beautiful design. This block is ideal for inclusion in sewing-themed quilts, wall hangings, or even as a decorative piece framed in your sewing studio. Now let’s explore the process of creating this block and the techniques that make it truly special.
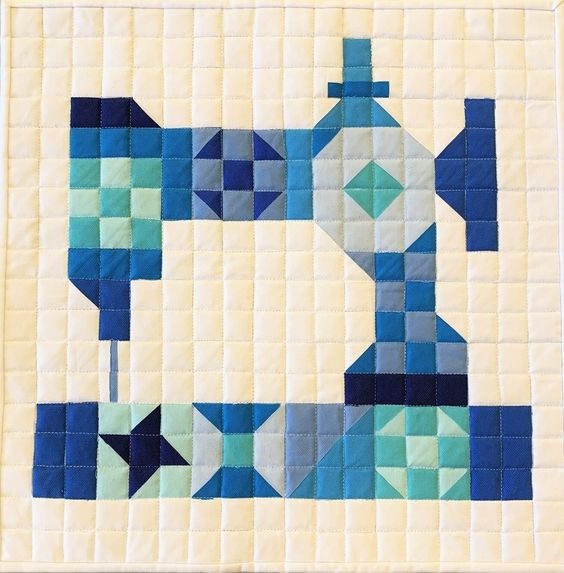
Before diving into the steps, it’s important to understand what makes the Sewing Machine Quilt Block pattern distinctive. Unlike standard quilt blocks, this design incorporates shapes that resemble a sewing machine, often including details like the needle, thread spool, and base. The key is achieving clean lines and symmetry, which create the recognizable silhouette of a sewing machine within the quilt block.
One of the first things to consider is your choice of fabrics. Select a combination that reflects your personal style or matches the theme of your quilt. Many quilters prefer using solid colors to highlight the sewing machine shape, while others use patterned fabrics to add depth and texture. Whichever approach you choose, be sure to press all fabrics before cutting to ensure accuracy.
The next step in working with the Sewing Machine Quilt Block pattern is accurate measurement. Each piece must be cut precisely to ensure the parts align correctly when sewn together. Using a rotary cutter, ruler, and cutting mat will help you achieve clean edges. Remember to account for seam allowances—typically a quarter inch—so your block remains the correct size.
When piecing your block, begin by assembling smaller sections first, such as the sewing machine’s base or needle area. Then, join these smaller parts together to complete the full block. Press seams carefully in one direction to keep the block flat and professional-looking. This step ensures that the design remains crisp and well-defined.
To add personality to your block, consider embellishments. You can use embroidery to outline the machine, or even applique details like buttons or spools of thread. These small touches enhance the visual appeal and make your Sewing Machine Quilt Block pattern stand out.
Finally, don’t rush the process. Precision is the heart of quilting. Take time to align seams, match points, and double-check your measurements. The effort you invest will be reflected in the beauty and quality of your finished block.
To begin your Sewing Machine Quilt Block pattern, gather the essential materials and tools before starting. Preparation ensures a smoother workflow and prevents interruptions during sewing.
You’ll need several coordinating fabrics for the block design, usually including background fabric, accent fabric, and a few contrasting pieces to define the sewing machine shape. Cotton is the preferred choice for quilting due to its ease of handling and durability. Make sure your fabrics are pre-washed and ironed flat before cutting.
The basic tools for this project include a rotary cutter, self-healing cutting mat, clear acrylic ruler, sewing pins, and an iron. These tools will help you cut and piece your block accurately. A quality sewing machine with a quarter-inch foot attachment is also highly recommended, as it helps maintain consistent seam allowances.
You’ll also need thread that coordinates with your fabrics. Neutral tones like white, beige, or gray are versatile options, but you can use colorful threads to create contrast or highlight specific areas of the block. For pressing, a steam iron and pressing cloth can help you achieve smooth, professional seams.
Optional but helpful tools include a seam ripper for correcting mistakes, small scissors for trimming threads, and a design wall or flat surface to lay out your fabric pieces before sewing. Planning your layout visually can prevent errors and help you maintain color balance in your Sewing Machine Quilt Block pattern.
Lastly, prepare your workspace. Ensure that your cutting and sewing areas are well-lit and organized. Having a comfortable and efficient workspace will make your quilting experience more enjoyable and productive.
Now that your materials are ready, it’s time to start creating your Sewing Machine Quilt Block pattern. Begin by cutting out all the necessary fabric pieces according to your chosen pattern template. Most designs will include rectangles, squares, and a few angled cuts to form the sewing machine outline.
Start by sewing smaller units together, such as the machine base and needle section. Assemble these components carefully, pressing each seam flat as you go. This ensures that your pieces fit together precisely and the block remains square. Consistent seam allowances are crucial for achieving a clean final look.
Once the smaller units are completed, join them to form the entire sewing machine shape. Pay attention to alignment at each junction to avoid uneven lines. Using pins or fabric clips can help secure the pieces before stitching. Take your time to verify that all edges match perfectly.
After assembling the main shape, add any decorative elements or additional sections such as borders or frames. This is your chance to enhance the design’s overall appearance. Many quilters add embroidery stitches, applique details, or even small patches representing spools of thread to make the Sewing Machine Quilt Block pattern more dynamic.
When your block is fully pieced, press it thoroughly. A well-pressed block lays flat and looks polished, which is especially important when combining multiple blocks into a larger quilt. If your block appears slightly uneven, you can trim the edges carefully to restore the correct size.
Finally, admire your work! Completing the Sewing Machine Quilt Block pattern is both satisfying and inspiring. It’s not only a creative quilting exercise but also a celebration of the tool that makes sewing possible.
Once you have finished your block, there are many creative ways to use it. You can incorporate the Sewing Machine Quilt Block pattern into a larger quilt, turning it into a centerpiece that captures attention. This block is especially suitable for sewing-themed quilts, studio decor, or gifts for fellow quilters.
Another idea is to create a wall hanging. By framing your finished block or adding borders and backing, you can make a stunning decorative piece for your sewing room. The design serves as both inspiration and tribute to the craft you love.
You can also transform the Sewing Machine Quilt Block pattern into a cushion cover. By combining it with complementary fabrics and quilting stitches, you’ll create a stylish and meaningful accessory for your home. It’s a great way to showcase your quilting skills in everyday decor.
If you’re making a sampler quilt, this block adds a distinctive touch among other designs. Its recognizable sewing machine shape brings a personal connection to the art of quilting, symbolizing creativity, tradition, and skill.
You could even adapt the block into a mini quilt. These small projects are perfect for practicing new techniques or experimenting with fabric combinations. They also make excellent gifts for sewing friends or members of a quilting group.
Ultimately, the Sewing Machine Quilt Block pattern encourages creativity and personalization. The versatility of this design means you can use it in endless ways to express your love of sewing and quilting.
1. What size should a Sewing Machine Quilt Block be?
The size can vary depending on your project, but most Sewing Machine Quilt Block patterns measure between 10″ and 12″ square. Adjust the size to fit your quilt layout or project needs.
2. Can beginners make this pattern?
Yes! This block is suitable for quilters of all skill levels. Beginners can start with simpler shapes, while advanced quilters can add more intricate details and embellishments.
3. What fabrics work best for this pattern?
Cotton fabrics are ideal because they are easy to cut, press, and sew. Choose solid or lightly patterned fabrics to make the sewing machine shape stand out.
4. Can I make the Sewing Machine Quilt Block by hand?
Absolutely. While a sewing machine makes the process faster, hand piecing can add a personal, vintage touch to your block.
5. How can I make my block more decorative?
Add embroidery, applique, or decorative stitching. You can also use metallic threads or fabric paint for extra visual interest.
6. How do I ensure my block stays flat?
Press seams after each step, use the correct seam allowance, and handle your fabric gently to prevent distortion.
Creating a Sewing Machine Quilt Block pattern is a delightful way to combine creativity, skill, and tradition. Throughout this article, we explored how to select fabrics, assemble the block, and personalize it to make it uniquely yours. Whether used in a quilt, wall hanging, or cushion, this block embodies the spirit of sewing and celebrates the craft we cherish.
If you’ve enjoyed learning about this pattern, I’d love to hear your thoughts. Share your experiences, suggestions, or any tips you’ve discovered while making your own Sewing Machine Quilt Block pattern. Your feedback helps inspire other quilters and keeps the art of quilting alive and thriving.


