
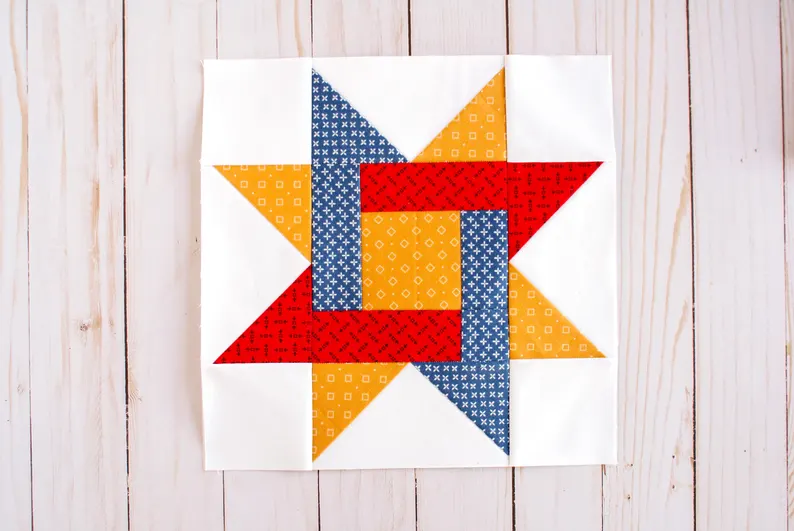
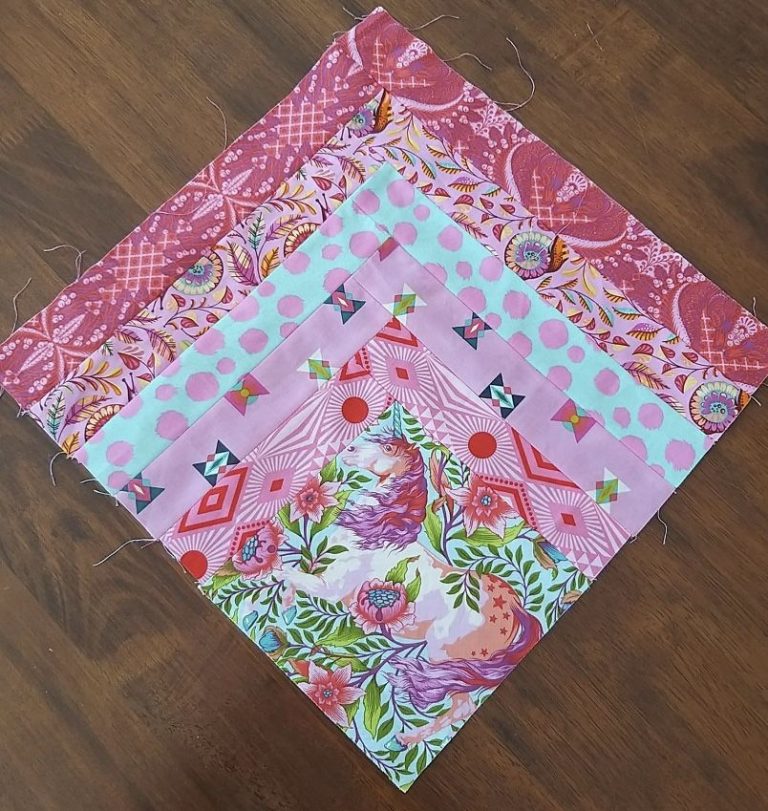
French Braid Quilt Block Pattern
The Simple Star Foundation Paper Piecing Quilt Pattern is a beautiful and creative project for quilters who love precision and symmetry. This pattern combines traditional quilting artistry with the modern method of foundation paper piecing, allowing even beginners to achieve sharp points and clean lines. Whether you’re a seasoned quilter or just starting, this star design offers a delightful way to enhance your skills while creating something visually striking. The foundation paper technique gives you control over every seam, making your quilt blocks look professionally made.
One of the greatest benefits of using the Simple Star Foundation Paper Piecing Quilt Block Pattern is its accuracy. By sewing directly onto the paper template, your pieces align perfectly, eliminating the common struggles of mismatched points. This method gives every star block a crisp, symmetrical finish, ensuring your quilt top looks cohesive and polished. Plus, the process is both fun and rewarding, offering a meditative rhythm as you piece each section together.
Beyond its technical advantages, the Simple Star Foundation Paper Piecing Quilt Pattern opens the door to endless design possibilities. You can experiment with different color palettes—soft pastels for a baby quilt, bold primaries for a modern twist, or muted tones for a classic appeal. Each variation brings the pattern to life in a unique way. Whether you’re crafting a full-sized quilt, a wall hanging, or a small decorative piece, this pattern provides a perfect balance between structure and creativity.
The first step in mastering the Simple Star Foundation Paper Piecing Quilt Pattern is understanding how foundation paper piecing (FPP) works. In this technique, you sew fabric pieces directly onto a printed paper template that guides the placement of each segment. The lines on the paper show exactly where to stitch, and the numbers indicate the order in which to add the fabric pieces. This ensures precision and consistency across all your blocks.
To start, you’ll need to print or trace your Simple Star Foundation Paper Piecing Quilt Block Pattern onto lightweight paper. Many quilters prefer foundation paper because it tears away easily once the block is complete. Make sure your printer settings are accurate to avoid scaling errors that could affect the final size of your block.
Once your template is ready, select your fabrics. This is where creativity shines! You can choose contrasting colors for a bold star effect or go for gradient shades to create depth. Press your fabrics before starting to remove wrinkles that might distort your seams later. Remember: accurate cutting and pressing are key to perfect results.
Next, place the first fabric piece on the wrong side of the paper, making sure it covers the designated area plus a seam allowance. Then, position the second piece right sides together, sew along the printed line, and press it open. Repeat this process, following the numerical order, until the block is fully pieced.
After sewing, trim the block along the outer edge lines to achieve clean edges. Finally, gently tear away the paper backing. Your crisp and flawless Simple Star Foundation Paper Piecing Quilt Block is now ready to be joined with other blocks or used as a standalone piece. This structured method transforms complex designs into manageable, enjoyable projects.
Color and fabric choice play a crucial role in the beauty of your Simple Star Foundation Paper Piecing Quilt Pattern. The right combination can turn a simple layout into a stunning masterpiece. When choosing fabrics, consider using solids or small prints that won’t distract from the sharp points and angles of the star. Fabrics with subtle textures, such as tone-on-tone prints, can add dimension without overpowering the design.
A helpful approach is to select a color scheme that enhances the star’s shape. For example, using a light background with a dark star makes the design stand out boldly. Alternatively, try a gradient effect by blending shades of the same color family from the center outward, creating a glowing starburst look.
For a cohesive quilt, repeat certain colors across different blocks. This helps maintain visual harmony while still allowing for variety. Quilters often use fabric scraps from other projects, giving the Simple Star Foundation Paper Piecing Quilt Block Pattern a sustainable and creative touch.
Don’t forget to prewash your fabrics to prevent bleeding or shrinkage after quilting. Once dried and pressed, cut your pieces slightly larger than the paper sections to allow for trimming. This ensures that every section fully covers the area, even after sewing and pressing seams open.
When working with multiple colors, test your combinations by laying fabric swatches together under good lighting. Sometimes, what looks perfect on a table might appear different once stitched. Take photos of your layout—it helps you visualize the final effect before sewing. With thoughtful color selection, your Simple Star Foundation Paper Piecing Quilt Pattern will shine with personality and balance.
Once your fabrics and template are ready, it’s time to sew your Simple Star Foundation Paper Piecing Quilt Block Pattern. Begin by preparing your sewing machine with a smaller stitch length, typically 1.5–1.8 mm. The smaller stitches make it easier to remove the paper later while keeping the seams secure.
Position your first fabric piece behind section one of the paper template, ensuring the fabric covers the area completely. Place the second piece right sides together along the seam line between sections one and two. Sew directly on the printed line, then fold the paper back and trim the seam allowance to 1/4 inch. Press the fabric open carefully, avoiding excessive stretching.
Continue adding pieces in numerical order, always checking that each fabric section extends beyond the next seam line. After all pieces are attached, press the entire block from the back to set the seams flat. Then, flip it over and trim along the outer edges using a ruler and rotary cutter for precision.
If your block has multiple units, repeat the process for each section and then join them together. Align seams carefully at the center points to maintain the star’s sharp shape. Pin the intersections before sewing, and press the seams open to reduce bulk.
Once the block is assembled, remove the paper backing by gently tearing it away along the perforated lines. Take care not to pull on the seams. You’ll be amazed at the perfect points and alignment that result from the Simple Star Foundation Paper Piecing Quilt Pattern. This technique transforms even intricate designs into achievable, satisfying results.
With your Simple Star Foundation Paper Piecing Quilt Blocks complete, the next stage is assembling your quilt top. Lay out the blocks on a flat surface to decide on their arrangement. You can alternate colors, rotate the stars for variety, or create a symmetrical layout for a clean look. Taking time to plan your layout ensures your finished quilt has a balanced visual flow.
Once you’re happy with the arrangement, sew the blocks together in rows. Press each seam as you go to keep everything flat and aligned. Joining the rows will reveal the full beauty of your star design. A consistent seam allowance is essential for perfect alignment, especially when matching star points between blocks.
After assembling the top, add borders if desired. Borders frame your quilt, enhancing the Simple Star Foundation Paper Piecing Quilt Pattern and giving it a professional finish. You can choose solid borders for a clean look or pieced borders for added interest.
Next, prepare your quilt sandwich: the top, batting, and backing. Baste the layers together using pins or spray adhesive to prevent shifting during quilting. Then, quilt as desired—straight lines, echo quilting, or free-motion designs all work beautifully with this pattern.
Once quilting is complete, trim any excess layers and bind the edges. The binding frames your quilt and adds a polished touch. Hand or machine stitch the binding, depending on your preference. Finally, label your quilt with your name and date—it’s a personal touch that celebrates your craftsmanship and creativity.
1. What is a Simple Star Foundation Paper Piecing Quilt Pattern?
It’s a quilting pattern that uses paper templates to guide precise stitching and placement of fabric pieces. The result is a perfectly aligned star design, ideal for quilters who want accuracy and clean lines.
2. Is this pattern suitable for beginners?
Yes! The Simple Star Foundation Paper Piecing Quilt Block Pattern is beginner-friendly. With patience and practice, even new quilters can achieve excellent results using this method.
3. What type of paper should I use for foundation piecing?
Use lightweight foundation paper or newsprint paper. It’s easy to sew through and tear away after the block is complete.
4. How do I remove the paper after sewing?
Reduce your stitch length and tear the paper gently along the perforated seams. Removing the paper is easier when the block has been pressed and cooled.
5. Can I resize the Simple Star pattern?
Yes. You can enlarge or reduce the paper template before printing, depending on the quilt size you want. Just ensure your fabric pieces are cut larger to fit the new scale.
6. What fabric types work best for this pattern?
Cotton fabrics are ideal due to their stability and ease of handling. Avoid stretchy or slippery fabrics for better precision.
The Simple Star Foundation Paper Piecing Quilt Pattern is a timeless design that blends creativity, precision, and beauty. From understanding the basics of foundation paper piecing to selecting the perfect fabrics and assembling your quilt, every step brings you closer to a handmade treasure. This method ensures flawless results and transforms your quilting experience into something deeply rewarding.
If you enjoyed this tutorial, I’d love to hear your honest opinion and suggestions. Share your thoughts about this pattern—what colors did you choose, and how did your stars turn out? Your feedback helps inspire future quilting projects and keeps the craft community thriving!


