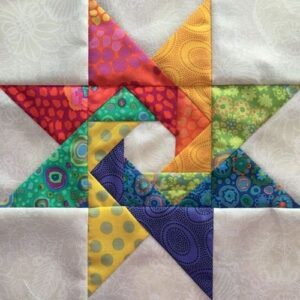
Spinning Star Quilt Block: A Step-by-Step Tutorial
Advertising
Are you ready to add a dazzling touch to your next quilting project? The Spinning Star Quilt Block is a classic and dynamic design that radiates movement and symmetry, making it a favorite among quilters.
Whether you’re a seasoned pro or a beginner eager to explore new quilt patterns, this guide will walk you through every detail of crafting your own Spinning Star Quilt Block. By the end of this tutorial, you’ll have a beautiful quilt block that’s perfect for any quilt design.
Advertising
The Spinning Star Quilt Block is known for its geometric beauty and precision. It’s composed of simple shapes that, when combined, create a star with a sense of motion. This block is versatile, allowing you to play with colors, fabrics, and arrangements to achieve your desired aesthetic. While it might seem complex at first glance, breaking it down into manageable steps makes it a delightful project for all skill levels.
Image From Pinterest
Before diving into the cutting and sewing, it’s important to gather the right tools and materials. For this project, you’ll need fabric in contrasting colors, a rotary cutter, a quilting ruler, a cutting mat, and your sewing machine. Accurate measurements and sharp tools are key to achieving crisp and clean edges, ensuring your quilt block comes together seamlessly.
To begin, prepare the materials needed for your Spinning Star Quilt Block. Choosing the right fabric and cutting precise measurements are essential for achieving a polished final result. Here’s what you’ll need:
Fabric A (Light Color): 1 fat quarter (or approximately 18 x 22 inches). This will serve as the background fabric for your block.
Fabric B (Dark Color): 1 fat quarter. This will form the star’s spinning points.
Fabric C (Accent Color): Scraps or a fat eighth for added contrast.
Thread: High-quality, neutral-colored thread for sewing.
Tools: Rotary cutter, quilting ruler, cutting mat, sewing machine, and an iron.
Cutting Instructions:
From Fabric A: Cut four 4.5-inch squares and four 3.5-inch squares.
From Fabric B: Cut eight 3.5-inch squares.
From Fabric C: Cut four 3.5-inch squares.
Optional: Prepare extra fabric for practice if this is your first attempt.
Once your fabric is cut, organize the pieces by color and size. Neat preparation ensures a smoother sewing process.
Advertising
Why These Sizes Work:
Using these measurements creates a 12-inch finished block. You can adjust the sizes proportionally for smaller or larger blocks, but ensure all pieces remain proportional to maintain the design’s integrity.
Assembling the Half-Square Triangles (H2)
Half-square triangles (HSTs) are the building blocks of many quilt patterns, including the Spinning Star Quilt Block. Follow these steps to create precise HSTs:
Pair Your Fabrics: Take one 3.5-inch square from Fabric A and one from Fabric B. Place them right sides together.
Draw a Diagonal Line: Using a fabric-safe marking tool, draw a diagonal line from one corner to the opposite corner on the back of Fabric A.
Sew Alongside the Line: Stitch a seam 1/4 inch on each side of the drawn line.
Cut on the Line: Use your rotary cutter to cut along the drawn diagonal line, creating two triangle pieces.
Press the Seams: Open the triangles and press the seams toward the darker fabric.
Trim to Size: Use your quilting ruler to trim each HST to exactly 3 inches, ensuring uniformity.
Repeat the Process:
You’ll need a total of 16 HSTs for this quilt block. Ensure consistency in your technique to achieve sharp, clean edges that will align perfectly during assembly.
Laying Out the Spinning Star Design
With your HSTs ready, it’s time to lay out the Spinning Star Quilt Block. This step is crucial for visualizing the final design and ensuring all pieces are correctly oriented.
Start with the Center: Place the four 3.5-inch squares of Fabric C in the center of your workspace to form a small square.
Add the Star Points: Surround the center square with HSTs, aligning the dark triangles to create the star’s spinning effect.
Position the Background Pieces: Place the 4.5-inch squares of Fabric A in the block’s corners and the smaller squares in the middle of each side.
Check the Layout: Step back and review the arrangement. Ensure the star’s spin is visible and symmetrical.
Make Adjustments: Rotate or reposition any pieces as needed for a balanced design.
Take a Photo: Photograph the layout to reference during sewing. This helps prevent mistakes as you piece the block together.
Tips for Success:
Maintaining consistent fabric placement and double-checking your layout ensures the star’s design remains clear and visually striking. Small adjustments at this stage can make a big difference in the final result.
Sewing the Spinning Star Quilt Block (H2)
Now comes the exciting part—sewing your Spinning Star Quilt Block! Follow these steps for accurate and neat assembly:
Piece the Rows: Start by sewing the squares and HSTs into rows. Use a 1/4-inch seam allowance for all seams.
Press the Seams: Press each row’s seams in alternating directions to reduce bulk and help seams nest during assembly.
Join the Rows: Align and pin the rows together, ensuring the seams nest for a crisp finish. Sew the rows with a 1/4-inch seam allowance.
Press Again: Press the completed block, ensuring all seams lie flat and the design is sharp.
Square the Block: Use your quilting ruler to trim the block to 12.5 inches, accounting for seam allowances.
Celebrate Your Work: Admire your finished block and consider how it will shine in your quilt project.
Final Thoughts:
Sewing requires patience and precision, especially when aligning seams. Take your time and enjoy the process, knowing that each step brings you closer to completing your beautiful quilt.
Incorporating the Spinning Star Quilt Block into a Quilt (H2)
Once your block is complete, it’s time to think about how to use it in a quilt. The Spinning Star Quilt Block can stand alone or be combined with other quilt patterns for a unique design.
Single Block Quilt: Use the block as a centerpiece in a wall hanging or table runner. Add borders to enhance its impact.
Multiple Blocks: Create several Spinning Star Quilt Blocks and arrange them in a grid. Experiment with alternating fabric colors for variety.
Combine with Other Patterns: Pair the Spinning Star with complementary blocks, such as the Flying Geese or Nine-Patch, for added interest.
Add Sashing: Frame each block with sashing to highlight its design and separate it from other blocks.
Quilting: Use free-motion or straight-line quilting to enhance the star’s motion and create texture.
Binding and Finishing: Complete your quilt with coordinating binding for a polished look.
Why It Works:
The versatility of the Spinning Star Quilt Block allows it to shine in various quilt designs. Whether used alone or in combination, it adds a dynamic and timeless quality to any project.
By following this tutorial, you’ve learned how to create a stunning Spinning Star Quilt Block, from cutting fabric to assembling and sewing. With practice, you’ll master this beautiful block and enjoy incorporating it into your future quilting projects. Happy quilting!


