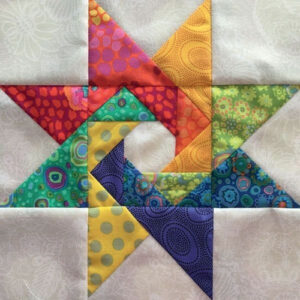
If you’ve ever dreamed of creating a dazzling quilt design that seems to spin and dance, the Spinning Star Quilt Block is a must-try. Known for its dynamic movement and striking geometry, this pattern is an excellent choice for quilters of all levels. Whether you’re new to quilting or a seasoned enthusiast, learning how to craft this quilt block is both a rewarding and enjoyable experience.
In this step-by-step quilting tutorial, we’ll walk you through the entire process of creating the Spinning Star Quilt Block, including fabric cuts, assembly instructions, and tips for achieving precise results. This pattern is not only visually stunning but also highly versatile, fitting beautifully into various quilt patterns like table runners, wall hangings, or full-sized quilts.
So, grab your favorite fabrics, dust off your sewing machine, and let’s dive into the world of quilting. By the end of this tutorial, you’ll have a completed Spinning Star Quilt Block ready to add to your next masterpiece.

This pattern is not only visually stunning but also highly versatile, fitting beautifully into various quilt patterns like table runners, wall hangings, or full-sized quilts.
So, grab your favorite fabrics, dust off your sewing machine, and let’s dive into the world of quilting. By the end of this tutorial, you’ll have a completed Spinning Star Quilt Block ready to add to your next masterpiece.
Accurate fabric cutting ensures your pieces fit together seamlessly. Take your time and double-check measurements as you go. The Spinning Star Quilt Block depends on sharp angles and aligned seams, so preparation is everything.
Start by pairing the 4.5” squares of the background fabric with the same-sized squares of Color 1. Place each pair right sides together. Using a ruler, draw a diagonal line from corner to corner on the lighter fabric.
Sew a straight line ¼ inch away from each side of the drawn line. This creates two sewing lines that are equidistant from the diagonal. Then, cut along the drawn line to separate the two halves.
Open each piece and press the seams toward the darker fabric. Trim the HSTs to measure 4” square, ensuring they are perfectly even for precise assembly later.
Repeat the same process for the 3” squares of the background fabric and Color 2. This will form the secondary star points. Trim these smaller HSTs to 2.5” square.
Half-square triangles are the building blocks of many quilt patterns, including the Spinning Star. Mastering this technique will improve your quilting skills significantly.
Lay out all your HSTs, background squares, and the center square before you begin sewing the block together. This visual organization will help you keep track of your progress.
On your cutting mat or a flat surface, start arranging your squares into the Spinning Star design. Place the large HSTs in the outer corners, alternating with background squares. The smaller HSTs will form the inner star points around the center square.
Rotate the smaller HSTs slightly until the “spinning” motion appears. The correct placement creates the illusion of movement, which is the hallmark of this block.
Take a step back and ensure there is enough contrast between your fabrics. The star’s definition depends on distinct colors and values.
Make any necessary adjustments before sewing. Small tweaks now can save time later when assembling the quilt.
Before you start sewing, take a quick picture of your layout. This serves as a reference in case pieces get moved or turned during stitching.
With everything arranged and aligned, it’s time to assemble your Spinning Star Quilt Block.
Start with the top row. Sew each piece together using a ¼-inch seam allowance, keeping the fabrics aligned. Repeat this for the second, third, and fourth rows.
Once a row is sewn, press the seams to one side, alternating directions for each row. This helps reduce bulk and makes joining rows easier.
Sew the rows together in order, being careful to align the seams. Pin at each intersection to ensure accuracy.
After sewing the rows, press all seams flat. Your Spinning Star design should now be taking shape!
Use your rotary cutter and ruler to trim the finished block to 12.5” square. Squaring up ensures your block fits perfectly with others in your quilt.
Take a moment to admire your finished block. The Spinning Star Quilt Block is a beautiful addition to any quilt pattern, showcasing your skill and creativity.
The spinning effect can be enhanced by experimenting with bold colors, gradients, or prints.
Combine multiple Spinning Star blocks in different fabric combinations for a dynamic quilt layout.
Frame your block with complementary borders to emphasize the star and add dimension.
This block pairs well with other star-based or geometric quilt patterns, creating a cohesive look.
Join quilting communities online or on social media to share your work and gain inspiration.
Mastering the Spinning Star Quilt Block opens the door to more complex designs. Keep challenging yourself and enjoy the creative process!
With this step-by-step quilting tutorial, you’re well on your way to creating a beautiful Spinning Star Quilt Block. Incorporating this design into your projects will undoubtedly elevate your quilting skills and add a touch of magic to your work. Happy quilting!
