Star Window Quilt Pattern: A Stunning Quilt Design for Your Next Project
Advertising
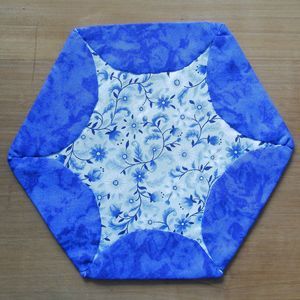
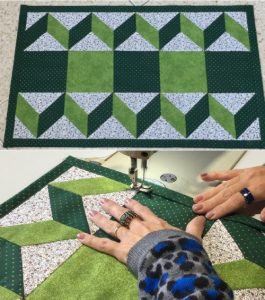
Creating a Star Window Quilt Pattern is an excellent way to combine precision, creativity, and traditional quilting techniques. This design is perfect for both beginners and experienced quilters, as it offers a beautiful geometric arrangement that mimics the elegance of stained glass windows. Whether you are making a cozy quilt for personal use or a decorative piece to showcase, this quilt pattern is sure to impress.
Quilting has long been a beloved craft, providing a way to create stunning and functional textile art. The Star Window Quilt Pattern brings together vibrant colors and sharp angles to form a mesmerizing star-like effect. Using careful fabric selection and precise cutting techniques, you can achieve a visually striking result that stands out among other quilt patterns.
Advertising
This guide will walk you through the step-by-step process of creating your own Star Window Quilt Pattern. From selecting the right materials to cutting fabric pieces and assembling the quilt top, every detail is covered. By following this tutorial, you will be able to make a quilt that is both beautiful and structurally sound.
Image From Google
H2: Materials and Fabric Selection
Choosing the right materials is crucial for ensuring that your Star Window Quilt Pattern turns out beautifully. High-quality fabric and the right tools will make the entire quilting process smoother and more enjoyable.
Fabric Selection: Opt for 100% cotton quilting fabric for durability and ease of handling. Choose contrasting colors to make the star pattern stand out. Traditional options include deep blues, purples, and blacks to mimic a night sky, with bright yellows or whites for the stars.
Cutting Tools: A rotary cutter, self-healing cutting mat, and acrylic rulers are essential for precise cuts. These tools ensure that all fabric pieces align perfectly, which is key for this geometric design.
Thread and Needles: Use a high-quality cotton thread that matches your fabric colors. A quilting needle (size 80/12 or 90/14) is recommended for smooth stitching.
Batting and Backing Fabric: Choose a cotton or cotton-blend batting for a soft, warm feel. The backing fabric should complement the front design and be large enough to cover the entire quilt.
Sewing Machine and Accessories: A sewing machine with a ¼-inch foot will help maintain even seam allowances. Fabric clips, pins, and marking tools will also be useful during assembly.
Iron and Pressing Tools: Pressing each seam as you sew helps keep the quilt flat and prevents distortion in the final product.
Precision cutting is essential for achieving a well-balanced Star Window Quilt Pattern. The accuracy of your cuts directly affects how well the quilt pieces fit together.
Advertising
Cutting the Star Pieces: Use the following measurements to cut the fabric pieces:
(4) 6.5″ x 6.5″ squares for the star center
(8) 4.5″ x 4.5″ squares for star points
(4) 3.5″ x 3.5″ corner squares
Cutting the Background Pieces:
(4) 6.5″ x 3.5″ rectangles
(4) 3.5″ x 6.5″ rectangles
(8) 2.5″ x 2.5″ squares
Marking the Fabric: Use a fabric marking pen to indicate sewing lines on the star point squares to ensure proper alignment during stitching.
Arranging the Layout: Before sewing, lay out all fabric pieces to visualize the pattern and confirm color placement.
Prepping for Sewing: Press all fabric pieces flat before starting to sew. This helps maintain precise seam allowances and reduces shifting.
Double-Checking Measurements: Ensure each fabric piece is accurately cut. Even slight measurement errors can impact the final design.
H2: Sewing and Assembling the Quilt Top
Once all fabric pieces are cut and prepared, it’s time to start assembling the quilt top. This step involves careful piecing to achieve sharp, symmetrical star points.
Sewing the Star Points: Take the 4.5″ x 4.5″ squares and place them diagonally on the corner of the 6.5″ x 6.5″ star center squares. Stitch along the marked diagonal lines, then trim and press open.
Creating the Star Center: Sew the four star center squares together in a 2×2 arrangement, ensuring all seams align correctly.
Adding the Background Pieces: Attach the 3.5″ x 6.5″ background rectangles to the sides of the star center. Press seams open to reduce bulk.
Joining the Corner Squares: Sew the 3.5″ x 3.5″ corner squares to the appropriate edges of the quilt top, ensuring that they align neatly.
Final Assembly: Carefully sew all sections together, pressing seams as you go to maintain a crisp, professional finish.
Checking Alignment: Before proceeding to the quilting step, inspect the quilt top to ensure all points and seams match up correctly.
H2: Quilting and Finishing Touches
The final steps involve quilting the layers together and adding binding to give the quilt a polished, finished look.
Layering the Quilt Sandwich: Lay out the backing fabric, batting, and quilt top. Smooth out any wrinkles and baste the layers together using quilting pins or spray baste.
Quilting the Layers: Use a walking foot or free-motion quilting technique to stitch through all layers. You can follow the star pattern lines for added emphasis or opt for a simple grid pattern.
Trimming the Edges: After quilting, trim the edges of the quilt so they are even and squared up.
Preparing the Binding: Cut fabric strips (2.5″ wide) for the binding. Fold in half lengthwise and press.
Attaching the Binding: Sew the binding to the quilt’s edges using a ¼-inch seam allowance, then fold over to the back and hand-stitch or machine-stitch in place.
Final Pressing and Inspection: Give the entire quilt a final press with an iron and inspect for any loose threads or uneven stitching before displaying your finished masterpiece.
By following this detailed guide, you’ll be able to create a stunning Star Window Quilt Pattern that showcases your quilting skills. Whether you choose bold contrasting colors or soft pastels, this quilt pattern is a timeless addition to any collection. Happy quilting!


