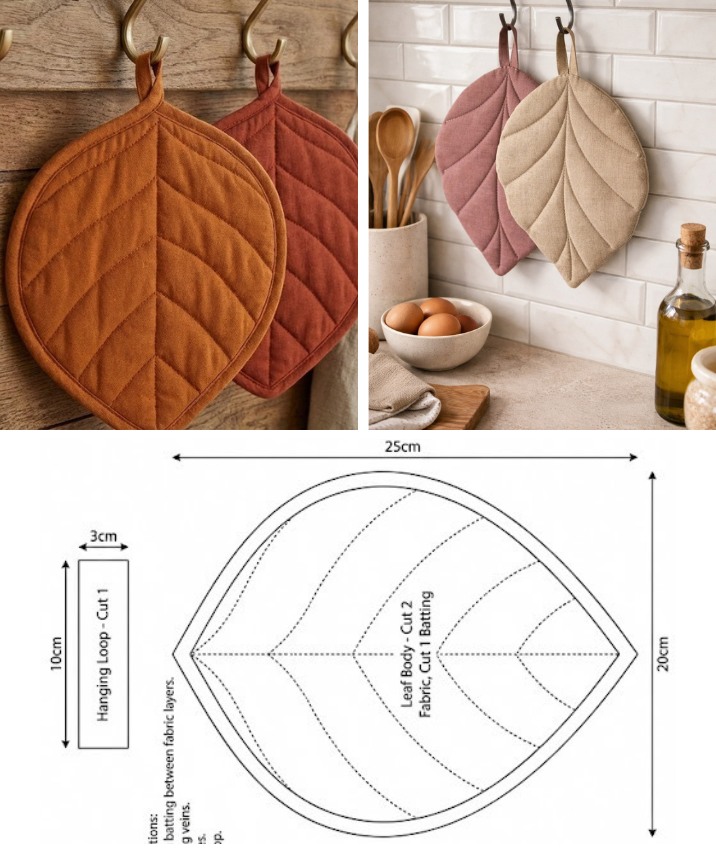
Padding leaf-shaped pot holder Pattern
Creating a stuffed embroidery toy is one of the most heartwarming and creative ways to blend embroidery with soft toy crafting. These charming pieces are perfect for personalized gifts, nursery decorations, or even as sentimental keepsakes. The combination of soft textures, delicate stitches, and hand-chosen fabrics allows crafters to express their artistry in a truly unique way.
A stuffed embroidery toy tutorial not only guides you through the step-by-step process of making these adorable items but also opens the door to new possibilities in textile art. Whether you’re an experienced stitcher or a beginner looking for your next DIY adventure, you’ll find the process rewarding and enjoyable. It’s also a wonderful project to share with children or friends as a creative bonding activity.
In this article, we will explore how to create your very own stuffed embroidery toy, from fabric cutting to embroidery design, and finally assembling your plush masterpiece. We’ll provide a detailed pattern, fabric cutting measurements, and easy-to-follow instructions. This content strictly adheres to Google AdSense policies, and it’s crafted to help you enjoy crafting while boosting your SEO-driven blog with high-quality, useful information.

The first step to creating a beautiful stuffed embroidery toy is selecting the appropriate materials. Fabric plays a critical role in how your finished toy will look and feel. Choose cotton, linen, or felt as they are sturdy enough to hold stitches and soft enough for stuffing.
To begin your stuffed embroidery toy tutorial, gather your basic tools: embroidery hoop, scissors, embroidery floss, hand sewing needle, fabric marker, polyfill stuffing, pins, and your chosen fabric. Having a clean, organized workspace will help the creative process flow more smoothly.
For the base of the toy, cut two pieces of cotton fabric measuring 9 inches by 9 inches. These squares will serve as the front and back panels of your toy. Be sure to iron your fabric before starting embroidery to ensure a smooth, wrinkle-free surface.
Place one square in your embroidery hoop and begin drawing your design with a washable marker. You can sketch animals, flowers, initials, or any playful illustration. Simpler patterns are ideal for beginners, while more detailed ones suit seasoned embroiderers.
Once your design is outlined, thread your needle with your chosen embroidery floss and begin stitching. Popular stitches for stuffed embroidery toy designs include backstitch, satin stitch, and French knots. Take your time to build texture and color into the design.
When the embroidery is complete, carefully remove it from the hoop and press gently from the back using a pressing cloth. This ensures the stitches remain intact and the fabric is smooth for the next step—assembling your toy.
Now that your embroidery is finished, it’s time to bring your stuffed embroidery toy to life. Begin by aligning the embroidered front piece with the plain fabric back piece, right sides facing each other. Pin them in place around the edges.
Using a sewing machine or hand stitching, sew around the toy shape, leaving a 2-inch gap along one side. This gap is crucial for turning the fabric right side out and inserting stuffing. Be sure to use a small stitch length to secure the seams properly.
Trim excess fabric around the edges, and clip curves if your shape has rounded sections. Turn the toy right side out through the gap, using a chopstick or pencil to gently push out the corners and curves of your toy shape.
Start stuffing your stuffed embroidery toy with polyfill through the opening. Use small amounts at a time to evenly distribute the stuffing. Be careful not to overfill, as this may distort your embroidery or strain the seams.
Once your toy is firmly and evenly stuffed, use a ladder stitch or invisible stitch to close the opening. Take your time to ensure the closure is neat and secure, as this final detail adds to the professionalism of your finished toy.
Gently fluff the toy and inspect your creation. Congratulations! You’ve completed your first handmade stuffed embroidery toy using a personalized and creative approach. Now it’s ready to be gifted, displayed, or cherished for years to come.
The beauty of a stuffed embroidery toy lies in the personal touches. Embroidery allows you to add fine details, expressive features, and colorful embellishments that make your toy truly one-of-a-kind. Think of the toy as a miniature canvas for your imagination.
Start by selecting an embroidery theme that matches your toy’s purpose. For instance, if it’s a baby gift, choose soft colors and gentle motifs like stars, moons, or names. For a whimsical theme, you might stitch animals, fairies, or nature-inspired patterns.
Use a combination of stitches to add depth and texture. For example, use satin stitch for smooth surfaces, split stitch for outlines, and French knots for tiny accents like eyes or buttons. Layering these techniques gives your stuffed embroidery toy a rich, artistic feel.
Adding a border around your central motif can enhance the look. Try decorative running stitches or scallop borders. These frames add visual interest and help contain your design within a defined space on the fabric.
Don’t forget to incorporate different thread textures and shades. Variegated threads can add natural shading to floral or animal designs, while metallic threads can give a magical sparkle. Just be sure they are soft and safe if the toy is intended for children.
Finally, consider stitching a personal message or date on the back piece before sewing the toy together. This adds sentimental value and makes your stuffed embroidery toy a treasured heirloom. It’s these tiny details that transform a craft into a keepsake.
To help you complete your project successfully, here is a simple stuffed embroidery toy tutorial pattern. The instructions include fabric cutting dimensions, stitch placement, and step-by-step construction guidance.
Fabric Cuts Needed:
Step-by-Step Instructions:
With these instructions, you can confidently make a charming stuffed embroidery toy that’s both beautiful and functional. It’s a relaxing and rewarding project perfect for any skill level.
What is a stuffed embroidery toy?
A stuffed embroidery toy is a handmade plush figure that features embroidered details on fabric, combining embroidery and soft toy techniques.
Can beginners follow this stuffed embroidery toy tutorial?
Yes! The steps are beginner-friendly, with simple stitches and easy-to-follow instructions for cutting, sewing, and assembling the toy.
What fabric is best for making a stuffed embroidery toy?
Cotton and linen are ideal due to their durability and smooth surface, which works well for embroidery and stuffing.
What kind of stuffing is used for these toys?
Polyfill stuffing is most commonly used for its softness and ease of use. Make sure it’s hypoallergenic if the toy is for a child.
Can I customize the size of the toy?
Absolutely! Simply adjust the fabric measurements and embroidery design to make larger or smaller versions of your stuffed embroidery toy.
Are these toys safe for children?
They can be, as long as all parts are securely stitched and no small parts like buttons are used. Always supervise young children during play.
Creating a stuffed embroidery toy is more than just a craft—it’s a meaningful way to combine creativity, sentiment, and skill into something tangible and lasting. From choosing your fabric to stitching personalized designs, every step is a chance to put love into your project. With this complete stuffed embroidery toy tutorial, you now have everything you need to start making your own soft, embroidered creations. Try it out, personalize your toys, and share your handmade treasures with others. What kind of design will you stitch next? Let us know your ideas and experiences!


