The Autumn Wonders Quilt Block – Block 1: Pull out the Cozy Clothing! - By Pat Sloan -
Advertising
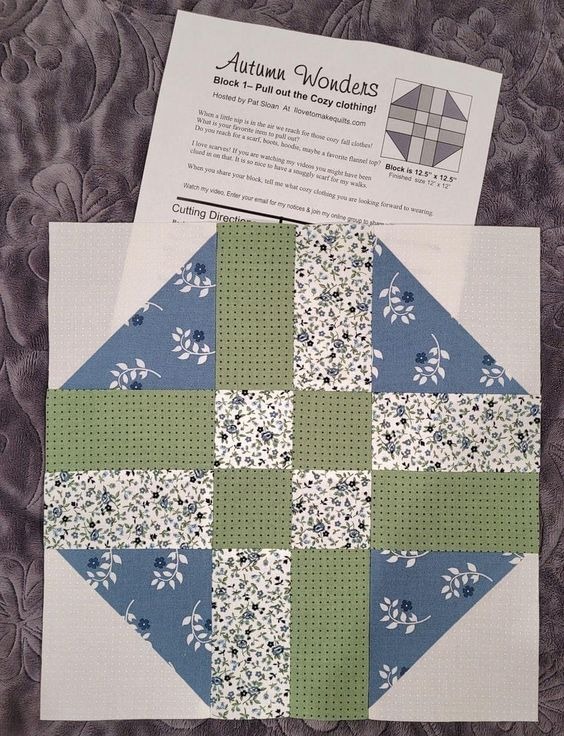
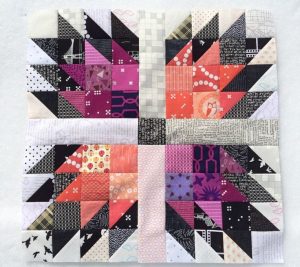
As the crisp air of autumn sets in, there’s nothing better than wrapping yourself in warm, cozy clothing and working on a new quilt project. The Autumn Wonders Quilt Block is a beautiful and beginner-friendly quilt pattern that perfectly captures the essence of fall. With warm tones and a design reminiscent of falling leaves, this block is the perfect start to a seasonal quilting adventure.
Creating your own quilt block not only brings a sense of accomplishment but also adds a personalized touch to your home decor. Whether you’re an experienced quilter or just getting started, this step-by-step guide will walk you through everything you need to know to complete Block 1 – Pull out the Cozy Clothing!. From fabric choices to precise cuts, you’ll be fully equipped to craft this stunning piece.
Advertising
In this guide, we’ll cover all the essential details, including quilt patterns, fabric selection, cutting measurements, and a clear step-by-step tutorial. Let’s dive in and create a quilt block that embodies the warmth and charm of autumn!
Selecting the right fabrics is the first step in bringing your quilt pattern to life. The Autumn Wonders Quilt Block embraces rich, cozy hues inspired by fall foliage, making it an excellent project for using warm-toned fabrics.
Pick Warm, Earthy Tones – Think about deep reds, burnt oranges, golden yellows, and rich browns. These colors will enhance the autumn aesthetic of your quilt block.
Use a Mix of Prints and Solids – Combining solid fabrics with subtle fall-themed prints adds depth and character to your quilt design.
Choose High-Quality Cotton – Cotton is the best fabric for quilting due to its durability, breathability, and ease of handling.
Pre-Wash Your Fabrics – Washing your fabrics beforehand prevents shrinkage and color bleeding after your quilt is assembled.
Consider Texture and Contrast – Mixing textures like flannels with regular quilting cotton can give your quilt block a cozy and unique feel.
Stick to a Color Palette – Keeping a cohesive palette ensures your quilt block blends well with other blocks if you’re making a full quilt.
Cutting Your Fabric – Measurements and Layout
Accurate cutting is crucial for a well-assembled quilt block. Below are the precise measurements you’ll need for Block 1 – Pull out the Cozy Clothing!.
Advertising
Gather Your Tools – You’ll need a rotary cutter, a self-healing cutting mat, and a quilting ruler to ensure precise cuts.
Fabric Pieces Needed:
(2) 5” x 5” squares of burnt orange fabric
(2) 5” x 5” squares of golden yellow fabric
(2) 5” x 5” squares of deep brown fabric
(4) 2.5” x 5” strips of a coordinating neutral fabric
(4) 2.5” x 2.5” squares of a light contrast fabric
Marking and Cutting Techniques – Use a fabric pen to mark diagonal lines on the squares that will be turned into half-square triangles.
Stay Organized – Arrange your cut pieces neatly to prevent confusion when sewing.
Double-Check Measurements – Even a slight miscut can affect the overall alignment of your quilt block.
Label Your Pieces – This makes it easier to follow along in the assembly process.
Assembling Your Quilt Block – Step-by-Step Guide
Now that your fabric is cut, it’s time to start piecing together your quilt block. Follow these simple steps to ensure a precise and polished finish.
Create Half-Square Triangles (HSTs) – Pair the 5” x 5” squares of burnt orange and golden yellow fabric, placing them right sides together. Sew a ¼” seam along both sides of the marked diagonal line, then cut along the line. Press the seams open.
Assemble the Center Row – Arrange your half-square triangles along with the deep brown squares to form a visually balanced center row.
Sew the Rows Together – Using a ¼” seam allowance, sew the fabric strips to connect the HSTs and squares, pressing each seam as you go.
Attach the Border Strips – Sew the 2.5” x 5” strips to the left and right sides of the block, then add the 2.5” x 2.5” squares at the corners.
Final Pressing and Trimming – Press the entire block flat and trim any uneven edges to maintain a clean 12” x 12” finished size.
Admire Your Work! – You’ve successfully completed Block 1 – Pull out the Cozy Clothing!. Repeat these steps to create additional blocks for a full quilt.
Finishing Touches – Quilting and Assembly
Once your quilt blocks are complete, it’s time to assemble them into a finished quilt or use them for smaller projects like pillow covers or table runners.
Plan Your Layout – Arrange multiple blocks together to see how they look before sewing them into rows.
Sew Blocks Together – Use a ¼” seam allowance to join the blocks into rows, then sew the rows together.
Add Sashing and Borders – If desired, include sashing strips between blocks to create separation and enhance the design.
Prepare the Quilt Sandwich – Layer your quilt top, batting, and backing fabric together and baste them securely.
Quilt Your Design – Choose a quilting pattern that complements your Autumn Wonders Quilt Block. Straight-line quilting or free-motion designs work beautifully.
Bind the Edges – Finish your quilt with a coordinating binding to give it a polished and professional look.
By following these steps, you’ll create a stunning quilt block that reflects the beauty of autumn while enhancing your quilting skills. Whether you choose to make a full quilt or use individual blocks for smaller projects, the Autumn Wonders Quilt Block – Block 1: Pull out the Cozy Clothing! will bring warmth and charm to your home.
Now, gather your fabrics, start stitching, and enjoy the process of creating something beautiful with your own hands!


