
Bird Quilt Block Pattern
If you have ever dreamed of making a stylish and functional accessory with your own hands, this Tote Bag | Sewing Tutorial – Quilt Pattern will be the perfect starting point. This project blends the creativity of quilting with the practicality of a tote bag, allowing you to craft something unique while learning new sewing skills. Whether you are a beginner in quilting or an experienced sewist looking for a new challenge, you will enjoy following this detailed guide step-by-step.
A tote bag is more than just a way to carry your essentials — it’s an expression of personal style and creativity. By combining quilting techniques with tote bag construction, you can produce a one-of-a-kind accessory that showcases your favorite fabrics and patterns. The beauty of this Tote Bag | Sewing Tutorial – Quilt Pattern lies in its adaptability; you can choose colors, fabric textures, and quilt block styles that match your taste.
Before diving into the sewing process, it’s essential to prepare your tools, fabrics, and mindset for the project. This tutorial will guide you through everything, from selecting the best quilting fabrics to cutting, piecing, and assembling the tote bag. By the end of this project, you will not only have a beautiful handmade tote bag but also a deeper understanding of quilting fundamentals and bag-making techniques.
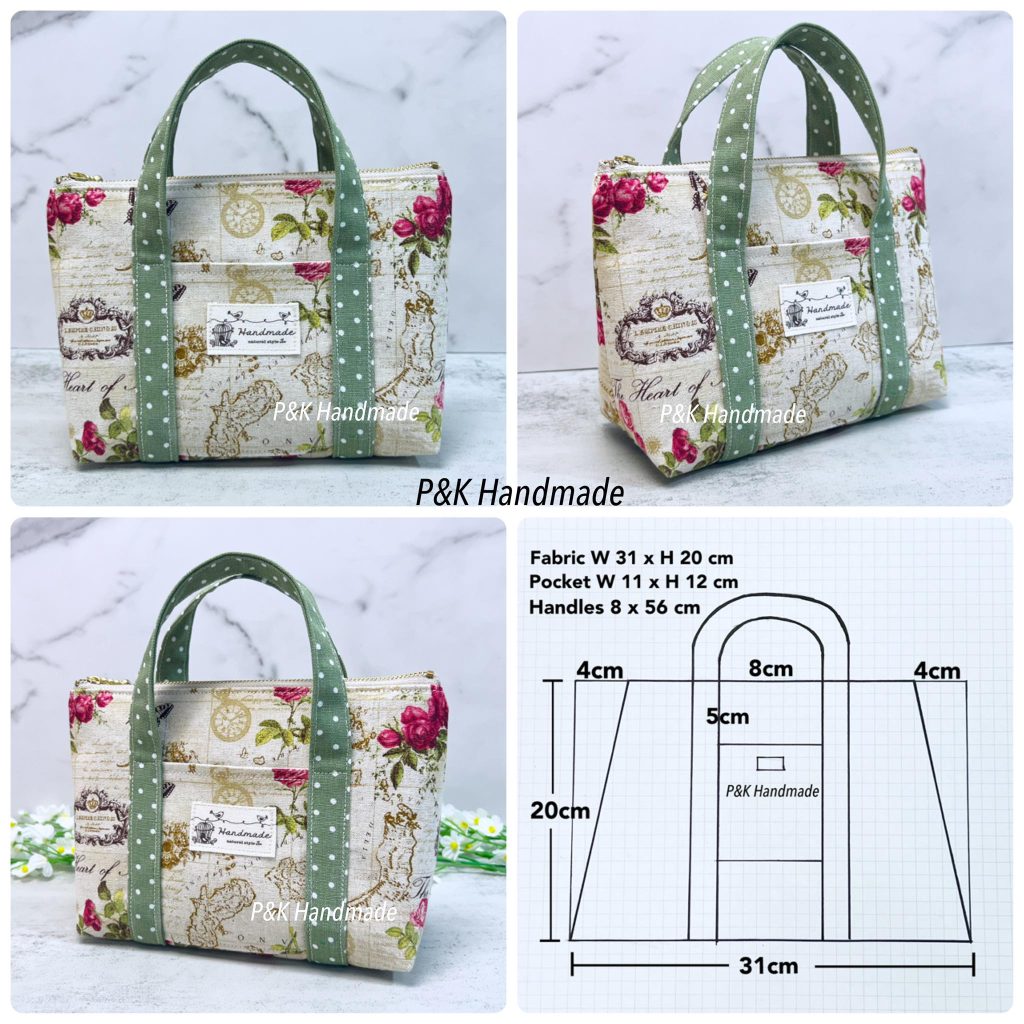
When starting your Tote Bag | Sewing Tutorial – Quilt Pattern, fabric selection is key to achieving a professional and appealing finish. Cotton fabrics are often preferred for quilting projects because they are easy to work with, hold their shape well, and offer a wide variety of prints. You can opt for solid colors, floral patterns, or even novelty prints to match your personality.
Aside from the main fabric, you will also need lining fabric to give the tote bag structure and durability. Many sewists choose plain cotton for the lining, but you can also use a contrasting print for a fun surprise inside. Quilting cottons, canvas, or linen blends are excellent options for the bag’s exterior to ensure it remains sturdy over time.
Another important element is interfacing, which will help your tote bag keep its shape. Fusible interfacing can be ironed directly onto the fabric, giving the panels more stiffness without adding too much bulk. For a quilted tote bag, batting is also used between the layers to create a soft, padded effect.
You will need a reliable sewing machine, rotary cutter, cutting mat, and quilting ruler for precise cuts. Sharp fabric scissors and quality thread are also essential. Taking the time to gather and prepare your tools ensures that the sewing process goes smoothly.
Lastly, don’t forget the straps. You can make them from matching quilted fabric or use cotton webbing for a quick and durable alternative. The length and width of the straps can be adjusted according to your personal preference and how you plan to use the tote bag.
With all materials prepared, you can move confidently into cutting and piecing the quilt pattern for your tote bag.
The most exciting part of the Tote Bag | Sewing Tutorial – Quilt Pattern is creating the quilted panels. This step transforms ordinary fabric pieces into a decorative, textured design that makes your tote bag stand out.
Begin by deciding which quilt block style you want to feature. Popular choices include the classic patchwork square, half-square triangles, or log cabin designs. Each offers a different visual effect, and you can experiment with color placement to enhance the pattern.
Once the design is chosen, use your rotary cutter and quilting ruler to cut each fabric piece with precision. Accuracy is critical in quilting, as even a small deviation can throw off the final alignment of your blocks. Take your time to ensure that all pieces are perfectly straight and of equal size.
Arrange the cut pieces on a flat surface to visualize the final design before sewing. This step allows you to adjust color placement and ensure that the pattern flows harmoniously. You can also take a photo for reference during sewing.
Join the fabric pieces using a 1/4-inch seam allowance, which is standard in quilting. Press the seams open or to one side, depending on the look you prefer. Good pressing is just as important as accurate sewing for a neat finish.
After completing the quilt blocks, sew them together to form larger panels for the front and back of your tote bag. Once the panels are ready, layer them with batting and backing fabric, then quilt them together using straight lines, diagonal patterns, or free-motion designs.
With your quilted panels complete, it’s time to assemble the tote bag. In this stage of the Tote Bag | Sewing Tutorial – Quilt Pattern, you will see the bag take shape before your eyes.
Start by trimming the quilted panels to the exact same size. This ensures that all edges align perfectly during assembly. If you want pockets on the inside or outside, now is the time to add them before stitching the main body.
Place the front and back panels right sides together, aligning the edges carefully. Sew along the sides and bottom, leaving the top open. Reinforce the seams for extra durability, especially if you plan to carry heavier items in your tote bag.
For a flat-bottom tote, create boxed corners by pinching each bottom corner into a triangle and stitching across about 1-2 inches from the tip. This will give the bag depth and make it stand upright more easily.
Next, prepare the lining by sewing it in the same shape as the outer bag, but leaving a small gap in the bottom seam. This gap will be used to turn the bag right side out later.
Insert the lining into the outer bag with right sides together, matching seams and edges. Sew around the top edge completely. Turn the bag right side out through the gap in the lining, then stitch the gap closed.
Press the top edge neatly and, if desired, topstitch around it for a polished look. Attach the straps securely, either by sewing them into the top seam or stitching them onto the exterior.
A handmade tote bag is an opportunity to showcase your creativity, so feel free to personalize your Tote Bag | Sewing Tutorial – Quilt Pattern in unique ways.
You can embellish the quilted panels with decorative stitching, embroidery, or applique for added charm. Adding buttons, lace, or fabric flowers can also enhance the design and make your tote bag one-of-a-kind.
Consider using contrasting thread colors for quilting to make the stitches stand out. This technique adds an artistic touch while highlighting the quilt pattern.
If you want extra functionality, add zippered compartments or magnetic snaps to keep your belongings secure. Adjustable straps or crossbody options can also be incorporated for versatility.
Another fun option is to experiment with seasonal fabrics or themes. For example, you could make a bright floral tote for spring, a nautical design for summer, or a cozy plaid version for winter.
Finally, don’t forget to label your work. Sewing a small handmade tag inside the bag adds a professional finish and celebrates your effort.
1. What is the best fabric for a quilted tote bag?
Cotton fabrics are the most popular choice because they are easy to work with, come in many designs, and are durable enough for everyday use.
2. Do I need a quilting machine to make this tote bag?
No, a regular sewing machine with a quilting foot attachment is sufficient for most quilted tote bag projects.
3. How long does it take to make a quilted tote bag?
Depending on your sewing experience, it can take anywhere from a few hours to a full day, especially if you are piecing a detailed quilt pattern.
4. Can I wash a quilted tote bag?
Yes, but it’s best to use gentle washing methods and air dry to maintain the bag’s shape and colors.
5. Can beginners make this tote bag?
Absolutely! This project is beginner-friendly, especially with a clear Tote Bag | Sewing Tutorial – Quilt Pattern to follow.
Creating a Tote Bag | Sewing Tutorial – Quilt Pattern is a rewarding experience that combines practicality with artistic expression. From choosing fabrics and piecing the quilt pattern to assembling and personalizing the final product, each step allows you to develop sewing skills while crafting something beautiful and functional. I hope this tutorial has inspired you to start your own tote bag project. Please share your honest opinion and suggestions — I’d love to hear about your creative journey and see your finished bags!


