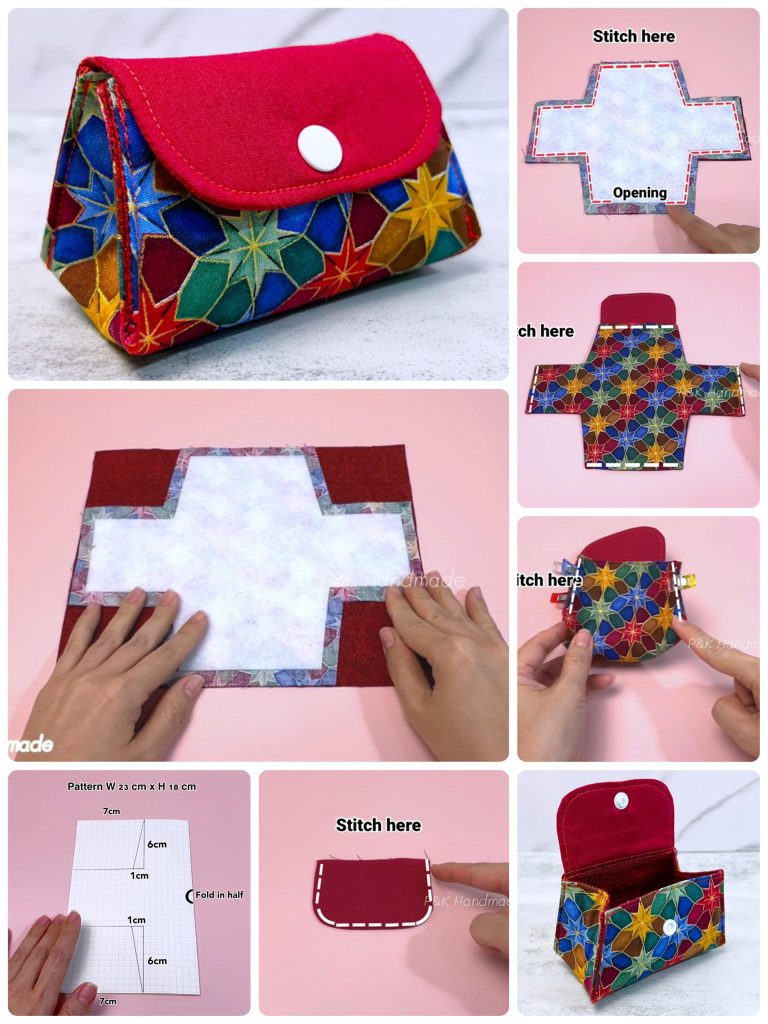
How to Make a Fabric Coin Purse Pattern
Turning Crumbs into Quilts is more than just a charming phrase; it’s a heartfelt approach to quilting that celebrates creativity, sustainability, and resourcefulness. For many quilters, crumbs—tiny leftover scraps of fabric that seem too small to use—often end up forgotten or discarded. Yet, these very crumbs hold the potential to become vibrant, textured quilts full of personality.
In this blog post, we’ll explore how Turning Crumbs into Quilts can be a fulfilling quilting journey. Whether you’re new to quilting or an experienced maker, you’ll discover how to turn what others might call “waste” into something truly beautiful and unique. This process is not only fun but also aligns perfectly with mindful crafting and eco-friendly living.
We’ll break down the steps, share a detailed pattern for Turning Crumbs into Quilts, and explain all the fabric cuts and measurements needed. Let’s dive into the colorful world where scraps shine and nothing goes to waste!

Turning Crumbs into Quilts begins with a shift in perspective. Instead of seeing small fabric scraps as useless, view them as possibilities waiting to be stitched into something wonderful.
The magic of Turning Crumbs into Quilts lies in the freedom it offers. There’s no strict pattern at first; you start by piecing together random crumbs. These tiny pieces, sometimes irregular in shape, create rich textures and surprising color combinations that make your quilt unique.
You’ll notice that no two crumb quilts are ever exactly alike. Each finished quilt tells its own story, stitched together from leftovers of other projects, cherished memories, or even fabrics shared among friends.
In quilting, crumb blocks are built by joining scraps into slightly larger pieces and continuing until you have blocks of the size you want. By repeating this, you turn piles of crumbs into organized, colorful units ready to assemble.
One of the joys of Turning Crumbs into Quilts is that it welcomes experimentation. You don’t have to worry about “wrong” fabric choices; the spontaneous nature of crumbs often results in unexpectedly beautiful designs.
Finally, crumb quilting offers a mindful and relaxing sewing experience. It allows you to slow down, appreciate each small piece, and watch your fabric stash transform into something both functional and beautiful.
Let’s get into the step-by-step guide for creating a quilt following the Turning Crumbs into Quilts approach. Below, you’ll find clear instructions, including recommended fabric cuts and measurements.
Step 1: Gather and Sort Crumbs
Collect small fabric scraps from previous projects. Aim for pieces at least 1.5” x 1.5” so they’re easier to work with. Group them roughly by color or print to help balance your design later.
Step 2: Create Crumb Units
Start sewing two crumbs together, right sides facing, using a ¼” seam allowance. Press open, then add another crumb to either side. Continue until you have small units about 4” x 4”.
Step 3: Build Crumb Blocks
Take four crumb units and join them together to make larger 8” x 8” crumb blocks. Trim edges as needed to keep your blocks square.
Step 4: Plan Quilt Layout
Decide the finished quilt size. For a cozy throw, you might need about 25 crumb blocks (5 rows by 5 columns). Each block will be 8” x 8”, resulting in a quilt roughly 40” x 40”, before adding borders.
Step 5: Cut Border Fabric
Choose a solid or neutral fabric to frame your crumb blocks. Cut strips 2.5” wide for inner borders. For an outer border, cut strips 4” wide to add more size and definition.
Step 6: Assemble Quilt Top
Sew the crumb blocks together in rows. Join rows to complete the quilt center. Add the inner border first, then the outer border.
At this stage, your Turning Crumbs into Quilts masterpiece is nearly ready for quilting and binding!
Once the quilt top is pieced, it’s time to transform it into a finished quilt. Here’s how to continue your Turning Crumbs into Quilts journey.
Layer your quilt top with batting and backing fabric. Cut batting and backing at least 2” larger on all sides than the quilt top to allow room for quilting and trimming.
Choose your quilting method: you can machine quilt straight lines, stitch in the ditch along block seams, or hand quilt for a traditional look. A free-motion design works wonderfully with the irregular look of crumb blocks.
After quilting, trim any excess batting and backing to match the edges of your quilt top. This keeps everything neat for the final step.
Prepare your binding by cutting strips 2.5” wide, joining them end to end, and pressing in half lengthwise. Attach the binding by machine on the front, then fold over to the back and hand stitch, or finish by machine.
Give your finished quilt a gentle wash and dry. This helps soften the fabric, tighten the stitching, and brings out the texture of your crumb design beautifully.
Now you have a complete Turning Crumbs into Quilts project: a unique, sustainable quilt created entirely from scraps, with every piece telling its own story.
Quilters love Turning Crumbs into Quilts for its flexibility, but a few practical tips will make your project even smoother.
First, keep your crumbs organized. A simple box or basket sorted by color can save time and inspire creative combinations when building blocks.
Iron frequently as you piece crumbs together. Pressing seams flat keeps your blocks from becoming bulky and helps them fit together neatly later.
Use a consistent seam allowance, typically ¼”. Even though crumb quilting feels free-form, consistency keeps your blocks square and makes assembly easier.
Don’t worry about perfect shapes. Irregular pieces often add charm and interest to crumb quilts. Let your eye guide you rather than chasing symmetry.
Mix in solids or tone-on-tone prints among busy crumbs. This prevents the quilt from looking too chaotic and helps each color pop.
Finally, enjoy the process! The spirit of Turning Crumbs into Quilts is creative freedom and sustainability. Let your quilt reflect your personality, memories, and fabric history.
Beyond creativity, Turning Crumbs into Quilts carries a deeper message about making the most of what we have and finding beauty in imperfection.
Using leftover fabrics keeps textiles out of landfills. In a world increasingly focused on sustainability, crumb quilting shows how crafting can be part of a greener lifestyle.
Each crumb quilt becomes a memory quilt of sorts, capturing fabric from past projects, old clothes, or shared scraps from fellow quilters.
The randomness of crumbs challenges us to let go of strict control and embrace unexpected design. This mindset can spill into other creative areas and even daily life.
Crumb quilts are wonderful gifts because they’re truly one-of-a-kind. No pattern can ever be duplicated exactly, making each quilt special.
Lastly, Turning Crumbs into Quilts reminds us that even the smallest pieces have value. It’s a comforting and creative philosophy for both quilting and life.
What fabrics can I use for crumb quilting?
Any cotton quilting scraps work best, especially those left from previous quilts or sewing projects.
Do crumb quilts need a special batting?
No, standard cotton or polyester batting works well.
How do I keep my crumb blocks square?
Trim edges frequently and use consistent seam allowances to keep your blocks even.
Can I use crumb quilting for other projects?
Yes! Crumb blocks are great for bags, table runners, and pillows too.
Do crumb quilts take longer?
They can, because of extra piecing, but the creative process is worth it.
What size should crumbs be?
Start with pieces at least 1.5” x 1.5” to keep sewing manageable.
Turning Crumbs into Quilts turns leftover fabric into cherished creations. It’s an inspiring journey of creativity, sustainability, and self-expression. By following the step-by-step pattern shared here, you can create a quilt full of character and meaning, knowing you made beauty from even the smallest scraps.
What do you think? Have you tried crumb quilting? Share your thoughts, stories, and suggestions below—we’d love to hear how you’ve turned your crumbs into quilts!

