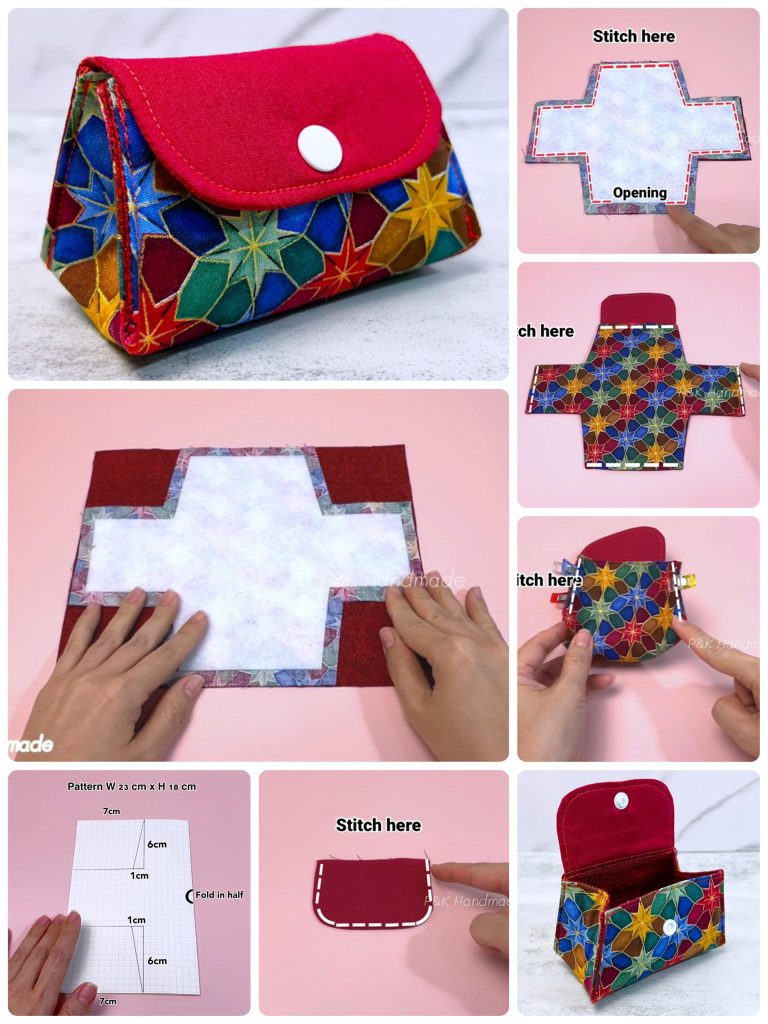
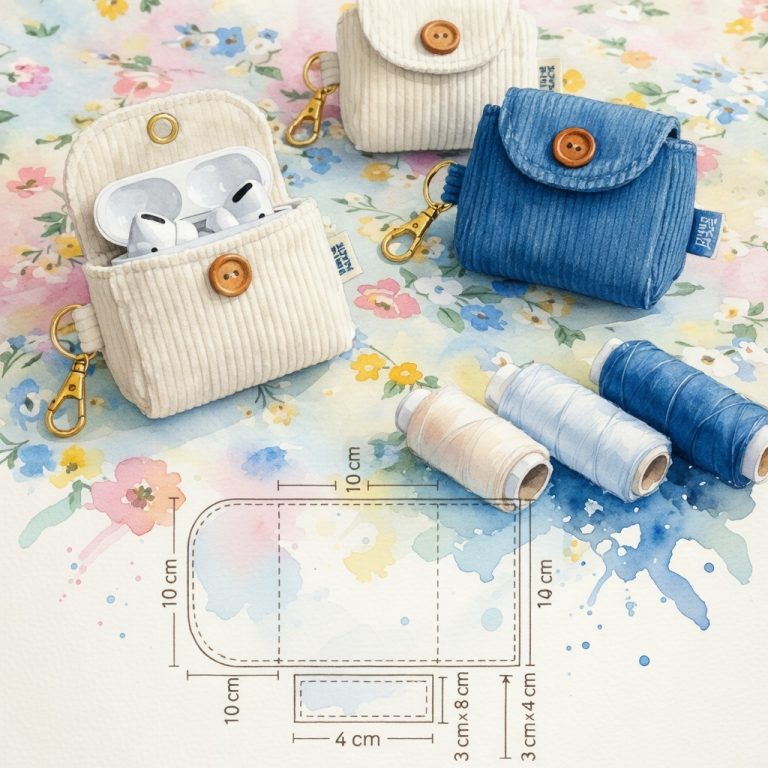
How to Make a Fabric Coin Purse Pattern
Creating a You Are My Sunshine Sign DIY project is a beautiful way to add warmth, love, and a handmade touch to your home decor. Whether you’re crafting for your child’s nursery, your bedroom, or as a heartfelt gift, this DIY project brings a sunny message to life with creativity and charm. In this post, we’ll guide you step-by-step through the process, from selecting materials to adding finishing details, ensuring your sign looks professional and feels personal.
The phrase “You Are My Sunshine” holds a special place in many hearts. It’s not just lyrics from a song—it’s an expression of affection that instantly makes any space feel brighter. Making your own You Are My Sunshine Sign DIY allows you to customize colors, fonts, and textures to match your aesthetic and intentions.
In this guide, you’ll learn how to prepare your wood or fabric base, stencil or paint the lettering, and add embellishments to make your sign truly shine. Plus, we’ve included all the fabric cuts and measurements you’ll need to recreate this pattern with ease. Let’s get started crafting sunshine into your home!

To begin your You Are My Sunshine Sign DIY, choosing the right materials sets the tone for your entire project. Depending on your preferred style, you can create this sign using either wood or fabric as the base. Both options offer beautiful results and long-lasting quality.
If you choose wood, opt for a pine board or MDF panel around 12″ x 18″ in size. Sand the surface to ensure smoothness before painting. For a quilted or fabric version, use a canvas base or batting layer as your foundation, measuring approximately 14″ x 20″ to allow seam allowances.
Select a bright, cheerful color palette to reflect the sentiment of You Are My Sunshine. Consider using yellow, white, orange, and gray fabric scraps or paint. These colors evoke warmth and optimism.
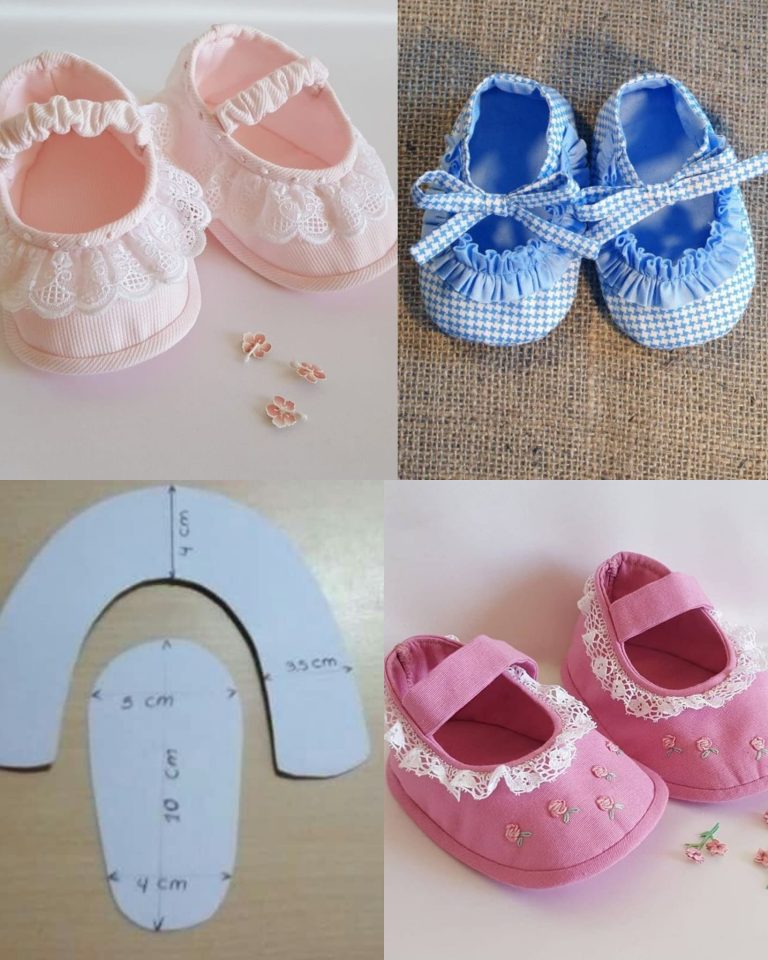
For a fabric sign, cut:
You’ll also need:
Planning your materials ahead ensures a smooth crafting process and helps you create a stunning You Are My Sunshine Sign DIY with confidence and clarity.
Now that you’ve gathered your materials, let’s walk through the step-by-step instructions to create your You Are My Sunshine Sign DIY. Whether you’re working with wood or fabric, the process focuses on layering, lettering, and finishing.
Step 1: Prepare the Base
For a wood sign, paint the base using a white or pale yellow background and let it dry. For a fabric version, iron the background fabric and fuse it to batting for added structure.
Step 2: Design the Layout
Sketch or print the words “You Are My Sunshine” to fit your sign. Use bold, playful fonts. If you prefer, print out a ready-made stencil or template. Arrange your lettering and sun shapes on the base before securing them.
Step 3: Cut and Attach Letters
If you’re doing appliqué, trace the letters onto the paper side of fusible web, fuse them to your letter fabrics, and then cut them out. Iron them onto the base fabric, following layout lines. For wood, use stencils or freehand paint.
Step 4: Add the Sunshine Motif
Cut a circle for the sun’s center (6” diameter) and arrange the ray strips (1.5” x 4”) around it. Fuse them in place using heat and bond. This adds dimension and reinforces the “sunshine” theme.
Step 5: Stitch or Seal
If using fabric, stitch around the letters and sun elements using a zigzag or straight stitch. For wood, seal the painted design with a clear coat to protect the finish.
Step 6: Finish the Back and Display
For fabric signs, add backing fabric and topstitch around the edges. Insert a dowel or hanger. For wood, add a sawtooth hanger or display on a shelf.
With these clear steps, your You Are My Sunshine Sign DIY will come together beautifully, whether you’re sewing or painting.
One of the joys of a You Are My Sunshine Sign DIY is the opportunity to personalize it for yourself or someone special. Customizing your sign ensures that it reflects your personality, interior decor, or heartfelt intentions.
You can begin by selecting unique color combinations. Perhaps you want to match a nursery’s pastel theme or use bold, contrasting tones for a dramatic touch. Color sets the emotional tone of your sign.
Next, consider using patterned fabric for the sun or lettering. Florals, polka dots, and gingham add charm and make your You Are My Sunshine Sign DIY stand out. If you’re painting, add tiny hand-drawn doodles like hearts or stars.
Add embellishments like buttons, beads, or embroidery to elevate your design. For example, embroider around the sun or add a stitched heart below the text. This brings a handmade feel that machines can’t replicate.
Incorporate names or dates to commemorate a birth, wedding, or anniversary. Simply add a banner below the main phrase with the personalization using fabric ink or embroidered letters.
Use different font styles for the lettering. Mixing cursive and bold block fonts adds visual interest and emphasizes key words like Sunshine.
Personal touches make your You Are My Sunshine Sign DIY more than just a craft—they make it a memory that will be cherished for years.
After you’ve completed your You Are My Sunshine Sign DIY, it’s time to think about how to display or present it. A beautiful sign deserves a place where it can shine and share its uplifting message with everyone who sees it.
For indoor use, hang your sign above a crib, bed, or in a family room. The cheerful message brightens up any wall and adds personality to your space. For fabric signs, a simple dowel rod or embroidery hoop makes display easy.
Use your sign as part of a gallery wall. Pair it with family photos, sun-themed decor, or vintage frames for a cohesive look. This amplifies the warmth of your You Are My Sunshine Sign DIY even more.
If gifting, wrap your handmade sign in tissue paper and place it in a sturdy box with a ribbon. Include a handwritten note to explain why you chose this message—especially meaningful for birthdays, baby showers, or anniversaries.
You can also transform the project into seasonal decor. Add autumn leaves, spring flowers, or Christmas-themed accents around the edges to adapt your You Are My Sunshine Sign DIY for any time of year.
Consider photographing your completed sign for social media or a craft blog. Use natural lighting and close-ups to capture the details. This can inspire others to try their own version.
Whether displayed proudly or gifted with love, your You Are My Sunshine Sign DIY project is a creative way to spread light and happiness to others.
What materials do I need for a You Are My Sunshine Sign DIY project?
You’ll need a wooden board or fabric, stencils or letter templates, paints or fabric, and embellishments like buttons or ribbon.
Can I make this sign using only fabric?
Yes! With fusible web and fabric scraps, you can create a quilted or appliqué fabric version that’s just as striking as wood.
What are the ideal dimensions for the sign?
A good starting size is around 12” x 18” or 14” x 20”. This provides enough space for lettering and design without being too bulky.
Can I personalize my You Are My Sunshine Sign DIY?
Absolutely! Add names, dates, colors, or embellishments to make it uniquely yours or perfect as a gift.
How do I hang or display the finished sign?
Use a sawtooth hanger for wood or a dowel for fabric. You can also frame it or display it on an easel.
Is this project beginner-friendly?
Yes, it’s great for beginners. The steps are simple, and you can adjust the difficulty depending on your materials and techniques.
Creating a You Are My Sunshine Sign DIY is more than just a crafting activity—it’s a way to express love, joy, and creativity. This project brings positive energy into your home and makes a thoughtful gift that’s personal and heartfelt. With clear instructions, material lists, and design ideas, you’re fully equipped to start crafting your own sunshine.
We hope this guide inspires you to create your own beautiful version. If you try this pattern, share your creations and tag us on social media—we’d love to see how your sunshine shines! Let us know in the comments if you’d like more DIY sign tutorials or ideas.

