
Crochet Cat Hair Ties Pattern
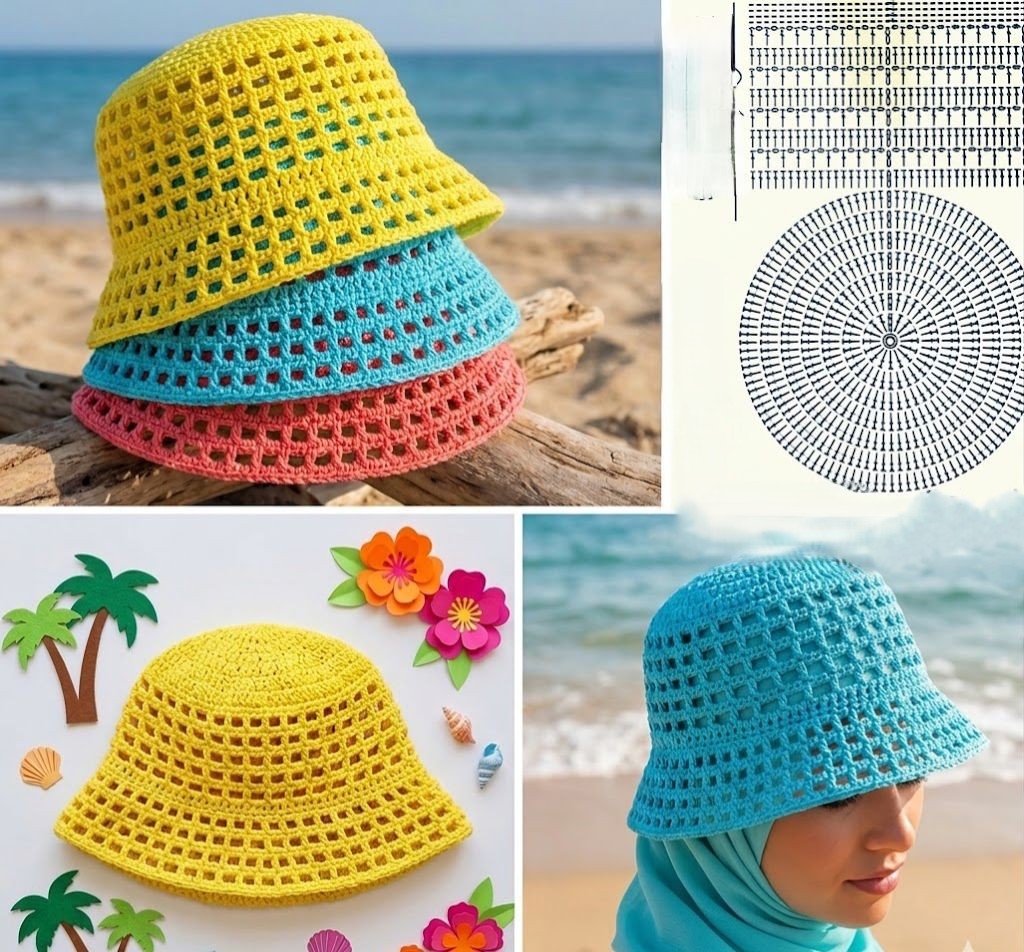
The Crochet Easy Bucket Hat Pattern is one of the most محبوب and beginner-friendly projects in the world of handmade fashion.
Whether you’re just starting your crochet journey or already have some experience, this pattern offers the perfect balance between simplicity and style.
A bucket hat is not only trendy but also practical, making it an excellent project for those who want to create something useful while improving their crochet skills. By following a well-structured Crochet Easy Bucket Hat Pattern, you can craft a beautiful accessory that reflects your personal style.Creating your own Crochet Easy Bucket Hat Pattern allows you to experiment with colors, textures, and yarn types, giving you full creative control. Unlike store-bought items, handmade crochet hats carry a unique charm that cannot be replicated. Additionally, crocheting your own hat is often more cost-effective and sustainable, especially when using leftover yarns. This project is also portable, meaning you can work on it anywhere, whether you’re relaxing at home or traveling.
Another reason why the Crochet Easy Bucket Hat Pattern is so popular is its versatility. It can be customized for all seasons by simply changing the yarn type. Cotton yarns are perfect for summer, while thicker acrylic or wool yarns are ideal for colder weather. The pattern can also be adjusted for different sizes, making it suitable for children, teens, and adults alike. With a little patience and creativity, this simple project can turn into a stylish wardrobe staple.
Before starting your Crochet Easy Bucket Hat Pattern, it’s essential to understand the basic stitches involved. Most bucket hat patterns use simple stitches like single crochet, half double crochet, or double crochet. These stitches are easy to learn and form the foundation of many crochet projects. Mastering them will make the entire process smoother and more enjoyable.
The structure of a Crochet Easy Bucket Hat Pattern typically consists of three main parts: the crown, the body, and the brim. The crown is worked in rounds, starting from a small circle and gradually increasing in size. This creates the flat top of the hat. Understanding how to increase stitches evenly is key to achieving a neat and symmetrical result.
Once the crown reaches the desired size, the body of the hat is worked without increases. This section determines the depth of the hat and can be adjusted based on personal preference. A longer body will create a more relaxed fit, while a shorter one results in a snug look. This flexibility is one of the reasons why the Crochet Easy Bucket Hat Pattern is so appealing.
The brim is the final part of the pattern and adds both style and functionality. It is usually created by increasing stitches again to give the hat its characteristic shape. A wider brim offers more sun protection, while a narrower brim creates a minimalist look. The choice depends entirely on your design preference.
Choosing the right hook size is also crucial for your Crochet Easy Bucket Hat Pattern. A smaller hook creates tighter stitches, resulting in a firmer hat, while a larger hook produces a softer and more flexible fabric. Always check your gauge before starting to ensure the correct fit.
Finally, understanding yarn types will greatly impact your finished hat. Cotton yarn is breathable and perfect for warm weather, while acrylic yarn is durable and easy to care for. Selecting the right materials will enhance both the comfort and longevity of your crochet bucket hat.
To begin your Crochet Easy Bucket Hat Pattern, start with a magic ring or a chain loop. This forms the center of the crown. Work your initial stitches into the ring and pull it tight to close the gap. This technique ensures a clean and professional-looking top.
In the next rounds, you will increase stitches evenly to expand the crown. Typically, you add a consistent number of stitches in each round to maintain a flat shape. This step is essential for achieving the correct diameter for your hat.
As you transition from the crown to the body, stop increasing and begin working in continuous rounds. This creates the sides of the hat. Keep your tension consistent to avoid uneven edges. The body should be long enough to comfortably cover the head.
When your desired length is reached, it’s time to start the brim. Increase stitches gradually to allow the brim to flare outward. This is where your Crochet Easy Bucket Hat Pattern begins to take its iconic shape.
You can customize the brim by adding decorative stitches or changing colors. This is a great opportunity to personalize your hat and make it truly unique. Simple variations can make a big difference in the final look.
Finish your hat by fastening off the yarn and weaving in all loose ends. This final step ensures durability and gives your project a polished appearance. Your handmade bucket hat is now ready to wear or gift.
One of the best things about the Crochet Easy Bucket Hat Pattern is how easy it is to customize. You can experiment with different color combinations to match your wardrobe or create bold, eye-catching designs. Stripes, color blocking, and gradients are all great options.
Adding texture is another way to enhance your Crochet Easy Bucket Hat Pattern. You can incorporate stitches like the puff stitch or shell stitch to create a more intricate design. These details add depth and visual interest to your hat.
You can also adjust the size of your hat by modifying the number of increase rounds in the crown. This makes the pattern adaptable for different head sizes. Always measure as you go to ensure a comfortable fit.
Embellishments such as buttons, patches, or embroidery can make your hat stand out even more. These small details can transform a simple project into a statement piece. Personal touches are what make handmade items special.
For seasonal variations, consider using lightweight yarn for summer hats and thicker yarn for winter versions. This allows you to enjoy your Crochet Easy Bucket Hat Pattern all year round. Versatility is key when creating handmade accessories.
Finally, don’t be afraid to experiment and make mistakes. Crochet is a creative process, and each project helps you improve your skills. Over time, you’ll develop your own unique style and techniques.
One common mistake when working on a Crochet Easy Bucket Hat Pattern is incorrect stitch counting. Missing or adding extra stitches can distort the shape of the hat. Always count your stitches at the end of each round to maintain consistency.
Another issue is uneven tension. If your stitches are too tight or too loose, the hat may not fit properly. Practice maintaining a steady tension to achieve a uniform look throughout your project.
Skipping the gauge check is also a frequent mistake. While it may seem unnecessary, checking your gauge ensures that your hat will fit as intended. Taking a few extra minutes at the beginning can save a lot of time later.
Choosing the wrong yarn can affect both the appearance and functionality of your hat. For example, using heavy yarn for a summer hat can make it uncomfortable to wear. Always select materials المناسبة للمشروع.
Many beginners rush through the brim section, which can lead to a misshapen hat. Take your time and follow the pattern carefully to achieve the desired flare. The brim is a defining feature of the Crochet Easy Bucket Hat Pattern.
Lastly, neglecting to weave in ends securely can cause your hat to unravel over time. Make sure all loose ends are properly secured to ensure durability. This small step makes a big difference in the longevity of your project.
What skill level is required for a Crochet Easy Bucket Hat Pattern
The pattern is suitable for beginners who know basic stitches like single crochet and double crochet. It’s also great for intermediate crocheters looking for a quick project.
How long does it take to complete a Crochet Easy Bucket Hat Pattern
Depending on your skill level, it can take anywhere from a few hours to a couple of days. Beginners may take longer, but the process becomes faster with practice.
What type of yarn is best for a Crochet Easy Bucket Hat Pattern
Cotton yarn is ideal for summer hats, while acrylic or wool yarn works well for colder seasons. The choice depends on the intended use of the hat.
Can I resize a Crochet Easy Bucket Hat Pattern
Yes, you can easily adjust the size by adding or reducing increase rounds in the crown and modifying the length of the body.
Do I need special tools for a Crochet Easy Bucket Hat Pattern
No special tools are required. A crochet hook, yarn, scissors, and a yarn needle are all you need to complete the project.
Why is my bucket hat not holding its shape
This can be due to loose tension or the type of yarn used. Try using a smaller hook or a sturdier yarn to improve structure.
The Crochet Easy Bucket Hat Pattern is a versatile and enjoyable project that combines creativity with practicality. Throughout this article, you learned about the basic structure of the pattern, step-by-step instructions, customization ideas, and common mistakes to avoid. With the right materials and techniques, anyone can create a stylish and functional bucket hat.
By practicing regularly and experimenting with different designs, you can turn a simple Crochet Easy Bucket Hat Pattern into a unique piece that reflects your personality. Handmade items always carry a special value, making them perfect for personal use or thoughtful gifts.
Now it’s your turn to try this project and bring your ideas to life. Feel free to share your honest opinion about this guide and leave your suggestions for future improvements. Your feedback is always welcome and helps make the crochet community even stronger.

