
Easter Bunny Basket - Crochet Pattern
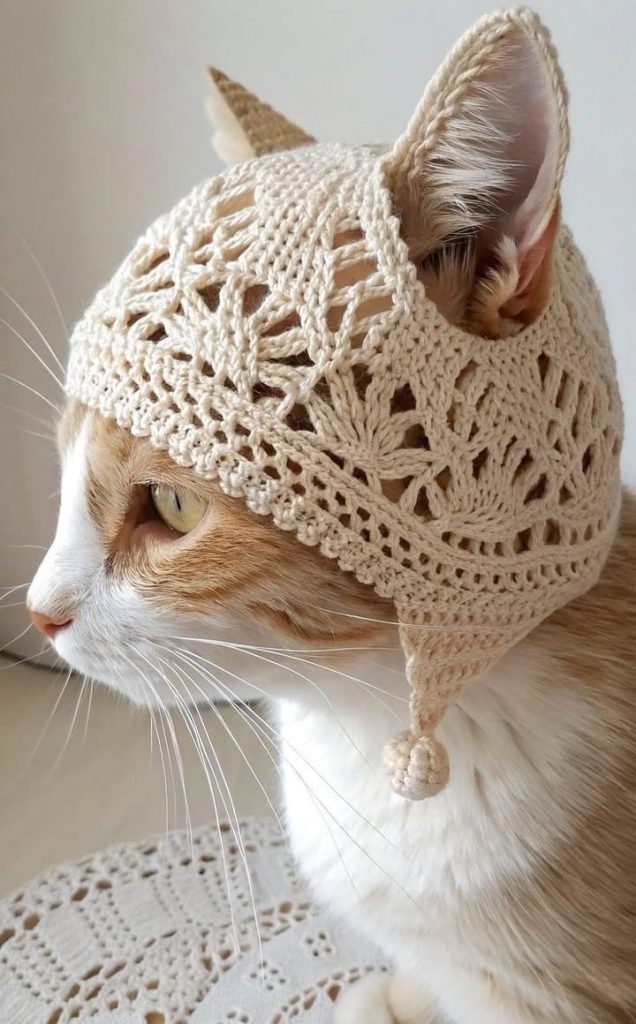
The Crochet Cat Hat is more than just an adorable accessory—it’s a handmade expression of creativity, warmth, and charm. Right from the very first stitch, making your own Crochet Cat Hat connects you to a tradition of artistry that’s both practical and delightfully fun. Whether you’re crafting a playful gift for a loved one, designing a stylish pet costume, or simply exploring your crochet skills, this project offers countless opportunities for personalization.
The popularity of the Crochet Cat Hat pattern comes from its versatility. It can be adjusted to fit different sizes—from small kittens to larger cats or even adapted for humans who love cute cat-themed fashion. Plus, the pattern allows for experimentation with colors, textures, and even adding decorative elements like little bows or bells.
In this blog post, we’ll guide you through every step to create your own Crochet Cat Hat, from selecting yarn and preparing your materials to the final finishing touches. Whether you’re an experienced crocheter or a curious beginner, you’ll find all the inspiration and instructions you need to bring your Crochet Cat Hat to life.
Creating a perfectly fitting Crochet Cat Hat starts with gathering the right materials and planning your cuts and measurements. Proper preparation ensures your project turns out exactly as you envision.
First, choose a soft acrylic or cotton yarn in your desired color. For a standard Crochet Cat Hat, you’ll need about 50 grams of worsted weight yarn. This amount usually covers a hat suitable for an average adult cat or small dog. Opt for lightweight yarn if you’re making a Crochet Cat Hat for a kitten to keep the hat comfortable.
Next, prepare the yarn into manageable cuts: two 2-meter strands for the ear flaps and ties, one 1-meter strand for shaping the ears, and the remainder (around 10-15 meters) for crocheting the hat body itself. Cutting your yarn beforehand helps avoid tangling and keeps the project organized.
For hook size, a 4.0 mm crochet hook is ideal for worsted weight yarn. If you prefer a tighter stitch, you can use a 3.5 mm hook. Always make a quick gauge swatch—about 10 cm x 10 cm (4 in x 4 in)—to ensure your stitches are neither too loose nor too tight.
In addition to yarn and hook, you’ll need a yarn needle for sewing, scissors, and optional embellishments like small felt circles for the inside of the cat ears. Felt should be cut into two small triangles measuring approximately 3 cm on each side to fit neatly inside the crocheted ears.
Finally, for those who like extra structure, you can add lightweight interfacing between the felt and yarn in the ear sections. Cut the interfacing slightly smaller—about 2.5 cm triangles—so it stays hidden but adds support.
Making a Crochet Cat Hat may sound complex, but following this simple pattern will help you complete it confidently. Let’s go through the process step by step.
Start by crocheting the base of the hat. Using your main yarn strand, make a magic ring and crochet 6 single crochets into the ring. Pull tight and slip stitch to join. This is the top center of your Crochet Cat Hat.
In the next round, crochet 2 single crochets in each stitch to reach 12 stitches. Continue increasing by adding single crochets evenly around each round until the circle measures about 10-12 cm (4-5 in) in diameter, depending on your cat’s head size.
Once the crown is complete, crochet without increases until the hat covers around 7-8 cm (3 in) down from the top. This forms the sides of the Crochet Cat Hat. Make sure to check the fit by gently placing the unfinished hat on your cat’s head.
For the ears, chain 6 and crochet single crochets back along the chain. Reduce by one stitch each row until you reach a point, then fasten off. Repeat for the second ear. Sew both ears securely to the top of the hat using your yarn needle and the prepared 1-meter strand of yarn.
Add ear flaps by identifying two points on each side of the hat, just above where your cat’s jawline would be. Attach your 2-meter yarn strands, chain about 10-12 stitches, and work single crochets back up to create sturdy ties.
Finish your Crochet Cat Hat by weaving in any loose ends, sewing on the felt ear inserts, and adding optional decorations. Consider a small pom-pom or bow under the chin for extra cuteness.
One of the joys of making your own Crochet Cat Hat is how easily you can personalize the pattern. Simple tweaks can turn a basic design into something uniquely yours.
Consider using variegated yarn or stripes for playful color patterns. You can alternate colors every two rounds when working the crown and sides of the Crochet Cat Hat. This creates a beautiful layered effect without much extra effort.
Add embellishments like small crochet flowers, hearts, or buttons sewn onto the sides of the hat. These add character and make your Crochet Cat Hat stand out, especially if you plan to use it for photos.
Experiment with ear shapes. Instead of classic pointed cat ears, you could crochet rounder or slightly larger ears for a cartoon-inspired look. Adjust the starting chain and number of rows to get the shape you want.
For themed hats, pick colors to match popular characters. Black yarn makes an elegant cat hat; orange and black together create a Halloween vibe; pastel colors give a soft, playful look perfect for kittens.
If you’re crocheting for humans, scale the pattern by adding extra increase rounds until the crown measures about 15-17 cm (6-7 in) in diameter, and continue the sides until the hat reaches about 18-20 cm (7-8 in) from top to bottom.
Lastly, keep comfort in mind. Avoid bulky seams inside the hat, and always choose soft yarn that won’t irritate your cat’s skin. Cats may not love wearing hats at first, so a gentle fit makes them more likely to accept it.
Once your Crochet Cat Hat is complete, proper care will keep it looking adorable for years to come. Handmade crochet items are durable, but gentle cleaning is key.
Hand wash your Crochet Cat Hat in cool water with mild soap. Avoid twisting or wringing, which could distort the shape. Instead, gently press out excess water and reshape the hat while damp.
Lay flat on a towel to air dry completely. Don’t hang the hat, as gravity can stretch out the stitches—especially in the ear flaps and ties.
If your hat has embellishments like felt inserts or buttons, check these regularly to ensure they stay securely attached. Cats can be playful, so reinforcing stitches occasionally helps maintain the hat’s durability.
Consider making seasonal Crochet Cat Hat designs to share on social media. Photos of cats in themed hats can be very popular online, and your handmade hats could inspire fellow crafters.
You might also create multiple hats to donate to local animal shelters or pet charities. A colorful Crochet Cat Hat can help shelter cats appear friendlier in photos, increasing their chances of adoption.
Finally, share your finished project and pattern tips with friends, family, or online crochet communities. Your creativity may spark someone else’s love for making their own Crochet Cat Hat.
The Crochet Cat Hat isn’t just a project—it’s a celebration of creativity, love, and the joy of crafting something special by hand. From gathering yarn and measuring your pieces to the final stitch, each step brings your vision closer to reality.
Whether you’re a seasoned crocheter or just starting out, this charming project is a rewarding way to express your personality—and perhaps bring a few smiles to friends, family, or your cat. By following this detailed pattern and adding your own creative touches, your Crochet Cat Hat will be truly unique.
We’d love to hear your thoughts! Have you tried making a Crochet Cat Hat? Share your tips, photos, and ideas with us in the comments. Your experiences might inspire someone else to pick up a hook and join in the fun.


