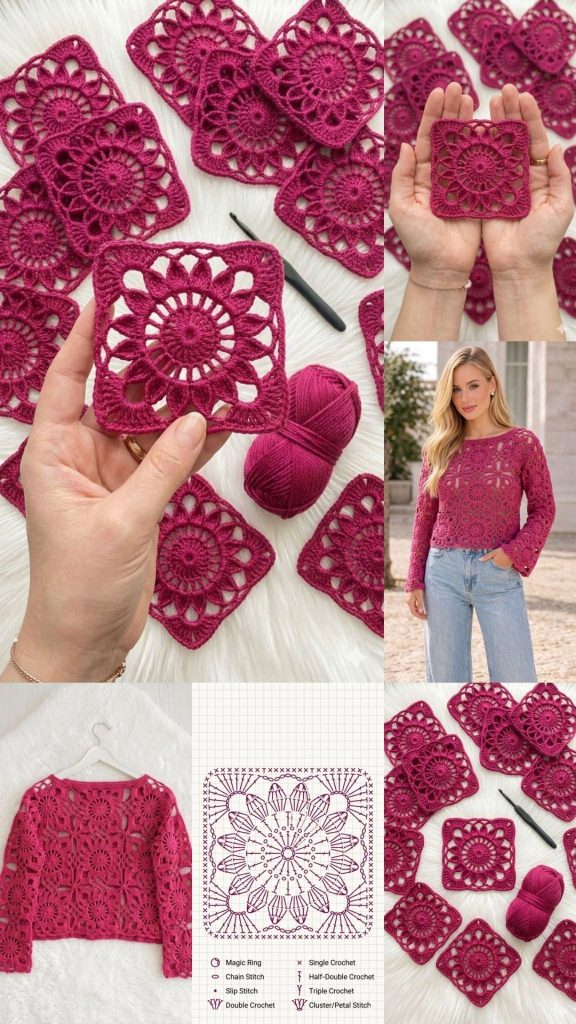
Crochet Trendy Blouse Motif Pattern
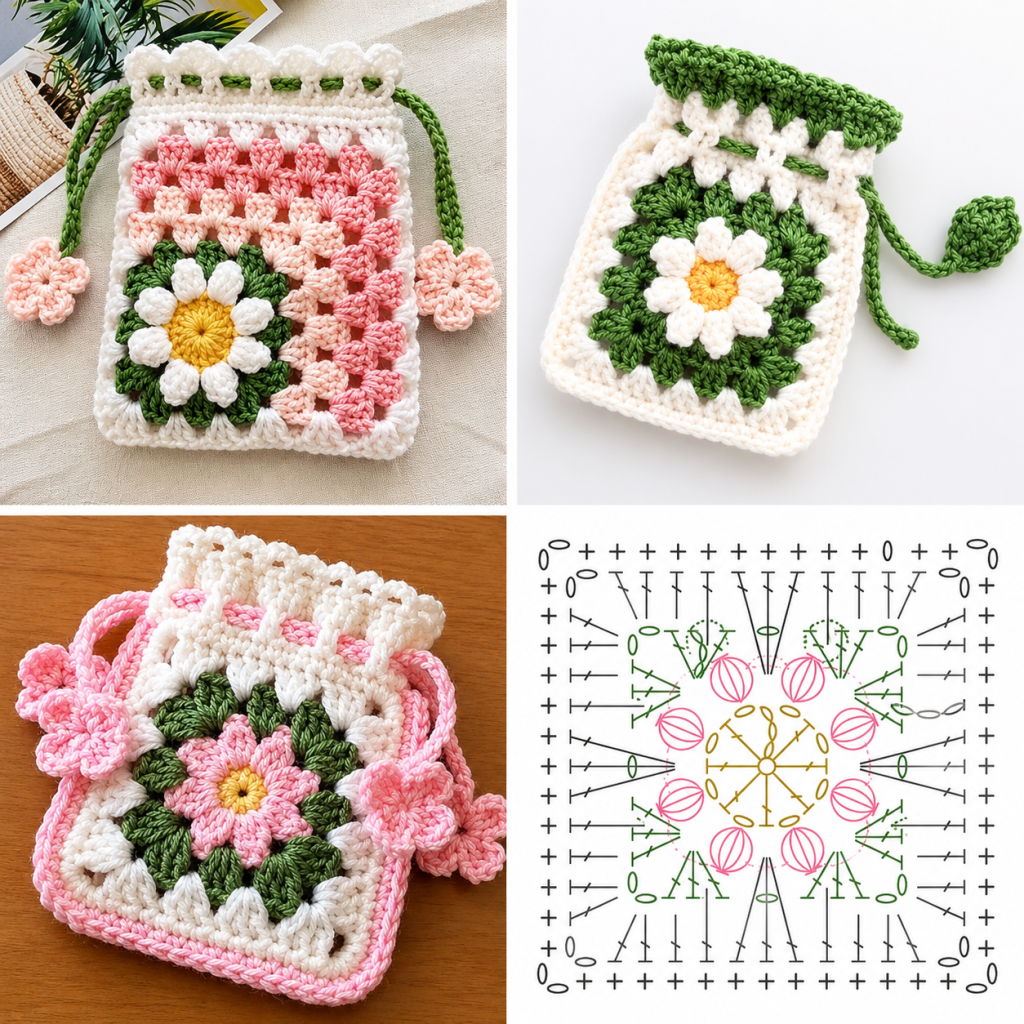
Crochet Granny Square Pouch Pattern is a creative and practical project that combines the timeless beauty of granny squares with the usefulness of a handmade pouch. Whether you are looking for a small bag to organize your crochet accessories, carry cosmetics, store earbuds, or keep everyday essentials in one place, this project is both enjoyable and rewarding.
The classic granny square design has remained one of the most beloved crochet techniques for generations because it is easy to customize, beginner-friendly, and suitable for endless color combinations. Throughout this tutorial, you will learn every step needed to create your own Crochet Granny Square Pouch Pattern using standard US crochet terminology and abbreviations.
One of the greatest advantages of making a Crochet Granny Square Pouch Pattern is that it allows crocheters to practice essential stitches while producing something beautiful and functional. Every granny square becomes a small canvas where colors, textures, and creativity come together. You can choose vibrant shades for a cheerful look, soft neutral tones for an elegant accessory, or leftover yarn from previous projects to create a colorful patchwork effect. Since the project is relatively small, it works up quickly and provides an excellent opportunity to improve your crochet skills without becoming overwhelming.
This detailed guide explains the complete process using standard US crochet abbreviations, making it easy for crocheters around the world to follow. Every stitch has a purpose, from building the classic granny square to joining the pieces, adding the pouch lining, and creating a secure closure. Even if this is your first granny square project, you will discover that patience, careful counting, and consistent tension are the keys to success. By the end of this tutorial, you will have the confidence to personalize your Crochet Granny Square Pouch Pattern in countless ways while mastering one of crochet’s most iconic motifs.
Choosing the right materials is the first step toward creating a durable and attractive Crochet Granny Square Pouch Pattern. Cotton yarn is highly recommended because it provides excellent stitch definition, durability, and structure. Acrylic yarn can also be used if you prefer a softer and lighter pouch, although cotton generally holds its shape better for everyday use.
A 4.0 mm (G/6) crochet hook pairs well with most worsted weight cotton yarns. You will also need scissors, a yarn needle for weaving in ends, stitch markers if desired, a zipper or button for closure, and optional fabric lining to give the pouch extra stability and a professional finish.
Recommended Materials:
US Crochet Abbreviations Used Throughout This Pattern:
Understanding these abbreviations before beginning makes the instructions much easier to follow. Most granny square patterns rely heavily on chains, double crochets, and chain spaces, making them ideal for beginners who wish to strengthen their foundational crochet skills.
Maintaining even tension throughout the project is equally important. If your stitches become too tight, the granny square may curl inward. If they are too loose, the finished pouch may lose its shape. Taking time to check your tension every few rounds helps create uniform squares that join together beautifully.
Before starting, consider your color palette. Traditional granny squares often feature multiple colors, changing yarn at the beginning of each round. However, a single-color design can look equally elegant and modern. Planning your colors ahead of time prevents unnecessary yarn changes and creates a cohesive finished project.
The foundation of every Crochet Granny Square Pouch Pattern is the classic granny square motif. The following instructions use standard US crochet terminology and create a square approximately 5 inches wide, depending on yarn choice and personal tension.
Round 1
Begin with a magic ring or create a foundation ring using ch 4, then join with sl st into the first chain to form a loop.
Inside the ring, work:
ch 3 (counts as first dc)
2 dc into the ring
ch 2
3 dc into ring
ch 2
3 dc into ring
ch 2
3 dc into ring
ch 2
Join with sl st into the top of the beginning ch-3.
You now have four groups of 3 dc separated by chain-2 corners.
Round 2
Sl st into the next corner space.
Ch 3 (counts as dc).
2 dc into the same corner.
Ch 2.
3 dc into same corner.
Ch 1.
Move to the next corner.
Work:
3 dc
ch 2
3 dc
Repeat this sequence in every corner.
Join with sl st.
At the end of Round 2, each side contains one granny cluster between two corners, and the square begins taking shape.
Continue maintaining consistent stitch tension while checking that every corner contains:
3 dc
ch 2
3 dc
These corners create the structure that allows the granny square to remain perfectly square as it grows.
For larger pouches, simply continue adding additional rounds following the same pattern. Every new round introduces another granny cluster between each corner, gradually increasing the overall size while preserving the classic design.
Once you have completed the desired number of rounds, fasten off the yarn if changing colors, or continue seamlessly if using a single-color version. Weave in all yarn ends carefully with a tapestry needle to ensure a clean and durable finish before assembling the pouch in the next steps.
Once your granny squares are finished, blocked if necessary, and all yarn tails have been woven in, it is time to transform them into a beautiful Crochet Granny Square Pouch Pattern. The number of squares you need depends on the size of the pouch you want to make. A simple pouch can be made with two matching granny squares, while a larger organizer may use four or more squares joined together.
Lay the granny squares flat on a clean surface and decide how you want the colors to appear in the finished project. If you used multiple colors, rotating one square may create a more balanced and symmetrical design. Taking a few moments to arrange the layout before joining the pieces often makes a noticeable difference in the final appearance.
There are several joining methods suitable for this project. A slip stitch join creates a decorative ridge, while a whip stitch with a yarn needle produces a nearly invisible seam. Single crochet joins are another excellent option because they add strength and a subtle textured border. Choose the technique that best matches the style you want for your Crochet Granny Square Pouch Pattern.
If you are making a pouch with two granny squares, place the wrong sides together so the right sides face outward. Join three sides together, leaving the top edge open. Remember to match the corner stitches carefully before beginning each seam to keep the pouch perfectly aligned.
For a larger pouch made from four squares, arrange them into the desired shape before joining. Fold the joined panel into the pouch shape and seam the side edges securely. Double-check the orientation before sewing to avoid twisting the fabric or placing the opening on the wrong side.
After completing the seams, gently turn the pouch right side out if necessary. The corners should look crisp, the edges should be even, and the opening should remain straight. At this stage, your pouch already has its recognizable shape and is ready for edging and finishing details.
A neat border gives the Crochet Granny Square Pouch Pattern a polished appearance while strengthening the opening against everyday use. Begin by attaching your yarn to any stitch along the top edge with a slip stitch.
Border Round
Join yarn with sl st.
ch 1
Work 1 sc in each st across the top edge.
Place 3 sc into each upper corner if needed to help the fabric lie flat.
Join with sl st to the first sc.
Fasten off if only one border round is desired.
If you would like a thicker border, continue with another round of single crochet or work decorative stitches such as crab stitch (reverse single crochet) or picot edging. These optional finishes give the pouch additional character without making the instructions difficult to follow.
A zipper is one of the most practical closures for this project. Choose a zipper slightly shorter than the pouch opening. Using matching sewing thread, hand sew the zipper to the inside edge with small, even stitches. Work slowly to ensure the zipper remains centered and opens smoothly.
A button closure is another charming alternative. Crochet a small loop by working ch 8–12, depending on the button size, then secure it to one side of the opening with a slip stitch and several reinforcing stitches. Sew the button directly opposite the loop, making sure it aligns comfortably without stretching the crochet fabric.
To increase durability, consider adding a fabric lining. Cut two fabric rectangles slightly smaller than the pouch dimensions, sew them together on three sides, then insert the lining inside the crochet pouch. Hand stitch it neatly around the opening before attaching the zipper or button. A lining helps prevent stretching and keeps small items from slipping through the crochet stitches.
Finally, inspect your entire Crochet Granny Square Pouch Pattern carefully. Weave in any remaining yarn tails, tighten loose stitches if necessary, trim excess yarn, and gently steam block the finished pouch if the yarn allows. These finishing touches elevate a simple handmade project into a beautifully crafted accessory suitable for daily use or as a thoughtful handmade gift.
Video Tutorial:
Yes. This project is an excellent introduction to granny squares because it mainly uses basic stitches such as ch, sl st, sc, and dc. Beginners can practice reading a pattern, maintaining even tension, changing colors, and assembling crochet pieces while creating a useful finished item.
Cotton yarn is the most popular choice because it is durable, holds its shape well, and provides excellent stitch definition. Acrylic yarn is also a good option if you want a softer pouch or prefer a wider range of colors. Medium (Category 4) yarn is ideal for most versions of this pattern.
Absolutely. One of the best features of the Crochet Granny Square Pouch Pattern is its flexibility. To make a larger pouch, simply add more rounds to each granny square or join multiple squares together. For a smaller pouch, stop after fewer rounds while keeping the same corner construction.
A 4.0 mm (G/6) or 4.5 mm (7) crochet hook is commonly recommended when working with worsted weight cotton yarn. Always check your gauge and adjust your hook size if your stitches appear too tight or too loose.
A lining is optional, but highly recommended if you plan to carry small items such as coins, makeup, stitch markers, crochet hooks, earbuds, or keys. The lining also helps the pouch maintain its shape and reduces stretching over time.
A zipper offers the most secure closure for everyday use. However, wooden buttons, magnetic snaps, drawstrings, or crocheted button loops are all excellent alternatives depending on the style you prefer.
Yes. Granny squares are famous for being excellent stash-busting projects. Using leftover yarn allows you to create colorful, unique combinations while reducing waste and making every pouch one of a kind.
Maintain consistent stitch tension, count your stitches carefully, and make sure every corner follows the correct sequence of 3 dc, ch 2, 3 dc. Blocking the finished squares before assembly also helps create crisp edges and even measurements.
Definitely. A finished Crochet Granny Square Pouch Pattern makes a thoughtful handmade gift for birthdays, holidays, Mother’s Day, teachers, friends, or anyone who appreciates handcrafted accessories. You can personalize it with favorite colors, decorative buttons, tassels, or embroidered initials.
If made with cotton yarn, hand washing in cool water with mild detergent is usually the safest option. Gently reshape the pouch while it is damp and allow it to air dry on a flat surface. Always check the yarn manufacturer’s care instructions before washing.
The Crochet Granny Square Pouch Pattern is a timeless crochet project that combines creativity, functionality, and classic design. Throughout this tutorial, you learned how to choose the appropriate materials, understand the essential US crochet abbreviations, crochet a traditional granny square step by step, assemble the pouch, add professional finishing touches, and customize the project to suit your personal style.
Because this pattern is highly adaptable, you can experiment with different yarns, color palettes, sizes, borders, and closures to create a pouch that is truly unique. Every finished piece not only improves your crochet skills but also results in a practical accessory that can be used every day or given as a heartfelt handmade gift.
As you continue practicing, you’ll likely discover new color combinations, decorative stitches, and creative embellishments that make each Crochet Granny Square Pouch Pattern even more special. Crochet is a skill that grows with every project, and simple patterns like this one provide an excellent foundation for tackling more advanced designs in the future.
Thank you for taking the time to follow this tutorial. I hope this step-by-step guide has inspired you to pick up your crochet hook and create your own beautiful pouch with confidence.
If you enjoyed this tutorial, please leave your honest opinion in the comments and share your experience making this Crochet Granny Square Pouch Pattern. Your feedback, suggestions, and creative ideas are always welcome and may inspire other crocheters to start their own handmade projects. Happy crocheting!

