
Crochet mini cat keychain Pattern
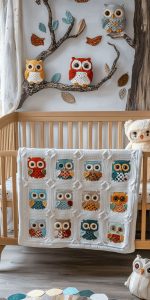
Creating a Crochet owl placemat is more than just a weekend project – it’s a way to add personality and charm to your dining table. From the whimsical look of the owl’s face to the playful textures of crochet stitches, this craft combines creativity and functionality. Beginners and seasoned crocheters alike can appreciate how such a simple design can transform a table setting into something truly memorable.
The popularity of the Crochet owl placemat lies in its balance of practical use and decorative appeal. These placemats protect your table from heat and stains while serving as conversation starters during meals. Plus, handmade crochet items always add a touch of warmth that store-bought accessories simply can’t replicate.
In this article, we’ll explore everything you need to know to make your own Crochet owl placemat: from gathering the right materials and choosing the perfect yarn colors to a detailed step-by-step pattern. By the end, you’ll feel confident to create a placemat that showcases both your craftsmanship and love for crochet.

Before starting your Crochet owl placemat, it’s essential to prepare your materials properly. The right choices make a difference in both appearance and durability. For this pattern, you’ll mainly use worsted weight cotton yarn, which is sturdy, washable, and keeps its shape well.
Choose three main yarn colors: one for the owl’s body, one for the wings and feet, and another for details like eyes and beak. Classic combinations include brown, beige, and white, but don’t hesitate to get creative with vibrant blues, greens, or even pinks for a playful touch.
For the placemat’s fabric base, if you’d like to back it for extra stability, cut a round cotton fabric piece measuring approximately 14 inches (35.5 cm) in diameter. Additionally, cut two small white fabric circles of about 2 inches (5 cm) each for the eyes and a small orange triangle measuring roughly 1 inch (2.5 cm) on each side for the beak.
Prepare a small amount of stuffing if you want the eyes or beak to stand out slightly in relief. And of course, keep your crochet hook (size H/8 – 5mm) and a tapestry needle handy for weaving in ends and sewing on details.
Lastly, consider adding felt backing or iron-on interfacing cut in the same 14-inch diameter shape to reinforce the placemat and help it stay flat on the table.
Let’s dive into the Crochet owl placemat step by step, designed to be clear and easy to follow. Whether you’re experienced or just starting, this guide will walk you through each stage.
1. Crochet the main round base:
Start with a magic ring and crochet 12 double crochets (dc) into it. Pull to close, and slip stitch to join. Continue working in the round, increasing evenly each round: next round with 2 dc in each stitch (24 stitches), then 1 dc in next stitch, 2 dc in next repeat (36 stitches), and so on, until you reach about 14 inches in diameter (around 120–130 stitches, depending on tension).
2. Add the owl’s wings:
On each side of the circle, mark about 10 stitches. Work rows of half-double crochet (hdc) over these stitches, turning at the end of each row, and decreasing by one stitch each row to create a tapered wing shape. Repeat on the opposite side for symmetry.
3. Crochet the eyes:
With white yarn, make two circles: start with a magic ring and 8 single crochets (sc), increase by adding 2 sc in each stitch (16 stitches). Continue increasing until each circle is about 2 inches (5 cm) across. Switch to black yarn and make smaller circles for pupils, about 1 inch (2.5 cm). Sew the pupils onto the white circles.
4. Create the beak and feet:
For the beak, crochet a small orange triangle using single crochets: chain 4, sc in 2nd chain, sc in next, sc in last; turn, decrease by one sc each row until you have just one sc left. For the feet, crochet two small ovals in orange: chain 6, sc around the chain, adding increases at the ends to make an oval shape.
5. Attach the details:
Use the tapestry needle to sew the eyes, beak, and feet onto the placemat base. Ensure everything is centered and symmetrical for a polished look.
6. Finishing touches:
Weave in all loose ends carefully, then optionally sew the cotton fabric backing and felt for extra stability. Lightly block the placemat to help it lay flat and show off the stitches.
By following these steps, you’ll have a finished Crochet owl placemat ready to brighten your dining space.
A Crochet owl placemat isn’t just cute; it’s also highly functional and versatile. Its thick yarn construction naturally insulates hot dishes, protecting your table from heat damage.
These placemats also serve as unique decorative accents, adding handmade charm to family meals, brunches, or holiday gatherings. Guests often admire the creativity and time invested in each piece.
Moreover, crocheting a Crochet owl placemat is a relaxing and satisfying project. It’s a manageable size for beginners but still interesting enough for experienced crocheters to enjoy.
They make thoughtful handmade gifts, too. Whether for a housewarming, birthday, or holiday, a set of owl placemats is both practical and personal.
Using bright or seasonal colors means you can adapt the same pattern to different themes. Imagine autumnal owls in rust and gold or winter owls in icy blues and grays.
Finally, making your own placemats lets you control every detail, from yarn quality to color palette, ensuring they match your home’s decor perfectly.
Customizing your Crochet owl placemat makes it even more special and unique to your table decor. Here are some creative ideas to try:
Experiment with different yarn textures, such as adding fluffy eyelash yarn around the eyes for a feathery effect. It gives the owl a playful, whimsical appearance.
Change the owl’s expression by adjusting eye placement. Wider-set eyes make the owl look surprised; closer eyes create a cute, sleepy look.
Incorporate embroidery to add extra details like feather patterns on the body or tiny flowers around the edge of the placemat.
Use variegated yarn for the owl’s body to create natural-looking feather color transitions. It can add depth and visual interest to the design.
Create matching coasters shaped like mini owl faces to complement your placemat and complete your table set.
Lastly, play with the placemat’s shape. Instead of a perfect circle, experiment with a slightly oval or scalloped edge to echo the shape of real owl feathers.
Making a Crochet owl placemat is a delightful project that blends art, craft, and function. It’s an accessible way to add handmade warmth and character to any meal while exploring your creativity.
By following the step-by-step pattern and using quality yarn and thoughtful fabric cuts, you can create a placemat that’s sturdy, charming, and one-of-a-kind.
Beyond its practical purpose, a Crochet owl placemat reflects the maker’s personality and passion for crochet. Every stitch tells a story, turning everyday dining into a moment of handmade beauty.
If you’ve enjoyed this guide, why not start today? Choose your favorite yarn colors, gather your fabric cuts, and begin crafting your own Crochet owl placemat masterpiece.
We’d love to hear your thoughts! Share your experiences, photos, or questions about crocheting owl placemats in the comments below.


