DIY Fabric Pear Spoon Holder Pattern

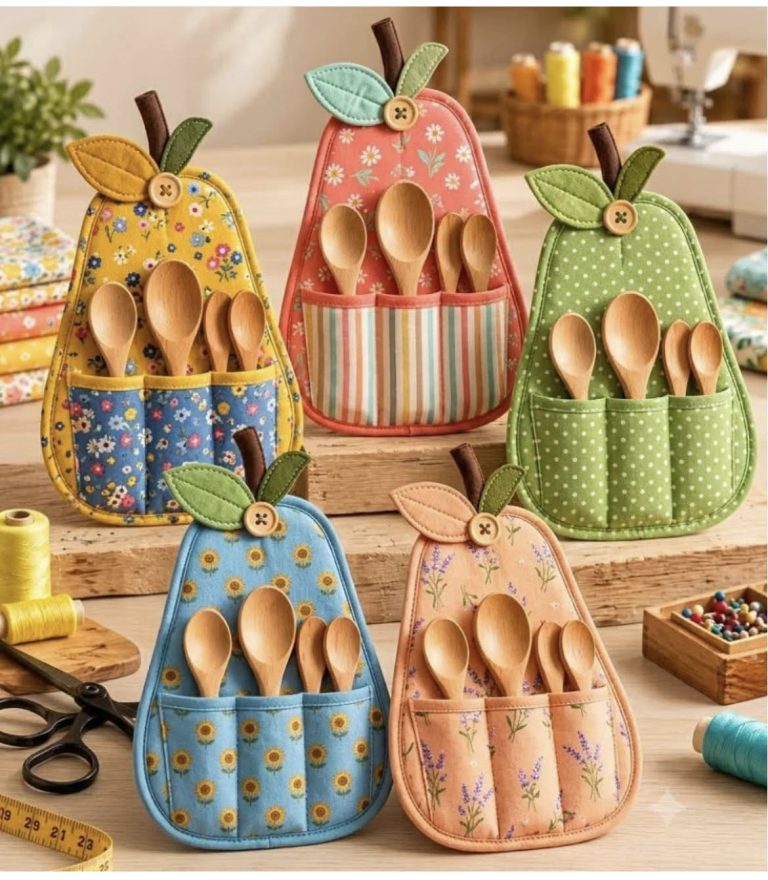
DIY Fabric Pear Spoon Holder Pattern is a charming sewing project that combines practical kitchen organization with the warmth of handmade fabric décor. Inspired by the pear-shaped utensil organizers shown in the reference photo, this project features a softly rounded pear body, a roomy divided front pocket, decorative leaves, a short fabric stem, and a button accent near the top.
The finished holder can store wooden spoons, spatulas, small kitchen tools, or even sewing supplies. Because the design uses relatively simple shapes and mostly straightforward seams, it is also an approachable project for anyone who wants to practice basic sewing techniques, topstitching, binding, and working with interfacing.
One of the most attractive features of the DIY Fabric Pear Spoon Holder Pattern is how easily it can be personalized. Floral cotton, polka dots, stripes, gingham, botanical prints, or solid fabrics can completely change the personality of the finished pear. The examples in the photo demonstrate how cheerful combinations such as yellow and blue, coral and stripes, green and white, turquoise and sunflower prints, or peach and lavender florals can make each organizer unique
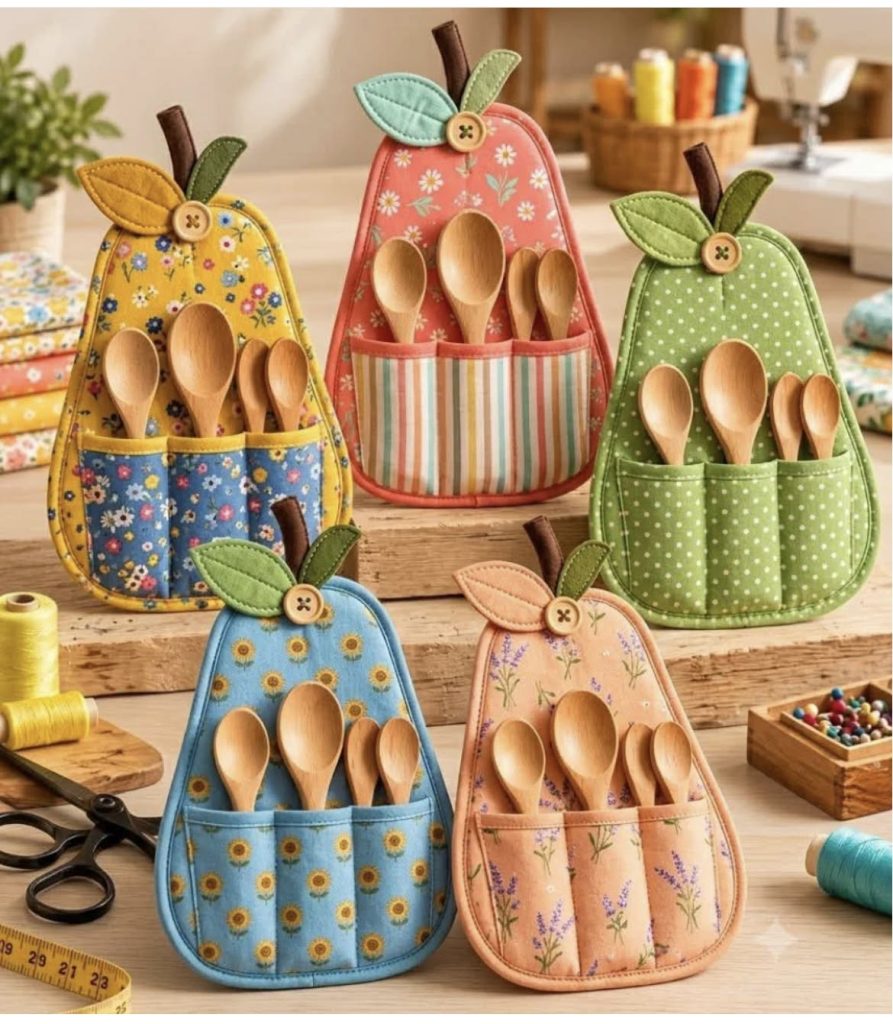
. You can coordinate the front pocket with the main body or deliberately choose a contrasting fabric. Small scraps can also be used for the fabric leaves, stem, and decorative details, making this a useful project for reducing a fabric-scrap collection.
Although this project looks decorative, good construction is important because the holder needs enough structure to support several utensils without collapsing. A layer of fusible interfacing, fleece, or thin batting between the outer fabric and lining helps create the padded appearance visible in the photo. Accurate cutting, smooth curves, reinforced pocket seams, and careful topstitching will also make the final piece look polished. In this detailed guide, you will learn how to create the pear template, prepare the fabric layers, sew the divided spoon pocket, make the stem and leaves, assemble the body, and finish the edges. The instructions can also be adapted to different dimensions depending on the size of the utensils you plan to store.
Start by gathering your supplies for the DIY Fabric Pear Spoon Holder Pattern. You will need quilting cotton or another medium-light woven fabric for the exterior, coordinating cotton for the pocket, lining fabric, fusible interfacing or thin batting, scraps of green fabric for the leaves, brown fabric for the stem, coordinating thread, and one decorative button. Basic tools include fabric scissors or a rotary cutter, pins or sewing clips, a ruler, marking pencil, iron, sewing machine, and a hand-sewing needle. A point turner can also be helpful when shaping the smaller decorative pieces.
For a practical kitchen-sized organizer, make the main pear approximately 28–32 cm (11–12½ inches) tall without the stem and approximately 18–22 cm (7–8½ inches) wide at its broadest area. These measurements are flexible rather than mandatory. If your wooden spoons are particularly long, enlarge the body slightly. The front pocket can measure approximately 11–14 cm (4¼–5½ inches) high after finishing, providing enough depth to hold spoon handles securely while leaving the upper portions visible.
To draft the pear-shaped sewing pattern, fold a sheet of paper vertically in half. Draw half of a pear with a narrow, gently curved upper section and a wider rounded lower section. Avoid making the bottom completely flat; a soft rounded bottom gives the project the friendly shape seen in the photo. Cut through both paper layers and unfold the template. Folding the paper before drawing helps ensure that the left and right sides remain reasonably symmetrical even if the pear is drawn by hand.
Use the paper template to cut one exterior pear, one lining pear, and one interfacing or batting pear. If you want a particularly firm holder, use fusible interfacing on both the outer fabric and lining. Remember to include approximately a 1 cm (3/8-inch) seam allowance if it is not already included in your paper pattern. Transfer any important alignment marks with a removable fabric marker rather than a permanent pen.
Next, prepare the front utensil pocket. Cut a rectangle slightly wider than the broad lower portion of the pear. The extra width gives you room to trim the pocket perfectly after it has been attached. For a clean upper edge, cut the pocket twice the desired finished height, fold it in half with wrong sides together, and press. Alternatively, use a single layer with a lining. A doubled pocket is particularly useful because it provides additional stability when several wooden utensils are inserted.
Finally, draft the decorative pieces. Make a gently curved leaf about 7–9 cm (2¾–3½ inches) long, a second narrower leaf if desired, and a short rectangular or slightly curved stem approximately 6–8 cm (2½–3 inches) long. These elements do not need to be identical to those in the photograph. Their purpose is to reinforce the pear theme while giving you an opportunity to use contrasting fabrics. Interface the leaves lightly if your fabric is thin so they remain crisp after sewing.
Begin construction with the fabric spoon pocket because it should be completed before the main pear body is assembled. If you are using a folded rectangle, fold the pocket with wrong sides together and press the upper fold sharply. Topstitch approximately 3 mm (1/8 inch) from the folded edge. This visible line of stitching gives the pocket a neat professional finish and also helps prevent the edge from stretching when utensils are repeatedly inserted and removed.
Place the prepared pocket across the lower front of the exterior pear. Align it so the pocket extends slightly beyond both sides of the pear. Pin or clip it securely, keeping the upper edge level. Baste around the curved outer edges within the seam allowance. Once it is secure, trim away the excess pocket fabric so its side and lower edges follow the exact outline of the pear body.
The reference design includes several vertical divisions in the front pocket. To recreate this feature, mark two or three vertical lines with a removable fabric marker. A holder about 20 cm wide can usually accommodate three or four compartments. Sew along each marked line from the bottom toward the top of the pocket. Backstitch securely at the upper edge because this area receives the most stress. These divided utensil pockets prevent spoons from sliding together and help the organizer maintain its attractive arrangement.
Now make the leaves. Place two leaf pieces right sides together and sew around the perimeter, leaving a small opening. Clip the seam allowance around tight curves, turn the leaf right side out, and carefully push out the edges. Press it flat and close the opening with topstitching. Add one line down the center and optional diagonal lines extending outward to imitate leaf veins. This simple decorative topstitching adds dimension and gives even plain green fabric a finished appearance.
Construct the stem using a narrow strip of brown fabric. Fold the long edges toward the center, press, and fold the strip in half again so the raw edges are enclosed. Stitch along the open edge. Another option is to sew two stem pieces right sides together, turn them, and press. The finished stem should be sturdy enough to stand slightly above the top of the pear without becoming bulky inside the final seam.
Arrange the stem and leaves at the top of the pear before assembling the body. The stem should extend upward while its raw lower end remains inside the seam allowance. Position the leaves diagonally across the top as shown in the inspiration image. Baste everything securely. The decorative wooden-style button can be added after final assembly. If the organizer may be washed frequently, choose a washable button and secure it with strong thread.
Fuse the interfacing to the wrong side of the appropriate fabric according to the manufacturer’s directions. If you are using batting instead, baste it to the wrong side of the outer pear. Smooth the layers carefully to eliminate wrinkles. The goal is to give the DIY Fabric Pear Spoon Holder Pattern enough structure to stay upright when displayed or hung while keeping it soft enough to retain the quilted handmade appearance of the original design.
There are two effective ways to finish the body. For a turned-edge construction, place the lining and prepared exterior right sides together, with the pocket, leaves, and stem already attached to the exterior. Sew around the pear using approximately a 1 cm seam allowance, leaving a turning opening along a relatively straight section. Clip the curved seam allowance carefully without cutting through the stitches. Turn the pear right side out and press it thoroughly.
After turning, gently roll the seam between your fingers so the lining does not show excessively from the front. Fold the raw edges of the turning opening inward and press them into alignment. Topstitch around the entire pear approximately 3–5 mm (1/8–3/16 inch) from the edge. This closes the opening and creates the crisp outlined appearance visible around the organizers in the photo. Work slowly around the curves rather than pulling the fabric.
Another attractive option is to finish the outer edge with fabric binding. Layer the exterior, batting, and lining with wrong sides together and baste around the perimeter. Attach narrow bias binding around the pear-shaped edge. Bias-cut fabric is preferable because it bends smoothly around rounded shapes. This technique produces a clearly defined contrasting border and is especially effective when the binding matches the upper edge of the pocket.
Once the body is complete, attach the decorative button near the point where the leaves and stem meet. Sew through the fabric securely without pulling so tightly that the body puckers. The button is primarily decorative, but it also visually connects the stem and leaves. You could use a wooden button for a rustic appearance, a colorful plastic button for a playful style, or a fabric-covered button for a coordinated finish.
Test the pocket by inserting several lightweight wooden spoons. Each compartment should be wide enough for at least one handle without excessive tension. If you intend to store larger utensils such as spatulas, make fewer pocket divisions. The project shown in the photo demonstrates this flexibility particularly well: wider compartments accommodate larger spoons while narrower sections organize smaller utensils. Customizing the pocket divisions is one of the easiest ways to make the fabric kitchen organizer suit your household.
Give the completed holder a final pressing, protecting any plastic or heat-sensitive button from the iron. Check the seams, remove visible basting stitches, and trim loose threads. Your finished DIY Fabric Pear Spoon Holder Pattern should now have a smooth pear silhouette, structured front pocket, clearly defined compartments, decorative leaves, and a contrasting stem. It can be placed against a kitchen backsplash, displayed on a small stand, or adapted with a hanging loop for wall storage.
What is the best fabric for a DIY Fabric Pear Spoon Holder Pattern? Quilting cotton is an excellent choice because it is easy to cut, press, sew, and coordinate with other prints. Medium-weight cotton can also work well. Very stretchy fabrics are less suitable because they can distort the pear shape. If you want to use lightweight fabric, reinforce it with fusible interfacing so the organizer has enough body to support the pocket and utensils.
Do I need batting or interfacing? Some form of stabilization is highly recommended. Fusible fleece creates a slightly padded finish, while medium-weight fusible interfacing produces a flatter and firmer result. Thin cotton batting can give the project a soft quilted appearance. The correct choice depends on the finish you prefer. Avoid extremely thick batting because excessive bulk can make the curved seams and binding difficult to sew neatly.
How large should I make the pear spoon holder? A body approximately 28–32 cm tall and 18–22 cm wide works well for many standard wooden utensils, but the best dimensions depend on what you intend to store. Lay your longest spoon on the paper template before cutting the fabric. Ideally, a generous portion of the handle should sit inside the pocket while the spoon bowl remains visible and easy to grasp.
How can I make the pocket stronger? Use a doubled fabric pocket, interface it lightly, and reinforce the upper ends of every dividing seam with backstitching. You can also sew a tiny bar tack at the top of each pocket division. These reinforcement points matter because repeated insertion and removal of utensils puts pressure on the upper pocket edge. Strong construction helps the spoon storage pockets maintain their shape over time.
Can beginners sew this pear organizer? Yes. The project involves several useful beginner-friendly skills, including tracing a template, sewing curved seams, topstitching, creating a lined or folded pocket, and making simple appliqué-style decorative pieces. Beginners may find bias binding slightly more challenging, so the turn-and-topstitch construction method is a good alternative. Sewing slowly around the pear’s curves is more important than sewing quickly.
Can this pattern be used for something besides wooden spoons? Absolutely. The same DIY Fabric Pear Spoon Holder Pattern can become a craft organizer, crochet-hook holder, paintbrush organizer, sewing-tool pocket, or decorative storage piece. Simply adjust the number and width of the vertical pocket divisions according to the objects being stored. For narrow tools, create several slim compartments; for wider accessories, use only two or three larger sections.
How can I create different versions like those shown in the photo? Keep the same basic pear template and change the fabric combinations. Try a floral pear with a contrasting pocket, a polka-dot body with a matching pocket, or a solid body paired with striped fabric. Changing the leaf colors, binding, button, and stem creates even more variety. Making several coordinating pears is also a practical way to use leftover fabric scraps from other sewing projects.
Should this organizer be used for wet or hot utensils? It is best suited to clean, dry, cool utensils. Ordinary quilting cotton and standard interfacing are not designed to protect surfaces from high temperatures or prolonged moisture. Allow cooking tools to cool and dry completely before placing them in the fabric pockets. This keeps the organizer cleaner and helps preserve the fabric, interfacing, stitching, and decorative elements.
How do I keep the curved edges smooth? Accurate clipping and careful pressing make a significant difference. When using the turned method, clip or notch the seam allowance around the curves without cutting the stitching. After turning, use your fingers or a blunt point turner to shape the perimeter. Press gently and topstitch slowly. If using binding, choose bias-cut strips because they naturally conform to curved edges better than straight-grain strips.
Can I enlarge or reduce the pattern? Yes. Because the design is based on a simple pear silhouette, the entire template can be scaled proportionally. Remember that the pocket depth should also change with the body. Before committing to fabric, make a paper version and place the intended utensils over it. This quick test makes it easier to determine whether the pear sewing pattern needs additional height or width.
Conclusion
The DIY Fabric Pear Spoon Holder Pattern transforms basic cotton fabric into a cheerful and practical organizer that can add handmade character to a kitchen or sewing room. The project begins with a simple pear-shaped template and becomes structured through interfacing or batting, a reinforced front pocket, carefully sewn divisions, and neat edge finishing.
Throughout this tutorial, you learned how to draft the pear body, determine practical measurements, prepare a divided utensil pocket, sew decorative fabric leaves and a stem, assemble the lining and exterior, topstitch curved edges, and customize the organizer with contrasting fabrics and a button. These techniques can also be reused in many other small sewing and fabric-storage projects.
The greatest advantage of this pattern is its flexibility. You can create a bright floral pear, a soft pastel version, a farmhouse-inspired organizer, or several coordinating holders using different fabric combinations. Pocket widths can also be adapted to wooden spoons, spatulas, craft tools, crochet hooks, or other lightweight accessories.
If you make your own DIY Fabric Pear Spoon Holder Pattern, leave your sincere opinion about the project and share your suggestions. It would be wonderful to know which fabric combinations you would choose, how you would customize the pockets, and what other creative details you would add to your handmade pear organizer.