How to Make the Denim Fox Patch Pattern is a creative and rewarding project that combines sustainability, craftsmanship, and artistic expression in one beautiful design.
Whether you are a beginner exploring textile crafts or an experienced maker looking for a unique patch idea, this tutorial-style article will guide you through every important detail. Using denim as your base material not only gives your fox patch a rustic and durable finish, but also allows you to repurpose old jeans into something truly special.
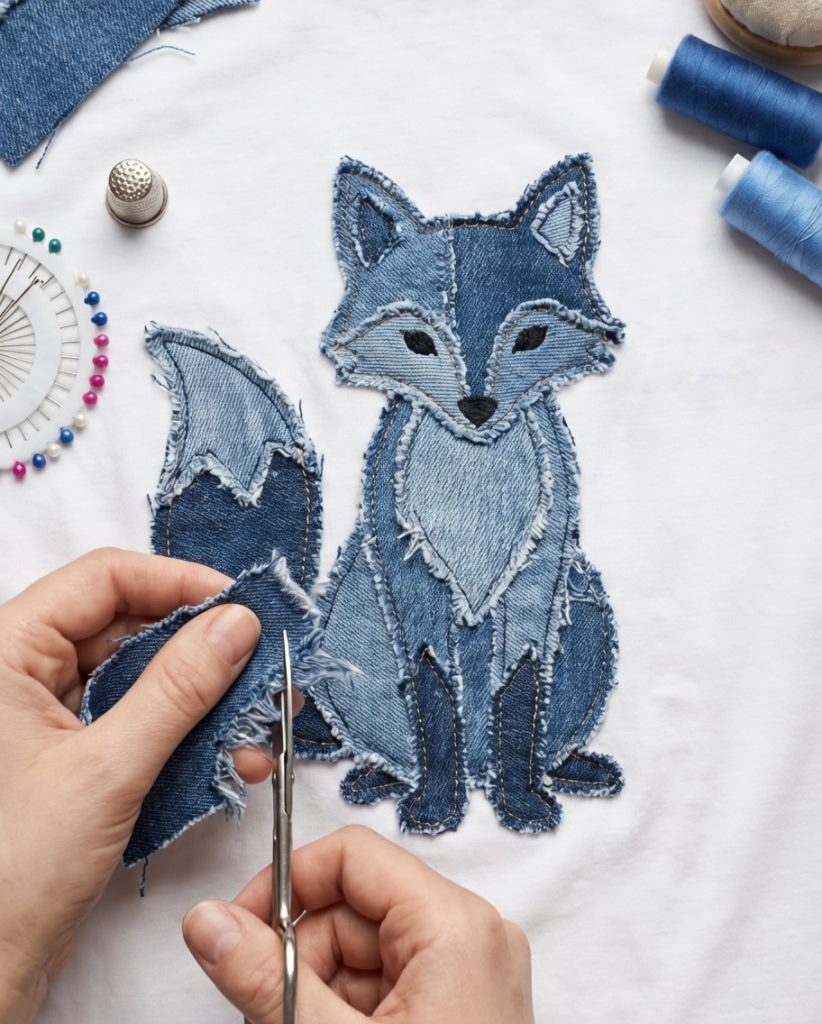
Creating a Denim Fox Patch Pattern is more than just sewing pieces together—it is about understanding textures, layering fabrics, and bringing a charming fox character to life through careful stitching. This type of project is especially popular among DIY enthusiasts because it can be customized in countless ways. You can adjust colors, sizes, and stitching styles to suit your personal taste while still following the core structure of the pattern.
Materials and Preparation for the Denim Fox Patch Pattern
Before starting How to Make the Denim Fox Patch Pattern, it is essential to gather all necessary materials. Denim fabric is the foundation of this project, and you can easily reuse old jeans for an eco-friendly approach. You will also need cotton fabric for contrast, embroidery thread, scissors, pins, and a needle or sewing machine.
Choosing the right denim is an important step in the Denim Fox Patch Pattern process. Medium-weight denim works best because it is sturdy but still flexible enough for detailed stitching. Avoid overly thick denim, as it can make sewing small shapes more difficult.
In addition to denim, selecting complementary fabrics helps bring the fox design to life. Orange, white, and black tones are commonly used to represent the fox’s natural colors. These shades will create contrast and make your patch visually appealing.
Preparing your materials also includes washing and ironing the fabrics. This step ensures that your How to Make the Denim Fox Patch Pattern project will not shrink or distort after completion. Smooth fabric is easier to cut and sew accurately.
You should also prepare your pattern template before cutting any fabric. You can draw a simple fox face or body shape on paper and use it as a guide. Keeping proportions balanced is key to achieving a polished final result.
Finally, organize your workspace to make the process smoother. Having all tools within reach allows you to focus on the creative aspects of How to Make the Denim Fox Patch Pattern without interruptions.
Cutting and Assembling the Fox Design
Once your materials are ready, the next step in How to Make the Denim Fox Patch Pattern is cutting the fabric pieces. Use your template to trace the fox shape onto the denim and other fabrics. Precision is important here, as clean edges will make assembly much easier.
Carefully cut each piece using sharp scissors. For the fox design, you will typically need a main face shape, ear pieces, and smaller details like the snout and eyes. Taking your time during this step ensures better results later.
After cutting, arrange the pieces on top of the denim base. This allows you to preview the final look of your Denim Fox Patch Pattern before sewing anything in place. Adjust positioning as needed until you are satisfied.
Pin the pieces securely to prevent movement while sewing. This is especially helpful when working with multiple layers, as it keeps everything aligned. Proper pinning is a simple but crucial step in How to Make the Denim Fox Patch Pattern.
Begin stitching the pieces together using either hand stitching or a sewing machine. A tight, even stitch will give your patch durability and a professional appearance. Start with the larger pieces and gradually move to the smaller details.
As you assemble the fox design, pay attention to symmetry and spacing. Small adjustments can make a big difference in the final outcome of your Denim Fox Patch Pattern, ensuring that your fox looks balanced and expressive.
Adding Details and Texture to the Patch
Details are what truly bring your How to Make the Denim Fox Patch Pattern project to life. Once the main pieces are assembled, you can start adding features like eyes, nose, and fur texture using embroidery techniques.
Embroidery thread is ideal for creating fine details. You can use simple stitches such as backstitch or satin stitch to define the fox’s facial features. These small touches add personality to your patch.
Adding texture is another important aspect of the Denim Fox Patch Pattern. You can use layered stitching or slightly frayed edges to mimic the look of fur. This creates depth and makes your design more visually interesting.
Consider using contrasting thread colors to highlight certain areas. For example, white thread on darker denim can emphasize the fox’s snout or inner ears. This technique enhances the overall design.
You can also experiment with decorative stitches around the edges of the patch. This not only secures the layers but also adds a unique handmade charm to your How to Make the Denim Fox Patch Pattern project.
Take your time with this stage, as it is where your creativity shines the most. The more attention you give to details, the more impressive your finished denim fox patch will be.
Finishing and Applying the Denim Fox Patch
The final stage of How to Make the Denim Fox Patch Pattern involves finishing the edges and preparing the patch for use. Trim any excess threads and ensure all stitches are secure.
To prevent fraying, you can use a zigzag stitch or fabric glue along the edges. This step is especially important when working with denim, as it tends to unravel over time.
Decide how you want to use your Denim Fox Patch Pattern. You can sew it onto clothing, bags, or even use it as a decorative piece. Each option may require a slightly different finishing method.
If you plan to attach the patch to clothing, consider adding an iron-on backing. This makes application easier and provides additional stability. However, sewing the patch on is still recommended for durability.
Press the finished patch with an iron to give it a clean and polished look. This step helps set the stitches and ensures your How to Make the Denim Fox Patch Pattern project looks professional.
Once completed, your denim fox patch is ready to be displayed or used. This final result reflects your effort and creativity, making it a truly satisfying project.
FAQ About How to Make the Denim Fox Patch Pattern
What is the best fabric for a Denim Fox Patch Pattern?
Denim is the primary fabric, but combining it with cotton or felt works well for details and contrast.
Is this project suitable for beginners?
Yes, How to Make the Denim Fox Patch Pattern can be adapted for beginners by simplifying the design and using basic stitches.
Can I use a sewing machine instead of hand stitching?
Absolutely, both methods work. A sewing machine can speed up the process, while hand stitching offers more control for details.
How long does it take to complete the patch?
The time varies depending on skill level, but most people can finish the project in a few hours.
Can I wash items with the patch attached?
Yes, as long as the patch is securely sewn and properly finished, it can withstand gentle washing.
What are some creative variations of the pattern?
You can experiment with different colors, add accessories like scarves, or change the fox’s expression to personalize your Denim Fox Patch Pattern.
Conclusion
In this complete guide on How to Make the Denim Fox Patch Pattern, you learned how to transform simple materials into a charming and durable handmade patch. From selecting the right denim and preparing your materials to assembling the design and adding intricate details, each step plays an important role in achieving a beautiful result. This project is not only practical but also a great way to express creativity and reuse fabric in a sustainable way.
By following these instructions, you now have the knowledge to create your own Denim Fox Patch Pattern with confidence. Whether you use it to decorate clothing or as part of a larger craft project, the possibilities are endless. If you enjoyed this tutorial, feel free to share your honest opinion and leave suggestions—your feedback is always valuable and helps inspire future ideas!
