
Star Oklohama Quilt Block Pattern
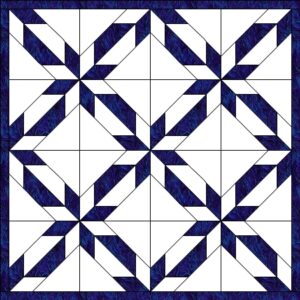
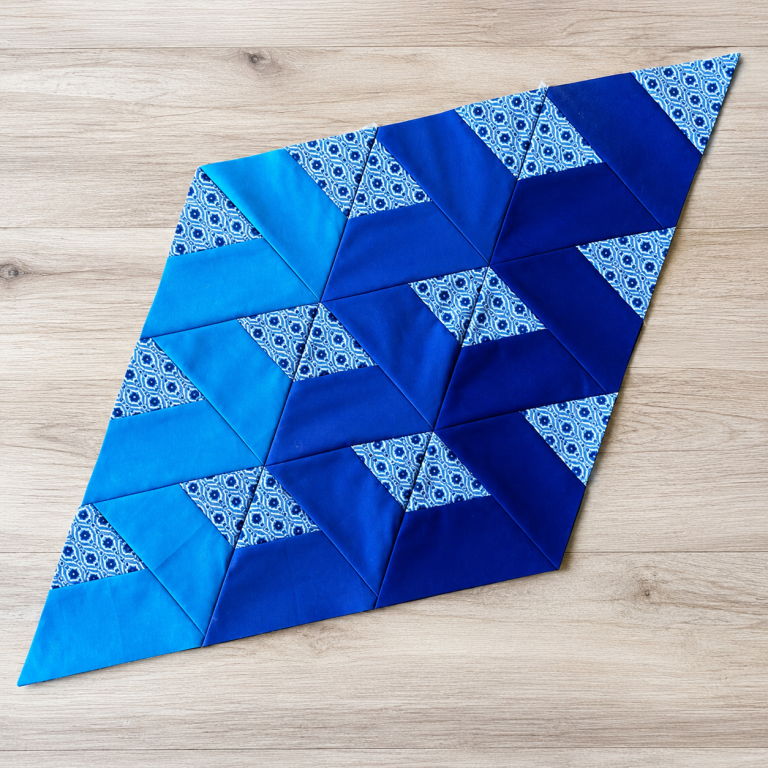
The Hunter Star Quilt Block is a popular and visually striking quilt pattern that combines precision piecing and bold design elements. With its unique star design and intricate arrangement of fabrics, it creates a stunning visual impact in any quilt.
Whether you are an experienced quilter or a beginner looking to dive into a new project, making a Hunter Star Quilt Block is an enjoyable challenge that will elevate your quilting skills. In this guide, we will explore the steps to create a beautiful Hunter Star Quilt and provide you with tips on how to master the quilt pattern.
Quilting is not just about sewing fabric together; it’s a creative process that allows quilters to express themselves through color, design, and technique. The Hunter Star Quilt Block is a perfect example of how different fabrics can come together to form a cohesive, intricate design. It is made up of multiple smaller blocks sewn together, often creating a bold and dynamic star shape at the center of the quilt.
Before you start creating your own Hunter Star Quilt, it’s important to understand the basic elements of this quilt block. The key to making this quilt block successfully is to have an organized approach, focus on the details, and follow a step-by-step process.
With the right instructions and techniques, you’ll be able to craft a stunning Hunter Star Quilt that showcases your quilting talent. Let’s dive into the details of how to make this gorgeous quilt block.
Before you begin, gather the materials needed to create the Hunter Star Quilt Block. Having everything ready will help streamline your process, making the entire quilting experience smoother and more enjoyable.
To make the Hunter Star Quilt Block, you will need several fabric pieces in different colors and sizes. Here is a breakdown of the fabric requirements for one block:
These fabric measurements apply to a single Hunter Star Quilt Block. Depending on the size of your quilt, you will need to repeat this process multiple times. Keep in mind that these measurements can be adjusted based on the final size you want for your quilt.
In addition to fabric, here are the essential tools you will need to make the Hunter Star Quilt Block:
Having all of your materials and tools organized will make the quilting process much easier and more enjoyable.
Now that you have gathered your materials, let’s dive into the process of making a Hunter Star Quilt Block. This quilt block consists of several smaller pieced units that come together to create the final star design. Below is a step-by-step guide on how to make this block.
The first step is to cut the fabric pieces according to the measurements mentioned earlier. You will need to cut:
Ensure that your cuts are as precise as possible. A rotary cutter and quilting ruler will help you achieve clean, straight edges. It’s important to cut your fabric accurately to ensure that your quilt block comes together properly.
The star points are the key feature of the Hunter Star Quilt Block. To make the star points, you will need to sew the accent fabric triangles to the background fabric pieces. Here’s how:
Once all the star points are attached, you should have eight units, each consisting of a background fabric square with an accent triangle sewn on.
Next, create the corner units that will form the points of the Hunter Star. Here’s how:
These corner units will form the outer edges of the Hunter Star Quilt Block, so make sure they are aligned and pressed properly.
The next step is to create the center of the star. Take the 3″ x 3″ fabric square that you cut earlier and place it at the center of the block. Surround this center square with the eight star point units, aligning the edges carefully. This will create the visual effect of a star in the center of your quilt block.
Once the star center and corner units are complete, it’s time to combine all of the pieced sections. Start by sewing the rows of star points and corner triangles together. Then, sew the rows into one large unit. Ensure that the points of the star are aligned perfectly, as this will give your Hunter Star Quilt Block a polished and symmetrical look.
Once your Hunter Star Quilt Block is pieced together, carefully press all seams to remove any creases. Trimming any excess fabric around the edges will help your block maintain its shape and size. You should now have a perfectly constructed Hunter Star Quilt Block ready to be incorporated into your larger quilt design.
Creating a Hunter Star Quilt can be a challenging but rewarding task. Here are a few tips to ensure that your quilt blocks come out beautifully:
Choosing the right fabric for your quilt blocks is essential for a professional-looking finished product. High-quality quilting cottons are the best choice for quilt patterns like the Hunter Star because they are easy to work with and provide a crisp, clean finish.
Precision is key when making intricate quilt blocks like the Hunter Star Quilt Block. Take your time to align fabric pieces carefully and ensure accurate stitching. Rushing through the process may lead to mismatched seams or uneven points.
Pressing your seams after each step will help your quilt blocks stay flat and prevent distortion. It’s also important to press seams in opposite directions where necessary to make joining the blocks easier.
If you’re new to the Hunter Star Quilt Block, consider making a practice block with scrap fabric before cutting into your main fabric. This will give you a feel for the process and help you build confidence before working on your final block.
A quarter-inch seam allowance is standard in quilting and is essential for ensuring that your blocks come together accurately. Be sure to use a quarter-inch foot on your sewing machine to maintain consistent seam allowances.
The Hunter Star Quilt Block can be used in quilts of various sizes. Adjust the dimensions of the block based on your desired quilt size, and remember to account for seam allowances when piecing multiple blocks together.
The Hunter Star Quilt Block is a timeless quilt pattern that offers both a visual impact and a rewarding quilting experience. By following these step-by-step instructions and practicing your skills, you’ll be able to create a beautiful and intricate quilt that showcases your talent. Whether you’re crafting a single Hunter Star Quilt Block or making an entire quilt, the process is sure to bring joy and creativity to your quilting journey.
If you’re new to quilting or looking to expand your skills, the Hunter Star Quilt is a fantastic pattern to try. With the right materials, tools, and techniques, you’ll be able to craft a stunning quilt that you can cherish for years to come. Happy quilting!


