Checkered Tiles Quilt Pattern: A Complete Step-by-Step Guide
Advertising
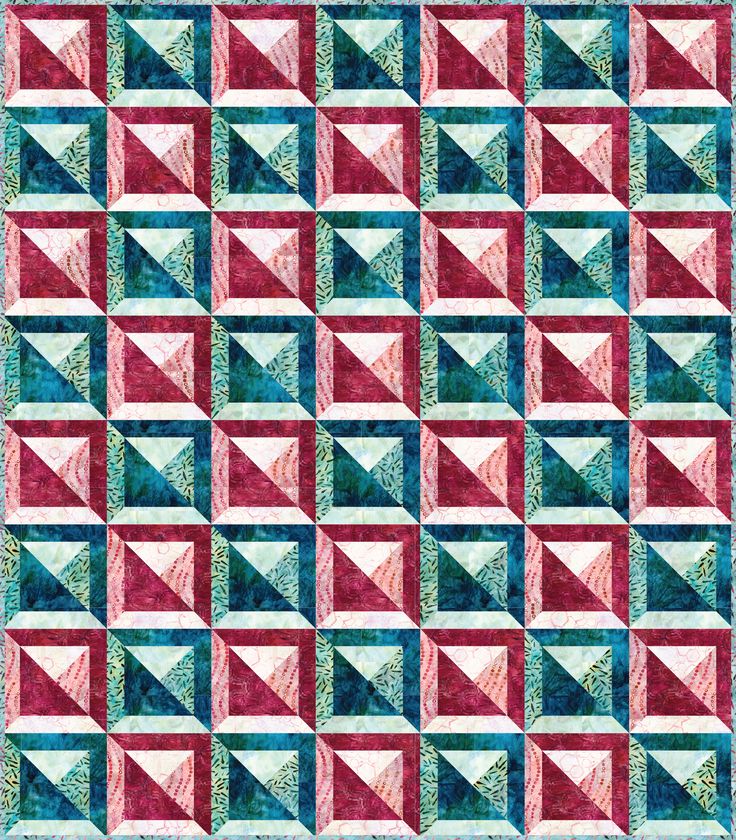
Creating a Checkered Tiles Quilt Pattern is a rewarding project for both beginner and experienced quilters. This classic design, often inspired by traditional tile flooring, brings a timeless charm to any quilt. Whether you’re looking to make a cozy throw or a full-sized bed quilt, mastering this quilt pattern will allow you to craft stunning pieces with a beautiful geometric aesthetic.
The Checkered Tiles Quilt Pattern is versatile and allows for creative fabric choices. You can opt for a monochrome look with black and white fabrics or mix and match vibrant colors to create a more modern and dynamic effect. The key to achieving the perfect checkered look is precise cutting, careful piecing, and a consistent seam allowance.
Advertising
In this detailed guide, you’ll learn step by step how to create a Checkered Tiles Quilt Pattern, including fabric selection, cutting measurements, assembly instructions, and finishing touches. Follow along as we explore each phase of this exciting quilting project.
Choosing the right materials is essential for a successful quilt. The fabric selection will determine the overall look and feel of your quilt pattern, so take your time in picking colors and textures that complement each other.
Fabric Choice: Select two contrasting fabrics to create the checkered effect. Classic options include black and white, but you can experiment with any color combination that suits your style.
Fabric Type: Opt for 100% cotton quilting fabric, as it is easy to work with, durable, and soft.
Measurements: For a lap quilt (50″ x 60″), you will need approximately 2 yards of each fabric. Adjust accordingly if making a larger or smaller size.
Tools Needed: Have a rotary cutter, self-healing cutting mat, quilting ruler, sewing machine, coordinating thread, and an iron ready for precise cutting and sewing.
Backing and Batting: Choose a complementary backing fabric (around 4 yards for larger quilts) and high-quality batting for warmth and softness.
Binding Fabric: You’ll need about ½ yard of fabric for binding to give the quilt a polished and professional finish.
H2: Cutting and Preparing Your Fabric
Proper fabric preparation and cutting are crucial in ensuring that your quilt pieces align correctly. Precision in this step will make the assembly process much smoother.
Advertising
Press the Fabric: Before cutting, iron the fabric to remove any wrinkles. This will help ensure accurate cuts.
Cut the Squares: Using a rotary cutter and quilting ruler, cut 5-inch squares from both fabric choices. You will need a total of 120 squares for a 50” x 60” quilt.
Arrange the Layout: Lay out your fabric squares in a checkerboard pattern, alternating between the two colors.
Check for Consistency: Make sure each row has the correct number of alternating squares and that the pattern remains consistent.
Label the Rows: Use small labels or pins to keep track of each row’s order, preventing any mistakes when sewing them together.
Double-Check Measurements: Ensure that all fabric squares are exactly the same size before proceeding to sewing.
H2: Sewing the Checkered Tiles Quilt Top
Now that you have your fabric squares ready, it’s time to start piecing them together to form the Checkered Tiles Quilt Pattern.
Sewing Rows Together: Start by sewing the squares together row by row with a ¼-inch seam allowance. Press the seams open or to one side to reduce bulk.
Connecting Rows: Once all rows are sewn, join them together by matching the seams precisely. Pinning the intersections will help maintain accuracy.
Press the Seams: Iron the seams flat to ensure the quilt top lays smoothly. This will also make quilting easier.
Trimming: Trim any uneven edges to keep the quilt top neat and square.
Adding a Border (Optional): If you want to frame the design, cut 2.5-inch strips of fabric and sew them around the edges as a border.
Final Pressing: Give the entire quilt top one last press before moving on to the quilting process.
Quilting and Finishing Touches
Once the quilt top is assembled, it’s time to layer, quilt, and bind your Checkered Tiles Quilt Pattern for a finished look.
Layering the Quilt: Lay the backing fabric right side down, place the batting on top, and finally position the quilt top right side up.
Basting: Secure the layers together using safety pins or basting spray to prevent shifting during quilting.
Quilting Design: Choose a quilting pattern that complements the design. Straight-line quilting along the seams enhances the checkered effect.
Trimming Excess Fabric: Once the quilting is complete, trim away any excess batting and backing fabric to align with the quilt top.
Binding the Edges: Cut 2.5-inch strips for the binding, sew them end-to-end, and attach the binding around the quilt’s edges.
Final Pressing and Finishing: Give the quilt a final press and check for any loose threads or unsewn areas before use.
By following this guide, you’ll successfully create a beautiful Checkered Tiles Quilt Pattern that is both stylish and functional. Whether you gift it to a loved one or keep it for yourself, this timeless design will always be a cherished piece in any home. Happy quilting!


