Patchwork Cat Sewing Quilt Pattern

Patchwork Cat Sewing Quilt Pattern is a delightful sewing project that combines the timeless beauty of quilting with the playful charm of a colorful cat design. Whether you are looking to decorate your sewing room, create a handmade gift, or simply enjoy a relaxing quilting project, this adorable design offers endless creative possibilities.
Throughout this guide, you will learn how to create your own Patchwork Cat Sewing Quilt Pattern from start to finish using simple patchwork techniques, accurate cutting, careful piecing, and thoughtful finishing methods.
Creating a Patchwork Cat Sewing Quilt Pattern is much more than sewing fabric pieces together. It is an opportunity to transform colorful fabric scraps into a cheerful piece of textile art. Every square tells its own story, and every print adds personality to the finished cat. Even beginners can successfully complete this project by following each step carefully, while experienced quilters will enjoy customizing colors, textures, and decorative details to make every cat unique.
One of the greatest advantages of this project is its versatility. The finished cat can become a decorative wall hanging, a quilt block for a larger quilt, a pillow front, a nursery decoration, or even a table accent. By carefully selecting coordinating fabrics and paying attention to seam accuracy, you can achieve a polished and professional appearance. Throughout this tutorial, the Patchwork Cat Sewing Quilt Pattern will be explained in detail so that every step is easy to understand and enjoyable to complete.
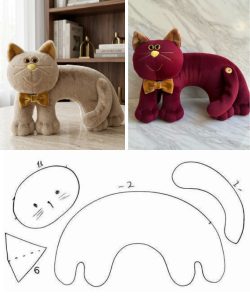
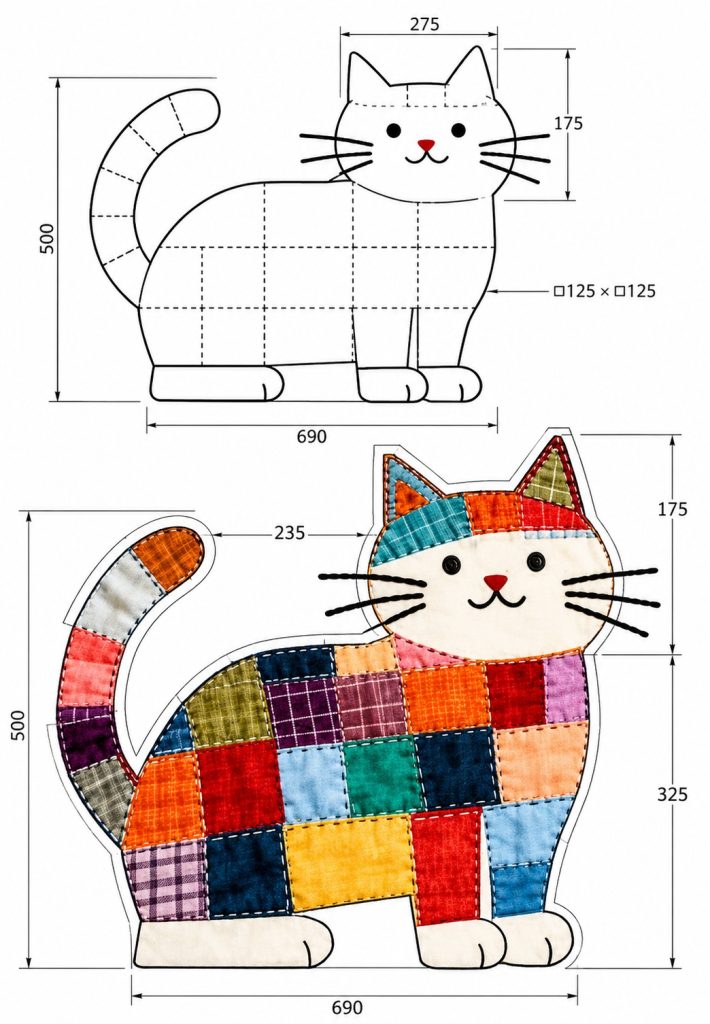
Before cutting any fabric, carefully examine the overall shape of the cat. The body consists of multiple patchwork squares arranged inside a curved silhouette, while the head, ears, legs, and tail are individual sections that complete the design. Understanding how these parts fit together makes construction much easier.
Prepare cotton quilting fabrics in a wide variety of colors and prints. Scrap fabrics work perfectly because the project celebrates colorful patchwork. You will also need batting if creating a quilted piece, backing fabric, lightweight interfacing if desired, coordinating thread, sewing pins or clips, fabric scissors, rotary cutter, quilting ruler, cutting mat, and an iron.
The sample pattern measures approximately 69 cm wide and 50 cm high. The body is divided into approximately 12.5 cm squares before seam allowances. You may resize the template proportionally if you prefer a larger or smaller finished project, but keeping the squares consistent will simplify assembly.
Print or draw the full-size template. Transfer the outline onto template plastic or sturdy cardstock for repeated use. Mark the locations of the head, ears, body, tail, legs, and facial features to keep everything aligned during assembly.
Organize your fabric pieces before sewing. Arrange colors across the body until you achieve a balanced composition. Alternate dark and light fabrics while mixing solids, florals, plaids, and textured prints. This prevents similar colors from clustering together.
Press every fabric before cutting. Flat fabric produces more accurate pieces, improves seam matching, and helps maintain the clean geometric appearance that makes patchwork so attractive.
Begin by cutting enough fabric squares to fill the entire body area shown in the template. Include a ¼-inch seam allowance around every square. If using the measurements shown in the illustration, maintain consistent dimensions for each block to ensure proper alignment.
Lay all the squares on a flat design surface before sewing. Rearrange colors until the overall appearance feels balanced. Bright fabrics near darker prints create visual contrast, while repeating a few colors throughout the body helps unify the design.
Sew the squares together row by row using a standard ¼-inch quilting seam allowance. After completing each row, press the seams carefully. Alternate the pressing direction between rows so the seam intersections nest together neatly.
Join the completed rows one at a time, matching every seam intersection as accurately as possible. Pin the intersections before stitching to prevent shifting. This simple step greatly improves the finished appearance of the quilted cat.
Once the patchwork panel is complete, press the entire section from the back, then lightly from the front using a pressing cloth if needed. The finished rectangle will become the foundation from which the cat body is cut.
Place the body template over the completed patchwork panel and position it until the arrangement of colors looks pleasing. Trace around the template, then carefully cut the body shape using sharp fabric scissors or a rotary cutter for smooth curves.
Cut the head from a light cream or ivory fabric to highlight the embroidered facial features. Add lightweight interfacing to the back if additional stability is desired, especially for wall hangings or decorative pieces.
Create the ears using contrasting fabrics. The outer ears may coordinate with the body colors, while the inner ears can feature soft orange, pink, or another accent color. Stitch the ear pieces together before attaching them to the head.
Construct the tail using several patchwork segments similar to those shown in the illustration. Piece the curved sections individually before joining them into the complete tail. Carefully clip seam allowances along the curves to reduce bulk.
Cut the four legs from coordinating cream fabric or another neutral color. Slight curved stitching lines near the paws can create simple toe details. These small additions help bring the finished cat to life without requiring advanced embroidery skills.
Prepare the facial features separately. Black safety eyes, embroidered eyes, or fabric appliqué circles all work beautifully. Embroider the nose using red thread and create the smiling mouth with black embroidery floss using small back stitches.
Finish the whiskers using black embroidery thread, thick cotton thread, narrow cord, or stitched fabric strips. Position them evenly on both sides of the face before securing them permanently with careful hand stitching or machine stitching.
After assembling the entire cat, layer the quilt top with batting and backing fabric if creating a quilted project. Smooth every layer carefully to eliminate wrinkles before pinning or basting.
Quilt around the patchwork squares using straight-line quilting or stitch-in-the-ditch techniques. Additional decorative quilting can follow the outline of the cat, emphasizing its playful silhouette while securing all layers together.
Trim the batting and backing after quilting. If creating a standalone decorative cat, finish the edges with a narrow binding, satin stitch, or carefully sewn turned edge depending on your preferred style and intended use.
For wall décor, sew a hanging sleeve onto the back before attaching the final binding. If making a pillow, incorporate the finished cat panel into a pillow front with a coordinating fabric back and concealed zipper closure.
Personalize your Patchwork Cat Sewing Quilt Pattern by adding embroidered flowers, bows, tiny buttons, decorative stitching, or appliqué hearts. These details allow every finished cat to reflect your own creative style while maintaining the original design.
Take time to inspect every seam, trim loose threads, give the project one final press, and enjoy your finished creation. Proper finishing techniques ensure the quilt remains attractive, durable, and ready to display or gift for many years.
Is this project suitable for beginners?
Yes. Anyone with basic sewing machine experience and knowledge of a ¼-inch seam allowance can complete this project by working carefully through each stage.
What type of fabric works best?
100% quilting cotton is the most popular choice because it is stable, easy to sew, presses well, and is available in countless colors and prints.
Can I use fabric scraps?
Absolutely. Scrap fabrics are one of the biggest advantages of this project and help create the colorful patchwork appearance shown in the design.
How do I keep the squares lined up correctly?
Accurate cutting, consistent seam allowances, careful pressing, and pinning seam intersections before sewing all contribute to perfect alignment.
Can I resize the pattern?
Yes. Simply enlarge or reduce the template proportionally while maintaining the same relative proportions throughout the design.
What can I make with this cat pattern?
The finished design works beautifully as a wall hanging, pillow cover, table decoration, nursery décor, tote bag panel, quilt block, or decorative gift.
Should I quilt the finished project?
Quilting is recommended because it stabilizes the layers, enhances durability, and adds beautiful texture, although decorative appliqué versions can also be made without batting.
How should I wash the finished quilt?
Wash gently using cold water and mild detergent. Air drying or low-temperature drying helps preserve the fabrics and stitching for years of enjoyment.
The Patchwork Cat Sewing Quilt Pattern is a joyful quilting project that combines colorful patchwork, simple sewing techniques, and creative expression into one charming design. Throughout this guide, you learned how to prepare materials, organize the fabric layout, piece the patchwork body, construct the individual sections, assemble the cat, quilt the finished project, and add the final decorative details. By working carefully and taking your time with each step, you can create a beautiful handmade piece that reflects your own style while practicing valuable quilting skills.
Whether you display your finished cat in your sewing room, gift it to a fellow quilting enthusiast, or incorporate it into a larger quilt, this project celebrates creativity and the timeless beauty of patchwork. If you enjoyed this tutorial, please leave your honest opinion in the comments and share your suggestions. Your feedback and creative ideas may inspire future sewing and quilting projects for everyone who loves handmade crafts.