Spiral Sunburst Quilt Pattern

The Sunburst Necktie Quilt Pattern is a creative quilting project that transforms vintage neckties into a stunning work of textile art. Instead of allowing old ties to remain forgotten in drawers or closets, this pattern gives them a brand-new purpose by arranging them into a dramatic sunburst design.
The result is a unique quilt that combines memories, color, texture, and craftsmanship into one impressive decorative piece. Whether the neckties belonged to family members or were collected from thrift stores, every tie contributes its own personality to the finished quilt.
Creating a Sunburst Necktie Quilt Pattern is much more than sewing fabric together. It is about preserving stories while practicing quilting techniques that improve precision and creativity. The radiating arrangement creates movement across the quilt surface, making every tie stand out while blending into the larger design. Because every collection of neckties is different, no two quilts will ever be exactly alike. That originality is one of the reasons this project has become so popular among quilting enthusiasts.
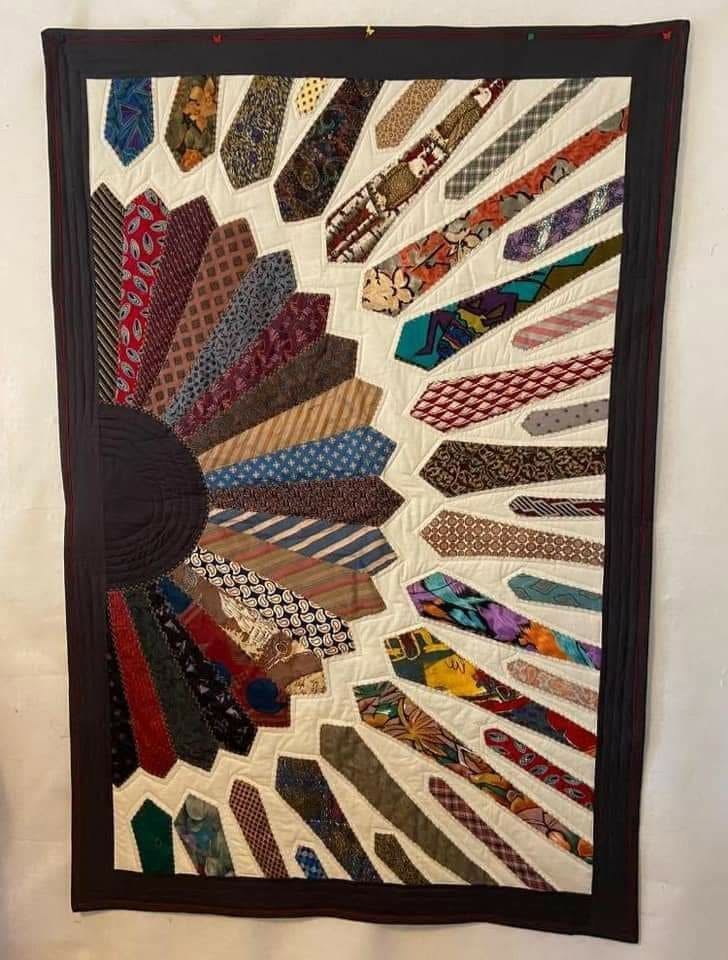
Another advantage of this project is that it is suitable for quilters who enjoy upcycling materials into beautiful home décor. Old silk, polyester, and cotton neckties introduce textures and prints that are difficult to reproduce with standard quilting fabric. By carefully selecting colors and arranging them in a balanced composition, you can create a spectacular wall hanging that becomes the focal point of any room. Throughout this tutorial, you will learn every important step needed to complete your own Sunburst Necktie Quilt Pattern from beginning to end.
Begin by collecting approximately 40 to 60 neckties, depending on the size of your quilt. Ties with different colors, patterns, and textures produce the richest visual effect. Mixing solids, stripes, florals, geometric prints, and vintage fabrics creates a dynamic sunburst appearance.
Inspect every tie carefully before using it. Remove the stitching on the back, take out the interfacing, and gently press the fabric flat using the proper temperature for each fiber. Silk ties should be pressed carefully with a pressing cloth to avoid shine.
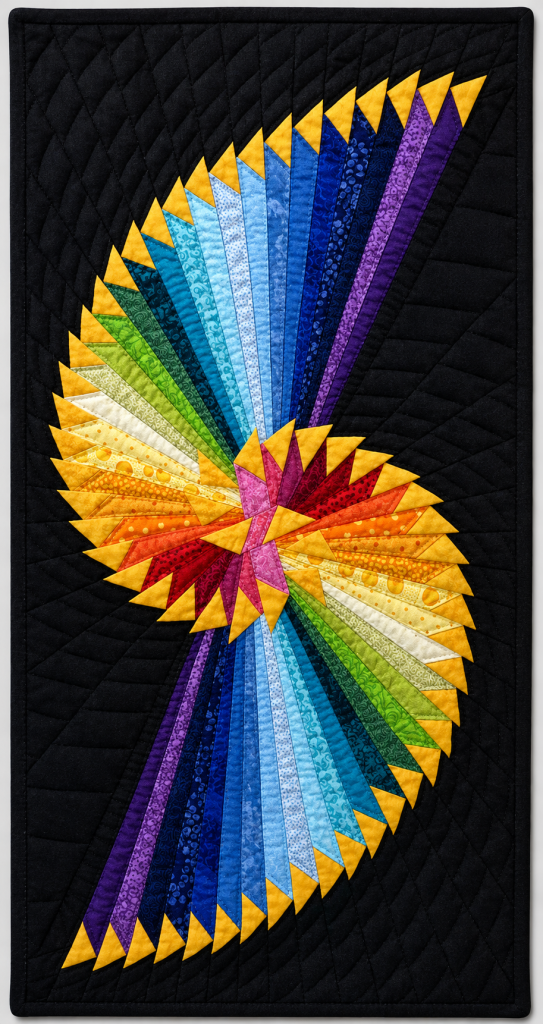
Prepare a sturdy background fabric. A light cream, ivory, or white background helps the colorful ties stand out dramatically, just like the example shown in the project photo. Cotton quilting fabric works especially well because it remains stable during sewing.
Choose a border fabric that frames the design. A dark brown, black, or navy border creates contrast and gives the finished quilt a polished appearance. Wide borders also help emphasize the radiating pattern.
Gather standard quilting tools including a rotary cutter, quilting ruler, cutting mat, pins, fabric clips, sewing machine, quilting thread, and iron. Having everything ready before starting keeps the project organized.
Before cutting the ties, sort them by color families. Creating small groups of warm colors, cool colors, neutrals, and bold prints makes the layout process much easier later.
After pressing the neckties, trim away any damaged sections while preserving as much usable fabric as possible. Most ties already have a tapered shape, making them ideal for creating sunburst rays with minimal trimming.
Cut your background fabric slightly larger than the planned finished quilt size. Mark the center point because this will become the origin of the entire sunburst arrangement.
Begin placing the widest neckties near the center of the quilt. Position each tie so the pointed end extends outward like a ray of sunlight. Rotate each piece slightly to create even spacing between neighboring ties.
Continue adding ties around the center until a complete circle begins to form. Alternate colors, prints, and textures so that similar designs are not grouped together. This creates visual balance across the quilt.
As you expand outward, fill the spaces between larger ties with narrower neckties. These smaller rays help complete the circular effect while preventing large empty gaps in the background fabric.
Step back frequently and evaluate the overall composition. Rearranging a few ties before sewing often improves color balance and creates a stronger visual impact. Taking a photograph of the layout can also help identify areas that need adjustment.
Once you are satisfied with the arrangement, begin attaching one tie at a time. Start from the center and gradually work toward the outside edge. This method prevents shifting during construction.
Pin each tie securely before sewing. Stitch close to both long edges using matching thread so the stitching blends naturally into the fabric. If preferred, decorative topstitching can add additional texture.
Continue attaching every tie individually while maintaining equal spacing between each ray. Consistent spacing is one of the details that gives the Sunburst Necktie Quilt Pattern its professional appearance.
Where several ties meet in the center, carefully overlap the wide ends to create a smooth circular shape. Covering the center with a fabric circle, appliqué piece, or decorative quilting can create an attractive finished focal point.
After every tie has been sewn, trim the quilt top so all outer edges become square. Add the border strips by sewing the side borders first, followed by the top and bottom borders. Press every seam flat after stitching.
Layer the quilt top with batting and backing fabric. Baste all three layers together using safety pins or temporary spray adhesive before quilting. This keeps the layers stable during the quilting process.
Choose quilting lines that complement the sunburst effect. Echo quilting around each tie creates depth, while straight-line quilting across the background adds texture without distracting from the design.
Quilt slowly around the pointed ends of the ties. Gentle curves and carefully controlled stitching help maintain smooth fabric without puckering, especially when working with silk neckties.
Trim away any excess batting and backing after quilting is complete. Check that all edges remain square before preparing the binding.
Create binding strips from coordinating fabric. Fold, press, and attach the binding around the entire quilt using your preferred quilting method. Neatly finished corners give the quilt a refined appearance.
Press the finished quilt one final time and inspect every seam for loose threads. Add a quilt label to the back if desired, including the date and any information about the neckties used in the project. This personal touch transforms the quilt into a meaningful keepsake.
Finally, hang the quilt where natural light can highlight the beautiful variety of colors and textures. Because every necktie has its own history, your finished Sunburst Necktie Quilt Pattern becomes not only a decorative piece but also a conversation starter that celebrates creativity, sustainability, and family memories.
What fabrics work best for a Sunburst Necktie Quilt Pattern?
Silk neckties are the most traditional choice because they provide rich colors and elegant textures. However, polyester, cotton, wool, and blended neckties can also produce beautiful results.
Do I need to stabilize silk neckties?
Yes. Lightweight fusible interfacing helps stabilize delicate silk and prevents stretching while sewing.
Can beginners make this quilt?
Absolutely. Although careful layout takes time, the sewing techniques are straightforward and suitable for confident beginners who have basic quilting experience.
How many neckties are needed?
The number depends on the finished size, but most wall-hanging versions use between 40 and 60 neckties.
Can I wash the finished quilt?
Hand washing or professional cleaning is recommended, especially if the quilt includes vintage silk neckties.
How do I choose the color arrangement?
Alternate dark and light colors while distributing bold prints evenly throughout the design. This creates balance and highlights the radiating sunburst effect.
Can I add decorative quilting?
Yes. Free-motion quilting, echo quilting, or gentle curved quilting all enhance the finished appearance without overpowering the necktie design.
Is this project suitable for memory quilts?
Yes. Many quilters create this pattern using neckties from loved ones, making it a meaningful keepsake filled with sentimental value.
Video Tutorial:
The Sunburst Necktie Quilt Pattern is an inspiring quilting project that combines creativity, sustainability, and storytelling into a single handmade masterpiece. Throughout this tutorial, you learned how to select and prepare neckties, organize an eye-catching sunburst layout, sew each piece securely, assemble the quilt top, add quilting and borders, and finish the project with professional binding techniques. By following each step carefully, you can transform a collection of old neckties into a striking wall quilt that is both decorative and deeply personal.
Every finished Sunburst Necktie Quilt Pattern is unique because the combination of colors, fabrics, and memories can never be duplicated. Whether you create it as a family heirloom, a thoughtful gift, or a beautiful piece of home décor, this project celebrates the art of quilting while giving cherished materials a meaningful new life.
If you enjoyed this tutorial, please leave your honest opinion about the project and share your suggestions. Your feedback and creative ideas may inspire other quilters and help make future quilting tutorials even more useful and enjoyable.