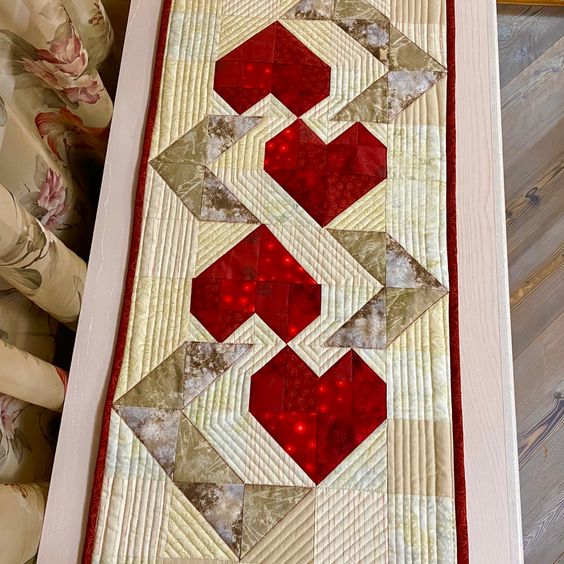
Heart Quilted Table Runner: A Beautiful DIY Project
Advertising
Creating a Heart Quilted Table Runner is a wonderful way to add charm and warmth to your home decor. Whether you are an experienced quilter or just starting, this project is both fun and rewarding. With its beautiful heart design, it makes the perfect accent for Valentine’s Day, anniversaries, or any time you want to bring a little extra love into your space.
This quilting project combines creativity and precision, allowing you to experiment with different quilt patterns and fabric combinations. The end result is a stunning handmade piece that showcases your craftsmanship. The Heart Quilted Table Runner also makes a thoughtful gift for friends and family who appreciate handmade decor items.
Advertising
In this guide, we’ll walk you through the entire process, from choosing the right materials to assembling and finishing your table runner. We’ll cover step-by-step instructions, fabric measurements, and tips to make the quilting process easier. Let’s get started!
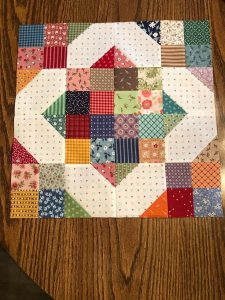
Image from google
Choosing Materials for Your Heart Quilted Table Runner
To create a beautiful Heart Quilted Table Runner, selecting the right fabrics and tools is essential. High-quality cotton fabrics in coordinating colors will ensure a polished look and durability.
Fabric Selection – Choose a mix of solid and patterned fabrics that complement each other. Reds, pinks, and whites are traditional for heart-themed quilts, but feel free to experiment.
Batting – A lightweight cotton batting will provide softness and structure to your quilted table runner.
Thread – Use high-quality cotton thread in a matching or contrasting color to enhance the quilting design.
Cutting Tools – A rotary cutter, self-healing cutting mat, and quilting ruler will help you achieve precise fabric cuts.
Sewing Machine – A basic sewing machine with a quilting foot is ideal for this project, but you can also quilt by hand if preferred.
Iron and Pins – Pressing your fabric pieces as you sew will ensure crisp seams, while pins help hold everything in place.
Cutting and Preparing Fabric Pieces
Before sewing, carefully measure and cut your fabric pieces. Precision is key to achieving a neat and symmetrical design.
Main Heart Blocks – Cut 4 squares of fabric in red or pink, each measuring 6” x 6”.
Background Fabric – Cut 8 squares of white or light-colored fabric, each measuring 6” x 6”.
Border Strips – Cut two long strips (4” x 40”) and two shorter strips (4” x 14”) for the borders.
Binding Strips – Cut strips measuring 2.5” wide to create the quilt binding.
Batting and Backing – Cut both slightly larger than your quilt top to allow for adjustments.
Pressing and Arranging – Lay out your pieces in the desired quilt pattern and press them with an iron before sewing.
Sewing the Heart Quilt Blocks
Now that your fabric pieces are ready, it’s time to assemble the heart blocks. This step requires careful stitching and pressing.
Creating the Half-Square Triangles – Take each 6” x 6” red or pink fabric square and pair it with a white fabric square. Draw a diagonal line on the back of the white square and sew ¼” away from each side of the line.
Cutting the Triangles – Cut along the drawn line to create two half-square triangles from each pair. Press the seams open.
Assembling the Heart Shape – Arrange the half-square triangles in a heart shape, making sure the colors align properly.
Sewing the Blocks Together – Sew the pieces row by row, pressing seams as you go to keep everything flat.
Joining the Heart Blocks – Once all the heart blocks are complete, sew them together with sashing strips in between to create the full runner.
Adding the Borders – Attach the border strips to frame the quilted table runner and provide a finished look.
Quilting and Binding the Table Runner
The final steps involve layering, quilting, and binding your Heart Quilted Table Runner to complete the project.
Advertising
Layering the Quilt Sandwich – Place the backing fabric right side down, followed by the batting, and then the quilt top facing up.
Basting the Layers – Use safety pins or basting spray to hold all layers together before quilting.
Quilting the Design – Quilt along the seams or create free-motion quilting designs to enhance the overall look.
Trimming Excess Fabric – Trim any extra batting or backing fabric to align with the quilt top.
Attaching the Binding – Sew the binding strips to the edges of the quilt, folding them over to create a clean finish.
Final Pressing and Finishing Touches – Give your table runner a final press and check for any loose threads or uneven stitches.
By following these steps, you will create a stunning Heart Quilted Table Runner that adds a handmade touch to your home. This project is a great way to practice quilting techniques while making something meaningful. Try different quilt patterns and colors to personalize your creation!


