
Star Oklohama Quilt Block Pattern
The Bubble Pod Container Quilt is an innovative and adorable quilting project that combines functionality with charm. Whether you are looking to create practical storage pods or simply want to explore a fun quilting technique, this pattern is perfect for quilters of all levels. In this guide, you’ll learn everything you need to know to make your own Bubble Pod Container Quilt, from fabric cuts to step-by-step assembly instructions.
This quilting project is not just beautiful but also highly functional. The Bubble Pod Container Quilt allows you to craft soft, padded containers that can hold sewing tools, notions, or even small household items. Its bubbly, rounded shape gives it a unique aesthetic appeal that stands out from ordinary fabric containers.
In this comprehensive guide, we will walk you through the materials you’ll need, detailed fabric measurements, and each step involved in making your own Bubble Pod Container Quilt. This article is designed to be beginner-friendly but detailed enough to satisfy experienced quilters as well. Let’s dive in!
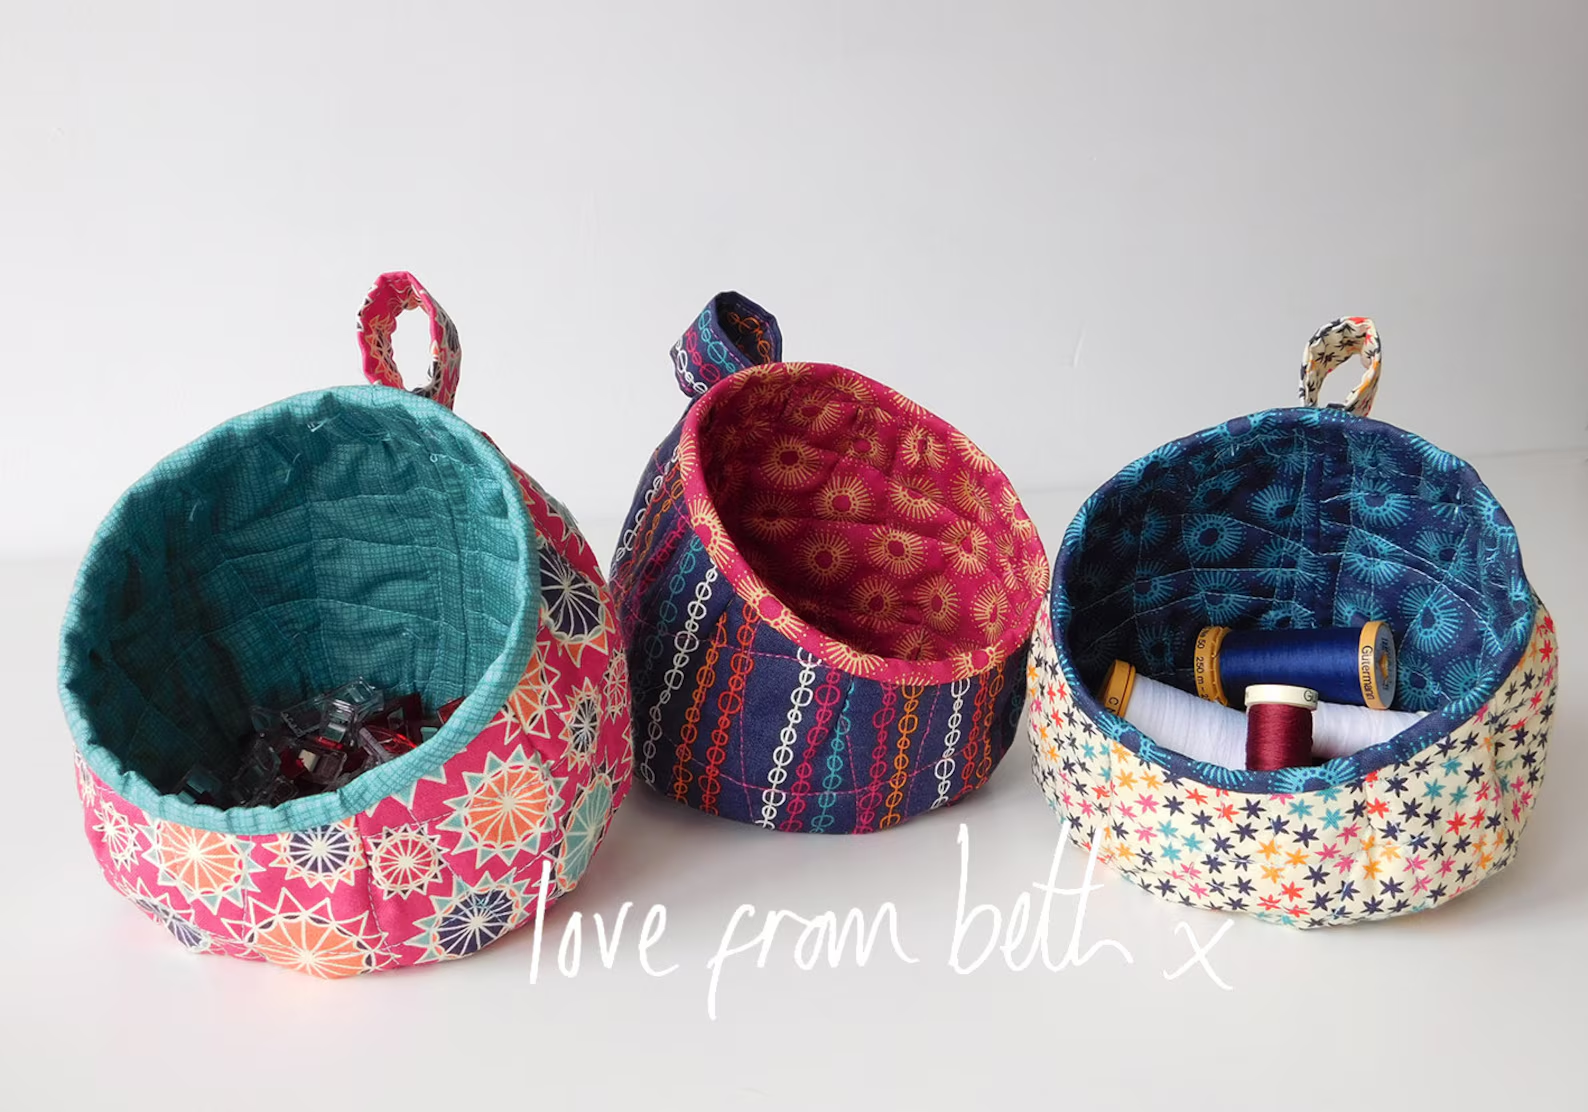
The Bubble Pod Container Quilt is a quilted storage container shaped like a soft pod, designed with a quilted bubble effect that provides both structure and decoration. These pods are often used for organizing craft supplies, home decor, or even gifting.
The charm of the Bubble Pod Container Quilt comes from its 3D, padded structure that feels sturdy yet soft. The quilted bubbles add both aesthetic appeal and functionality by providing cushioning and durability to the pod.
This project is great for using up fabric scraps, experimenting with different textures, or creating coordinated sets of storage containers. Whether you want a minimalist style or a colorful patchwork, the Bubble Pod Container Quilt adapts easily to your taste.
One of the biggest advantages of this pattern is that it combines quilting with basic bag-making techniques. This means you get to enjoy the creativity of quilting while ending up with a practical item.
These quilted pods are lightweight but sturdy, thanks to the batting and quilting techniques used. You can easily adjust the size depending on your storage needs or the space where you want to place them.
Creating a Bubble Pod Container Quilt is not just about sewing—it’s about crafting something unique, useful, and visually delightful. Let’s move on to the materials and cuts you’ll need.
To successfully create a Bubble Pod Container Quilt, you’ll need to prepare your materials carefully. Accurate fabric cuts and the right materials are essential for the perfect finish.
Start by selecting high-quality quilting cotton for the outer fabric. You can go for solids, prints, or even mix them for a patchwork effect. For the inner lining, choose a complementary fabric that is smooth and sturdy.
You’ll also need batting to create the bubble effect. A medium to high-loft polyester batting works best as it gives the necessary puffiness to the quilted sections of your pod.
Here are the precise fabric cuts and measurements for one medium-sized Bubble Pod Container Quilt:
Make sure to also have matching thread, quilting pins or clips, fabric marker, and your sewing machine set up with a walking foot for quilting.
It’s always a good idea to cut your pieces slightly larger and trim them after quilting to ensure perfect alignment and clean edges.
These measurements can be adjusted to create smaller or larger pods based on your needs. Just scale each piece proportionally.
Now that your fabric is cut and prepared, let’s start the exciting part—assembling your Bubble Pod Container Quilt.
The first part of making the Bubble Pod Container Quilt is creating the quilted panels. This step gives the pod its distinctive bubbly texture and padded strength.
Start by making a quilt sandwich for each panel. Place the lining fabric right side down, batting in the middle, and outer fabric right side up. Pin or clip the layers together securely.
Use a fabric marker to draw a quilting grid on the outer fabric. A simple 2” x 2” grid works perfectly for creating the bubble texture. You can also experiment with diagonal lines or circular patterns if desired.
Sew along the marked lines using your walking foot. This is where the magic happens—the batting puffs up between the stitched lines, creating the bubbly quilted texture that defines the Bubble Pod Container Quilt.
Once the quilting is complete, trim the quilted panels to ensure clean edges. Each panel should now measure exactly 13.5” x 9.5”.
Repeat the same process for the bottom circular piece. Create a quilt sandwich with the outer circle, batting circle, and lining circle, then quilt it with concentric circles or radiating lines.
If desired, you can add decorative stitching or free-motion quilting to enhance the design. This is your chance to personalize the Bubble Pod Container Quilt.
With the panels quilted and trimmed, you’re ready to move on to assembling the pod structure.
Begin the assembly by taking the two quilted panels and placing them right sides together. Sew along the side and bottom edges with a ¼” seam allowance, leaving the top open.
Now it’s time to create the curved pod shape. Align the bottom circular quilted piece with the bottom opening of the rectangular body. Pin it carefully, easing the fabric around the curve.
Sew the bottom circle to the body using a ¼” seam allowance. Take your time with this step—curves require patience to avoid puckering.
Turn the pod right side out and check the seams. If everything looks good, you can proceed to attach the lining. Repeat the same steps with the lining pieces but leave a small gap in the bottom seam for turning later.
Insert the lining pod into the outer quilted pod, right sides together. Align the top edges and sew around the top opening with a ¼” seam allowance.
Pull the outer pod through the gap left in the lining. Stitch the gap closed by hand or with a machine, then tuck the lining into place.
Finish the top edge with a binding strip. Fold the binding over the raw edge, and stitch it in place neatly. This gives the Bubble Pod Container Quilt a professional look.
If you want your Bubble Pod Container Quilt to be portable, adding a handle is a great option. Take the 3” x 10” strip, fold it lengthwise right sides together, and sew along the edge.
Turn the handle right side out, press it flat, and topstitch along both edges for strength. Pin the handle to the inside of the pod’s top edge before attaching the binding.
Secure the handle by sewing it into the binding seam or with reinforced stitches separately. Make sure it is centered and evenly placed for balance.
Check all seams for strength. Since the Bubble Pod Container Quilt is designed to hold items, double-stitching critical points like the handle and bottom seams is recommended.
At this stage, you can also personalize your pod with labels, buttons, or decorative charms. This adds a custom touch to your Bubble Pod Container Quilt.
Press the entire pod carefully, shaping the curves and smoothing out the seams. This gives your finished project a crisp and professional appearance.
Your Bubble Pod Container Quilt is now complete and ready to be used for organizing or gifting. Enjoy the satisfaction of a functional quilted creation!
What is the best fabric for the Bubble Pod Container Quilt?
Quilting cotton is the best choice for both the outer and lining fabrics because of its durability and ease of quilting.
Can I make the Bubble Pod Container Quilt in different sizes?
Yes! Simply adjust the measurements proportionally to make larger or smaller pods to fit your needs.
What type of batting works best for this project?
A medium to high-loft polyester batting works best as it creates the puffiness needed for the bubble effect.
Is this pattern beginner-friendly?
Absolutely. The Bubble Pod Container Quilt uses basic quilting and sewing techniques suitable for beginners, with some practice on sewing curves.
How do I clean the finished pod?
The pod is machine washable on a gentle cycle, but spot cleaning is recommended to maintain its shape and quilting texture.
Can I sell items made from this pattern?
Yes, handmade Bubble Pod Container Quilts can be sold as long as you create them yourself and not for mass production.
The Bubble Pod Container Quilt is a delightful project that merges creativity with practicality. With its unique bubble texture and functional design, it’s perfect for organizing, gifting, or adding a charming touch to your home decor. This step-by-step guide has walked you through fabric choices, accurate cuts, and the detailed process of making your own pod.
Now it’s your turn! Try making a Bubble Pod Container Quilt in your favorite fabrics and colors. Have questions, suggestions, or want to share your creations? Leave a comment below—I’d love to hear from you!

