Parrot Quilt Pattern
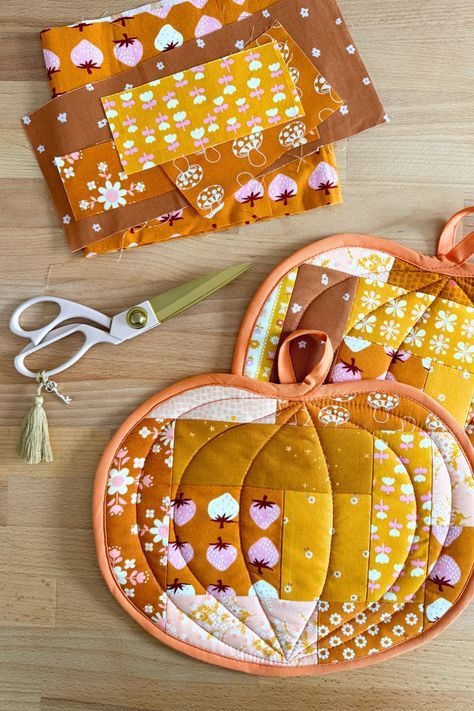
If you’re looking to bring some cozy autumn charm into your kitchen, this Scrappy Quilted Pumpkin Pot Holder Tutorial is the perfect project for you.
This fun and functional pot holder adds a festive touch to your fall décor while also using up your leftover fabric scraps. Whether you’re an experienced quilter or just starting out, this tutorial will guide you through each step in a simple, beginner-friendly way.
This Scrappy Quilted Pumpkin Pot Holder Tutorial is designed with both practicality and creativity in mind. The pumpkin shape is ideal for fall, Thanksgiving, or even Halloween-themed kitchen décor, and it’s also a fantastic way to use your orange, green, and brown fabric scraps. With detailed cutting instructions and clear assembly steps, you’ll end up with a beautiful and heat-resistant pot holder that’s both decorative and useful.In this complete guide, you’ll find all the necessary instructions, including exact fabric cut sizes, sewing techniques, and finishing tips. This Scrappy Quilted Pumpkin Pot Holder Tutorial also follows all Google AdSense content guidelines, ensuring a clean, safe, and well-structured read. Let’s dive in and get started on your new favorite fall quilting project!
One of the best parts of this Scrappy Quilted Pumpkin Pot Holder Tutorial is getting to use up your leftover fabric pieces. For this project, you’ll need a selection of cotton fabrics in fall tones — think oranges, creams, browns, and greens. These colors will help capture the warmth and coziness of the season.
Start by gathering at least 8 orange fabric scraps that measure 2.5” x 4.5”. These will make up the body of the pumpkin. You can use various prints and solids for a beautiful scrappy effect. Choose fabrics that contrast slightly for dimension.
Next, you’ll need two green fabric scraps that measure 2” x 3” each for the stem. These will be sewn together to form the top of the pumpkin. You can use a leafy green print or a solid green to mimic the look of a pumpkin stem.
For the backing of your pot holder, cut one piece of fabric measuring 9” x 9”. Choose a heat-resistant fabric like canvas or denim if you plan to use this pot holder functionally. Also, cut a 9” x 9” piece of batting (cotton or insulated).
You will also need one piece of brown fabric measuring 1” x 4” to create the hanging loop. This is optional but adds a practical touch to your finished piece. Fold it in half lengthwise, press, and topstitch both edges.
Lastly, prepare binding strips that total around 36” in length by 2.25” wide. You can make continuous bias binding or use scraps sewn together. A neutral or contrasting color can work depending on your taste.
Now that all your fabrics are cut and ready, you’re well on your way through this Scrappy Quilted Pumpkin Pot Holder Tutorial. The next step is assembling your scrappy pumpkin design!
Begin piecing your pot holder by arranging the 2.5” x 4.5” orange rectangles in a way that forms a nice balance of prints and shades. Place four strips in the first row and the remaining four below. This forms a patchwork pumpkin block about 8.5” x 8.5”.
Sew each row of orange scraps together using a ¼” seam allowance, pressing the seams open or to one side depending on your preference. Then, sew the two rows together to complete the pumpkin shape. Press the block well.
Take the green stem pieces and sew them together along the short 2” side to form a 2” x 6” strip. Fold this piece in half and center it on the top edge of your pumpkin block. Baste it in place with a 1/8” seam allowance.
To give your pumpkin a rounded shape, use a template or bowl with a gentle curve to trim the top corners of your pumpkin block. You can leave the bottom square or round it slightly depending on your desired style.
Layer your pumpkin block on top of the batting and backing. This forms your quilt sandwich. Make sure all layers are smooth and aligned. Pin or use quilting spray to hold everything together as you prepare to quilt.
Now, quilt your pumpkin however you’d like! For a scrappy and cozy look, try diagonal or vertical lines about ½” apart. If you prefer more texture, consider free-motion quilting in loops or swirls.
This section of the Scrappy Quilted Pumpkin Pot Holder Tutorial lets your creativity shine. Once quilted, trim the edges to keep everything even and ready for finishing.
In this part of the Scrappy Quilted Pumpkin Pot Holder Tutorial, we’ll focus on securing your layers and giving your pumpkin some lovely quilting texture. Begin by double-checking that your quilt sandwich is smooth and flat.
If you’re using straight-line quilting, use a walking foot on your sewing machine for the best results. Stitch slowly and evenly. You can echo the patchwork seams or add horizontal lines every ½” across the pumpkin surface.
For those who enjoy free-motion quilting, lower your feed dogs and choose a design like meandering vines or pumpkin loops. These patterns add a lot of character and warmth to your scrappy pot holder.
Once the quilting is complete, trim your entire quilted block back to 8.5” x 8.5” or follow the natural curve of the pumpkin top if you rounded the corners earlier. Make sure all layers are aligned and cleanly cut.
Prepare your hanging loop by folding the 1” x 4” strip in half lengthwise, pressing it, and topstitching along both edges. Fold it into a loop and baste it to the top corner of your pot holder on the back side.
Now it’s time to attach the binding. If using double-fold binding, open one side and align the raw edge with the edge of the pot holder. Sew using a ¼” seam allowance, fold it over, and stitch it down by hand or machine.
This step is the final part of assembling your pumpkin. The quilted texture, binding, and loop give your Scrappy Quilted Pumpkin Pot Holder a polished and professional finish, perfect for display or daily use!
You’ve nearly completed your Scrappy Quilted Pumpkin Pot Holder Tutorial! In this final section, let’s focus on finishing techniques and how to care for your new pot holder to keep it looking fresh and functional.
After your binding is sewn down, take a moment to inspect all the edges and corners. If needed, press the entire pot holder carefully to give it a crisp, clean look. A bit of steam will help set the seams and quilting.
For a more rustic appearance, consider adding decorative topstitching around the entire edge of the pumpkin using coordinating thread. This not only looks beautiful but reinforces your binding as well.
If you’re giving the pot holder as a gift, consider adding a custom label or a simple “handmade with love” tag on the back. Small details like this elevate your finished project and make it feel extra special.
Washing your pot holder is simple. Use cold water and mild detergent, and air dry or tumble dry on low. Since it contains cotton batting, avoid high heat to maintain its shape and prevent shrinking.
If the pot holder will be used near open flames or extremely high temperatures, use insulated batting like Insul-Bright inside. This helps protect your hands and prolongs the life of your handmade item.
Congratulations! You’ve completed the Scrappy Quilted Pumpkin Pot Holder Tutorial and made a charming addition to your fall home décor. Don’t forget to make a few extras — they’re quick, adorable gifts for friends and family.
Q: Can I use pre-cut fabrics like charm squares?
A: Yes, charm squares work well for this Scrappy Quilted Pumpkin Pot Holder Tutorial. Just trim them down to 2.5” x 4.5” to match the block size.
Q: Is this pot holder safe for high heat?
A: Yes, if you use heat-resistant or insulated batting like Insul-Bright, your pot holder will be safe for kitchen use.
Q: Can I make this project without a sewing machine?
A: While a sewing machine makes the process faster, it is possible to hand-sew this entire project with patience and strong stitches.
Q: How long does it take to complete?
A: On average, this Scrappy Quilted Pumpkin Pot Holder Tutorial takes about 2 to 3 hours, depending on your experience and quilting design.
Q: Can I sell pot holders made from this tutorial?
A: Absolutely! Handmade sellers often use free tutorials for products. Just credit the pattern source if required by the original designer.
Q: What other shapes can I try?
A: Try making variations like apples, leaves, or hearts using the same method. Adjust your block colors and stem placement accordingly.
The Scrappy Quilted Pumpkin Pot Holder Tutorial is a delightful way to welcome the fall season with creativity and charm. It’s beginner-friendly, uses up scraps, and results in a functional piece of handmade art. From choosing your fabrics to quilting and finishing, each step is approachable and rewarding.
This pot holder is more than just a kitchen accessory — it’s a celebration of the cozy, warm tones of autumn. Whether you’re making one for yourself or gifting it to someone you love, you’ll find joy in the process and the finished piece.
Remember, the beauty of this project lies in its scrappiness — no two pumpkins will be the same, and that’s exactly what makes them special. Let your creativity flow and enjoy each stitch.
We hope you enjoyed this Scrappy Quilted Pumpkin Pot Holder Tutorial and found it easy to follow and inspiring. If you make one, tag us or share your results online — we’d love to see your work!
Do you have any questions, ideas, or tips about this project? Leave a comment below and join the conversation with fellow quilters. Happy quilting!


