
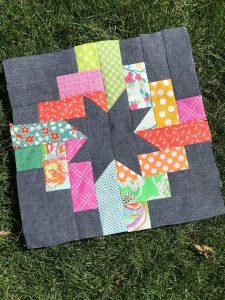
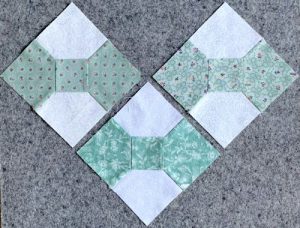
Star Oklohama Quilt Block Pattern
Creating a Heart Zipper Pouch pattern is a delightful and practical way to express your creativity while making something useful and charming. Whether you’re sewing for Valentine’s Day, gifting, or simply want to keep your accessories organized in style, this project is ideal for beginners and seasoned crafters alike. With a few basic materials and sewing tools, you can make a heart-shaped pouch that’s not only adorable but also functional.
The Heart Zipper Pouch pattern features a symmetrical heart shape, a top zipper closure, and the opportunity to mix and match your favorite fabrics. This pouch is perfect for storing coins, lip balm, keys, or small trinkets. Its small size makes it ideal for scrap fabric projects, and the results are impressive whether you choose solids, florals, or bold prints.
In this tutorial, we’ll walk through every step of the Heart Zipper Pouch pattern, from cutting the fabric to adding the zipper and finishing the seams. You’ll also find a list of all fabric cuts with measurements and tips to ensure your pouch turns out perfect. Let’s get started on this fun and heartwarming sewing project!
Before you start your Heart Zipper Pouch pattern, make sure you have all the necessary materials and fabric pieces cut to size. Proper preparation makes the sewing process smoother and ensures a neat finish.
To begin, you’ll need:
Fabric Cutting Instructions:
Fuse the interfacing to the wrong side of the outer heart fabric pieces. Make sure it’s centered, leaving room at the edges to reduce bulk in the seams. Preparing the materials properly is essential for creating a clean and structured Heart Zipper Pouch pattern.
Once all pieces are cut and fused, organize them by type and label each if needed. This will help streamline your sewing process. Double-check that your zipper opens and closes smoothly and that all edges are clean and even.
Adding the zipper is one of the most important steps in the Heart Zipper Pouch pattern. Don’t worry if you’ve never sewn a zipper before—this tutorial simplifies the process and guides you every step of the way.
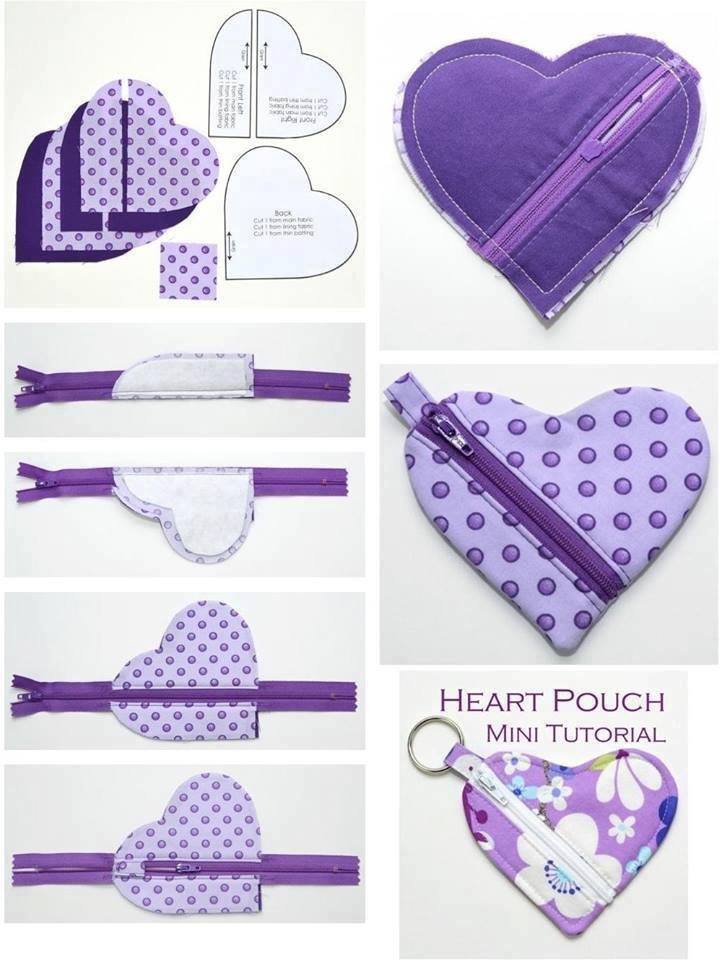
First, attach the zipper tabs to each end of your zipper. Fold the short sides of the zipper tab rectangles under about ¼ inch, place them over each zipper end, and topstitch to secure. This will shorten your zipper to the correct length and add a polished look.
Next, take one outer heart piece and place it right side up. Align the zipper right side down along the top edge (the cleft of the heart), and then place a lining heart piece on top, right side down. Pin or clip all three layers together.
Using a zipper foot, sew along the curved top edge. After stitching, fold both fabric layers away from the zipper and press. Topstitch close to the zipper to keep the fabric from catching in the zipper teeth.
Repeat this step with the second side of the zipper, aligning the remaining outer and lining heart pieces in the same way. Sew, press, and topstitch. Now your zipper is sandwiched neatly between the outer and lining fabrics, forming the center of the heart.
With the zipper in place, open it halfway before continuing. This is important for turning the pouch right side out later. Clip or pin the outer heart pieces together, and do the same with the lining pieces, right sides together.
Now it’s time to complete your Heart Zipper Pouch pattern by sewing it all together and turning it inside out for the final reveal. Patience and careful stitching are key in this stage.
Start sewing around the heart, leaving a 2-inch gap at the bottom of the lining for turning. Stitch slowly around the curves and make sure the zipper tabs are folded toward the lining to prevent bulk at the seam.
After stitching, trim the seam allowance to about ¼ inch and clip notches around the curves. Be extra careful not to cut into the stitches. This step ensures the pouch turns smoothly and maintains a clean heart shape.
Turn the pouch right side out through the opening in the lining. Gently push out all curves and corners using a blunt tool like a chopstick or a knitting needle. Make sure the heart shape looks symmetrical.
Tuck the raw edges of the opening in the lining inward and press them neatly. Sew the gap closed using a small slip stitch or topstitch close to the edge with your machine.
Push the lining inside the pouch and press the entire Heart Zipper Pouch pattern flat. Zip and unzip the pouch to ensure everything works smoothly. Your heart zipper pouch is now complete and ready to use!
Experiment with different fabric combinations, add decorative stitching, or embellish the outer layer with embroidery or appliqué for a personalized touch. The possibilities are endless with this adorable and practical pattern.
The beauty of the Heart Zipper Pouch pattern lies in its versatility. From gifts to storage solutions, you can easily personalize each pouch based on fabric choice, size variation, and added details.
Try using theme-based fabrics for special occasions. Valentine’s Day, birthdays, and anniversaries are perfect moments to gift a handmade heart pouch. Customize it by embroidering names or initials onto the outer layer.
You can also add a wrist strap or keyring loop to one side, turning your heart pouch into a mini wristlet or coin purse that’s easy to carry on the go. Just insert the loop into the seam before stitching the outer layers.
Play with texture by using faux leather, denim, or canvas as the outer layer. Combine these with soft cotton linings for a fun contrast. Stiffer materials will require adjustments in seam allowances and careful clipping.
If you prefer a quilted look, add batting instead of interfacing and stitch decorative quilting lines before attaching the zipper. This adds a lovely handmade texture and extra structure to the pouch.
Consider sizing up or down your Heart Zipper Pouch pattern to fit different purposes—make a tiny version for earbuds or a larger one for cosmetics. The heart shape scales beautifully while keeping its unique charm.
Lastly, don’t forget to take pictures of your finished pouch! Sharing your creations online or with your crafting community can inspire others and show off your sewing skills with pride.
Q1: Can beginners sew the Heart Zipper Pouch pattern?
A1: Yes! This is a beginner-friendly sewing project that teaches basic zipper installation and curved seam sewing.
Q2: What type of zipper is best?
A2: A 6-inch nylon or metal zipper works well. Nylon is easier for beginners to sew over.
Q3: Can I use fusible fleece instead of interfacing?
A3: Absolutely! Fusible fleece adds softness and structure, especially if you want a quilted effect.
Q4: How do I scale the pattern to make different sizes?
A4: You can resize your heart template using a copier or design software. Just remember to adjust the zipper length accordingly.
Q5: Is it washable?
A5: Yes, if you use cotton fabrics and a nylon zipper, your pouch is fully machine washable. Use gentle settings.
Q6: Can I sell Heart Zipper Pouches made from this pattern?
A6: Yes, handmade items can usually be sold, especially if the design is your own or used with permission if following another’s pattern.
The Heart Zipper Pouch pattern is more than just a sewing project—it’s a heartfelt gift, a practical item, and a fun way to use your fabric stash creatively. Whether you’re sewing for yourself or someone special, the process is rewarding, and the result is adorable and functional.
With easy-to-follow steps, fabric measurements, and room for personalization, this pattern is perfect for crafters of all levels. It’s a fantastic way to learn new skills like zipper insertion and sewing curves, while creating something you’ll love to use or gift.
Try making a few in different colors and textures, and you’ll quickly see why the Heart Zipper Pouch pattern has become a favorite among sewing enthusiasts. Have fun with your sewing, and don’t forget to share your finished pouch on social media or with your sewing group!
Have you made a Heart Zipper Pouch before? Share your tips, fabric choices, or ideas in the comments below—I’d love to hear from you and see your beautiful creations!

