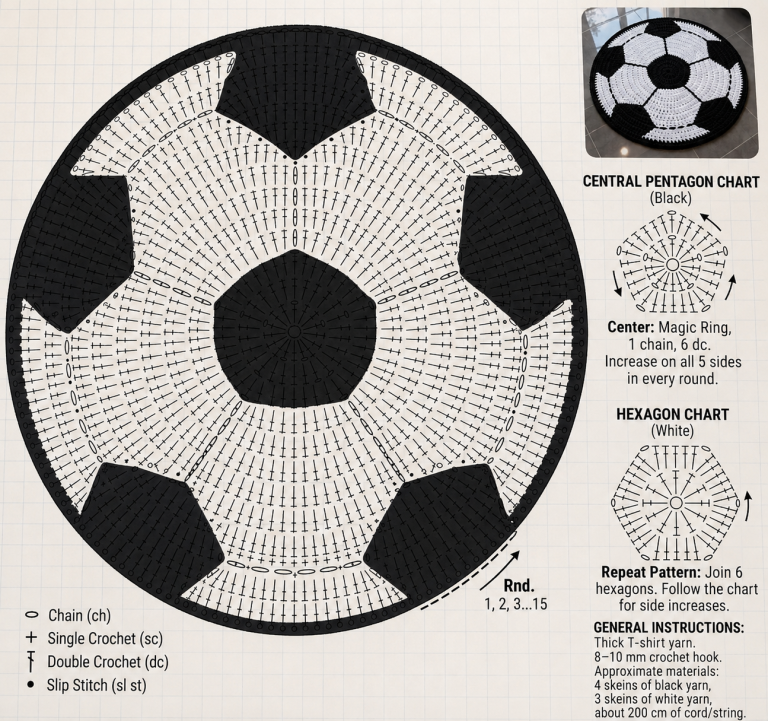
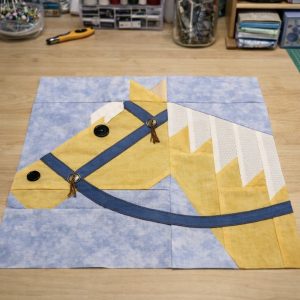
Crochet Soccer Ball Rug Pattern
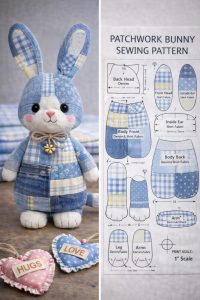
The world of amigurumi brings endless joy to crafters, and starting your journey with a Crochet pattern bunny and clothes is both rewarding and surprisingly easy. In this blog post, we’ll dive deep into the steps, measurements, and creative touches that turn yarn into a cuddly friend dressed in charming handmade outfits. By following this guide, you’ll have everything you need to create an adorable bunny and a lovely set of clothes that make it even more special.
Using a Crochet pattern bunny and clothes is perfect for gifting, decorating nurseries, or selling in craft fairs. The project helps you master stitches, explore color combinations, and add personalized details that make each bunny unique. What’s even better is how fun it is to mix and match different clothing items, allowing you to craft a whole wardrobe.
With the step-by-step tutorial below, we’ll cover materials, fabric cuts, exact measurements, and creative tips. Let’s jump right in and bring your Crochet pattern bunny and clothes to life!

To create your Crochet pattern bunny and clothes, start by gathering high-quality materials. Using soft, washable yarn is highly recommended, especially if the bunny is intended as a gift for children. Choose your favorite yarn colors for the bunny’s body and clothes to make your creation truly your own.
For the bunny, use medium-weight cotton or acrylic yarn. You’ll need about 120 grams of light beige or gray yarn for the bunny’s body, arms, legs, ears, and tail. Pair it with a 3.0 mm crochet hook to keep your stitches neat and firm, ensuring the toy keeps its shape.
The clothing set for your Crochet pattern bunny and clothes can include a dress, hat, or shorts. For these, use about 50 grams of colored yarn per item. If you prefer, combine several leftover yarns for a patchwork look. It adds character and reduces waste, which is perfect for sustainable crafting.
You’ll also need small pieces of fabric for accessories. For a simple dress, cut a piece of cotton fabric measuring 20 cm x 12 cm for the skirt. For a hat brim, cut a circle with a 10 cm diameter. These tiny touches give your Crochet pattern bunny and clothes extra charm.
Don’t forget other essentials: toy stuffing (polyester fiberfill), stitch markers, scissors, yarn needle for sewing parts together, and optional small buttons or embroidery thread to create facial features and decorate the clothes.
By preparing these materials and fabric cuts, your Crochet pattern bunny and clothes project becomes smoother and more organized, so you can focus on the joy of crafting.
Let’s start crafting the bunny itself. The Crochet pattern bunny and clothes process begins with the bunny’s head. Using your main color yarn, start with a magic ring and crochet 6 single crochets (sc). Increase evenly until you reach about 48 stitches around, then continue straight until the head measures about 9 cm tall. Begin decreasing gradually, but leave an opening for stuffing.
Stuff the head firmly with fiberfill, shaping it gently as you go. Close the top and fasten off, leaving a long tail for sewing. Using black embroidery thread or small safety eyes, add eyes between rows 14 and 16, spaced about 6 stitches apart.
For the body, start with a magic ring and crochet 6 sc. Increase evenly to 36 stitches. Continue straight for about 10 cm. Stuff the body before closing, shaping it so it sits well when assembled.
Crochet two arms and two legs using the same yarn. Each arm starts with a magic ring of 6 sc, increases to 12, then continues for 8 cm. Legs follow a similar pattern, but extend to about 10 cm. Stuff lightly, fold the open ends flat, and sew to the body.
Finally, for the ears, crochet two pieces starting from a magic ring of 6 sc. Increase gradually to 14 stitches, then crochet straight until the ear measures 12 cm. Sew them on top of the head, folding slightly for a curved look. Add a small pompom tail or crochet a circle and sew it to the back.
This completes the bunny in your Crochet pattern bunny and clothes set. Take your time on each step, ensuring even stitches and careful shaping.
Now for the most creative part: the clothes! Begin with a simple dress. Start with a chain of 30 stitches and join to form a ring. Crochet 6 rounds of half double crochets (hdc) for the bodice. At the bottom edge, increase evenly to form a skirt, then continue crocheting in double crochets (dc) for about 6 more rounds. Finish with a simple scallop edge.
To add a hat, crochet a magic ring of 6 sc, increasing gradually to 36 stitches. Continue for 4 cm straight. For the brim, switch to double crochets and increase every 4 stitches. Crochet 2 rounds, then finish.
For shorts, crochet two identical rectangles measuring 8 cm x 6 cm each. Fold and join sides, then attach them together at the crotch. Add a few rounds at the top for a waistband and finish with a drawstring chain.
Optional accessories bring your Crochet pattern bunny and clothes set to life. Add a tiny scarf by chaining 40 stitches, crocheting 2 rows in single crochet. Or make a little bag: crochet a small oval base, then work up in single crochet to form a pouch.
Don’t forget to test each piece on your bunny as you go, adjusting length and width as needed. This ensures a perfect fit and keeps your Crochet pattern bunny and clothes looking tailored and professional.
Personalizing your Crochet pattern bunny and clothes makes your creation unique. Experiment with yarn colors for clothes: pastel shades for a soft look, or bold colors for playful energy.
Add embroidery to clothes: small flowers, hearts, or initials make each item special. You can even add tiny buttons, beads, or lace trims to the dress or hat for a vintage style.
For facial features, embroidered noses or small felt circles give expression. Soft pink blush, gently applied with fabric-safe paint, can create a sweet rosy cheek effect.
Consider seasonal themes: create a bunny in winter clothes with a scarf and hat, or a summer bunny with a short dress and sun hat. This makes your Crochet pattern bunny and clothes perfect for holiday decor or gifts.
Make multiple clothing sets so the bunny can “change” outfits. Kids especially love this, turning your crochet project into a playful toy.
Finally, photograph your finished bunny in natural light to showcase your work. Sharing online or selling on craft platforms becomes easier with beautiful pictures of your Crochet pattern bunny and clothes.
Crafting a Crochet pattern bunny and clothes is a delightful project that combines creativity, skill, and personalization. With careful attention to details like fabric cuts, yarn choice, and step-by-step assembly, your bunny becomes more than just yarn—it becomes a handmade treasure.
Whether you’re making it for a loved one, for yourself, or as part of a craft business, each bunny tells its own story. Take your time, enjoy the process, and don’t be afraid to customize.
Now it’s your turn: try this Crochet pattern bunny and clothes and bring your own bunny friend to life. Share your creations and ideas in the comments—we’d love to see what you make.

