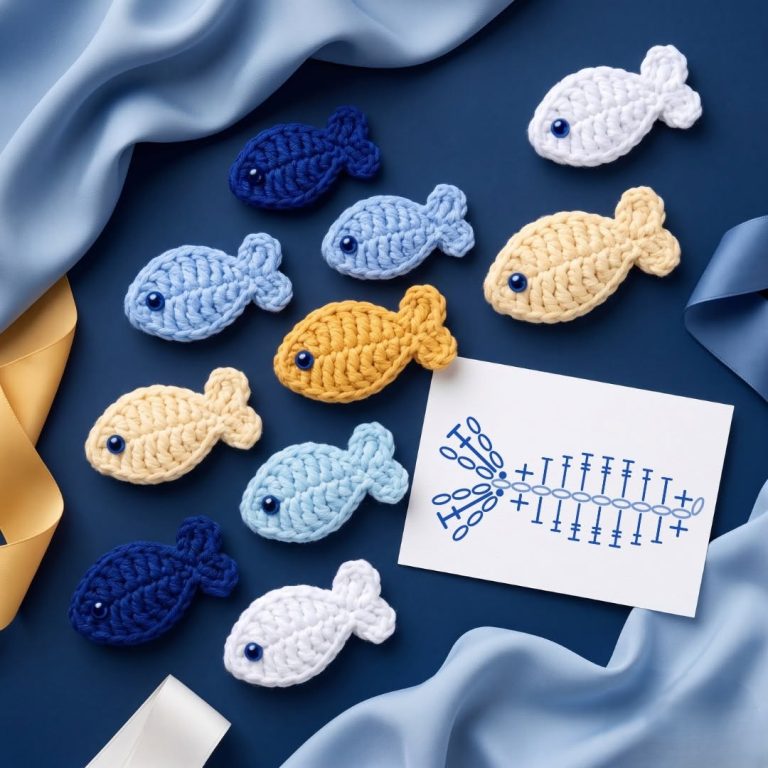
Crochet Easy Mini Fish Pattern
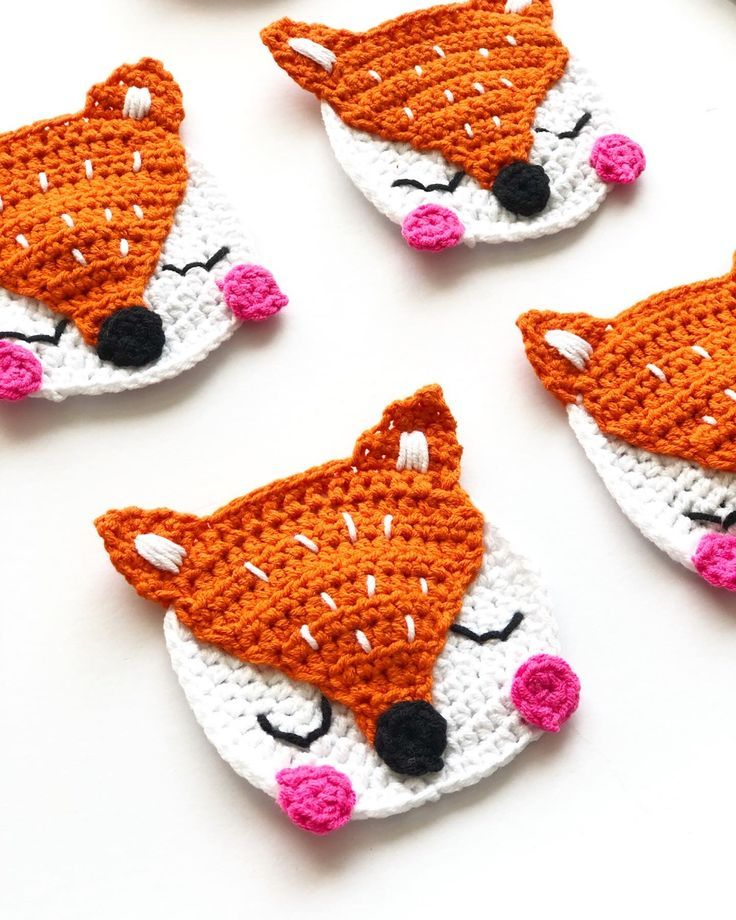
Discover the charm of the Cute Fox Applique, a delightful sewing project that adds warmth and personality to any handmade creation. Whether you’re decorating a baby quilt, a tote bag, or a cushion cover, this applique brings a playful yet cozy touch that everyone will love.
In this blog post, you’ll learn how to design, cut, and stitch a Cute Fox Applique from scratch. We’ll go through detailed instructions, share all the fabric cuts and measurements, and explore creative ways to use your finished fox applique on different projects.
With a clear step-by-step approach, this guide is perfect for beginners and experienced crafters alike. Let’s dive in and discover how the Cute Fox Applique can become your next favorite fabric embellishment!
Before starting your Cute Fox Applique, it’s important to choose high-quality materials to ensure a neat and durable finish. Begin by selecting fabrics with contrasting colors: a warm orange or rust tone for the fox’s body, white or cream for the face and tail tip, and black or dark brown for the nose and eyes.
Prepare fusible web (such as HeatnBond or Wonder Under) to make the applique process easier and cleaner. This web allows your fabric pieces to temporarily adhere to the base fabric before stitching, preventing them from shifting.
For the base, choose a sturdy yet soft fabric like cotton or linen, especially if you plan to attach the Cute Fox Applique to quilts, bags, or clothing. Soft fabrics are easier to sew through while maintaining a polished look.
Next, prepare your workspace. Use a rotary cutter, fabric scissors, pins, and an iron. Make sure your iron’s steam setting is off to avoid warping the fusible web.
Print or draw your Cute Fox Applique pattern on paper. The design typically includes separate pieces: the fox’s head, body, tail, inner ears, cheeks, and facial features. Each piece will be traced onto fabric, so keep them clearly labeled.
Finally, gather coordinating threads in orange, white, and black. For a modern touch, consider metallic thread for outlining the ears or tail. Your preparation is key to making the Cute Fox Applique both fun and successful.
Accurate fabric cutting ensures the Cute Fox Applique looks balanced and charming. Here are the recommended fabric cuts and measurements for a fox design around 8 inches tall by 6 inches wide. Adjust as needed based on your project.
Once the pieces are cut, layer them to visualize the finished design. This helps check proportion and balance. Take your time here; even small adjustments will make your Cute Fox Applique look more lifelike and symmetrical.
Now comes the creative part: assembling your Cute Fox Applique! Follow this detailed step-by-step process to put everything together.
Start by fusing the web onto the back of each fabric piece. Place the rough side of the fusible web against the fabric, then iron gently for a few seconds until it adheres. After cooling, peel off the paper backing.
Next, position the main body piece on your base fabric. Iron it in place according to the fusible web instructions. Ensure it’s centered and straight.
Layer the head piece on top of the body, slightly overlapping to create a seamless look. Press gently with the iron to fuse it.
Add the tail, tucking the end slightly behind the body piece so it appears naturally connected. Attach the white tail tip last for contrast.
Place the white face details: cheeks, snout area, and inner ears. Adjust carefully to give your Cute Fox Applique a friendly expression. Once satisfied, press to adhere.
Finally, position the small black eyes and nose. Double-check symmetry; small details can change the fox’s expression dramatically. Once everything is placed, give the entire applique a final press to secure.
The Cute Fox Applique is now ready for stitching, which will add definition and durability to your design.
The last stage is stitching, which outlines your Cute Fox Applique, keeps it secure, and adds beautiful details.
Use a small zigzag or satin stitch to go around each fabric piece. Choose thread colors that match the fabric for a classic look, or contrasting thread for a playful style.
Start with the body and head, carefully guiding the fabric so your stitches stay close to the edge. Take your time on curves, pausing to adjust as needed.
Outline the tail and tail tip next. The slight color difference between the orange and white pieces helps your stitches stand out.
Move on to the face details: cheeks, snout area, and inner ears. Here, shorter stitch lengths help navigate tighter curves without puckering.
Finish by stitching around the eyes and nose with black or dark brown thread. For extra character, add a few decorative lines: whiskers, or a small mouth below the nose.
If desired, embroider small details like eyebrows or fur lines with a backstitch or split stitch. These extra touches make your Cute Fox Applique look even cuter.
Finally, press the finished applique gently to flatten stitches and remove any fabric puckers. Your adorable Cute Fox Applique is ready to embellish quilts, bags, clothing, or even framed as a standalone art piece!
1. Can beginners make the Cute Fox Applique?
Yes! This project is perfect for beginners because it uses simple shapes and fusible web, making it easier to position and secure pieces.
2. What fabrics work best for the Cute Fox Applique?
Quilting cotton is ideal due to its stability and variety of prints. Felt can also work, but remember it may feel bulkier.
3. How do I keep my applique edges from fraying?
Using fusible web helps, but stitching around the edges with a zigzag or satin stitch is essential to prevent fraying.
4. Can I resize the Cute Fox Applique?
Absolutely! Adjust the paper pattern before cutting fabric to make your fox larger or smaller to fit your project.
5. What’s the best way to wash an item with an applique?
Use gentle cycles with cold water and air dry if possible. Turn the item inside out to protect the stitches.
6. How long does it take to finish the Cute Fox Applique?
For most crafters, it takes about 1–2 hours from cutting to stitching, depending on the level of detail added.
Creating a Cute Fox Applique is a wonderful way to add charm and personality to your handmade items. With the right materials, careful cutting, and thoughtful stitching, this simple design becomes an adorable highlight of any craft project.
We hope this step-by-step guide inspires you to start your own Cute Fox Applique today. Share your creations, ask questions, or leave your suggestions in the comments—we’d love to hear about your crafty adventures!Discover the charm of the Cute Fox Applique, a delightful sewing project that adds warmth and personality to any handmade creation. Whether you’re decorating a baby quilt, a tote bag, or a cushion cover, this applique brings a playful yet cozy touch that everyone will love.
In this blog post, you’ll learn how to design, cut, and stitch a Cute Fox Applique from scratch. We’ll go through detailed instructions, share all the fabric cuts and measurements, and explore creative ways to use your finished fox applique on different projects.
With a clear step-by-step approach, this guide is perfect for beginners and experienced crafters alike. Let’s dive in and discover how the Cute Fox Applique can become your next favorite fabric embellishment!
Before starting your Cute Fox Applique, it’s important to choose high-quality materials to ensure a neat and durable finish. Begin by selecting fabrics with contrasting colors: a warm orange or rust tone for the fox’s body, white or cream for the face and tail tip, and black or dark brown for the nose and eyes.
Prepare fusible web (such as HeatnBond or Wonder Under) to make the applique process easier and cleaner. This web allows your fabric pieces to temporarily adhere to the base fabric before stitching, preventing them from shifting.
For the base, choose a sturdy yet soft fabric like cotton or linen, especially if you plan to attach the Cute Fox Applique to quilts, bags, or clothing. Soft fabrics are easier to sew through while maintaining a polished look.
Next, prepare your workspace. Use a rotary cutter, fabric scissors, pins, and an iron. Make sure your iron’s steam setting is off to avoid warping the fusible web.
Print or draw your Cute Fox Applique pattern on paper. The design typically includes separate pieces: the fox’s head, body, tail, inner ears, cheeks, and facial features. Each piece will be traced onto fabric, so keep them clearly labeled.
Finally, gather coordinating threads in orange, white, and black. For a modern touch, consider metallic thread for outlining the ears or tail. Your preparation is key to making the Cute Fox Applique both fun and successful.
Accurate fabric cutting ensures the Cute Fox Applique looks balanced and charming. Here are the recommended fabric cuts and measurements for a fox design around 8 inches tall by 6 inches wide. Adjust as needed based on your project.
Once the pieces are cut, layer them to visualize the finished design. This helps check proportion and balance. Take your time here; even small adjustments will make your Cute Fox Applique look more lifelike and symmetrical.
Now comes the creative part: assembling your Cute Fox Applique! Follow this detailed step-by-step process to put everything together.
Start by fusing the web onto the back of each fabric piece. Place the rough side of the fusible web against the fabric, then iron gently for a few seconds until it adheres. After cooling, peel off the paper backing.
Next, position the main body piece on your base fabric. Iron it in place according to the fusible web instructions. Ensure it’s centered and straight.
Layer the head piece on top of the body, slightly overlapping to create a seamless look. Press gently with the iron to fuse it.
Add the tail, tucking the end slightly behind the body piece so it appears naturally connected. Attach the white tail tip last for contrast.
Place the white face details: cheeks, snout area, and inner ears. Adjust carefully to give your Cute Fox Applique a friendly expression. Once satisfied, press to adhere.
Finally, position the small black eyes and nose. Double-check symmetry; small details can change the fox’s expression dramatically. Once everything is placed, give the entire applique a final press to secure.
The Cute Fox Applique is now ready for stitching, which will add definition and durability to your design.
The last stage is stitching, which outlines your Cute Fox Applique, keeps it secure, and adds beautiful details.
Use a small zigzag or satin stitch to go around each fabric piece. Choose thread colors that match the fabric for a classic look, or contrasting thread for a playful style.
Start with the body and head, carefully guiding the fabric so your stitches stay close to the edge. Take your time on curves, pausing to adjust as needed.
Outline the tail and tail tip next. The slight color difference between the orange and white pieces helps your stitches stand out.
Move on to the face details: cheeks, snout area, and inner ears. Here, shorter stitch lengths help navigate tighter curves without puckering.
Finish by stitching around the eyes and nose with black or dark brown thread. For extra character, add a few decorative lines: whiskers, or a small mouth below the nose.
If desired, embroider small details like eyebrows or fur lines with a backstitch or split stitch. These extra touches make your Cute Fox Applique look even cuter.
Finally, press the finished applique gently to flatten stitches and remove any fabric puckers. Your adorable Cute Fox Applique is ready to embellish quilts, bags, clothing, or even framed as a standalone art piece!
1. Can beginners make the Cute Fox Applique?
Yes! This project is perfect for beginners because it uses simple shapes and fusible web, making it easier to position and secure pieces.
2. What fabrics work best for the Cute Fox Applique?
Quilting cotton is ideal due to its stability and variety of prints. Felt can also work, but remember it may feel bulkier.
3. How do I keep my applique edges from fraying?
Using fusible web helps, but stitching around the edges with a zigzag or satin stitch is essential to prevent fraying.
4. Can I resize the Cute Fox Applique?
Absolutely! Adjust the paper pattern before cutting fabric to make your fox larger or smaller to fit your project.
5. What’s the best way to wash an item with an applique?
Use gentle cycles with cold water and air dry if possible. Turn the item inside out to protect the stitches.
6. How long does it take to finish the Cute Fox Applique?
For most crafters, it takes about 1–2 hours from cutting to stitching, depending on the level of detail added.
Creating a Cute Fox Applique is a wonderful way to add charm and personality to your handmade items. With the right materials, careful cutting, and thoughtful stitching, this simple design becomes an adorable highlight of any craft project.
We hope this step-by-step guide inspires you to start your own Cute Fox Applique today. Share your creations, ask questions, or leave your suggestions in the comments—we’d love to hear about your crafty adventures!


