
Spiral Sunburst Quilt Pattern
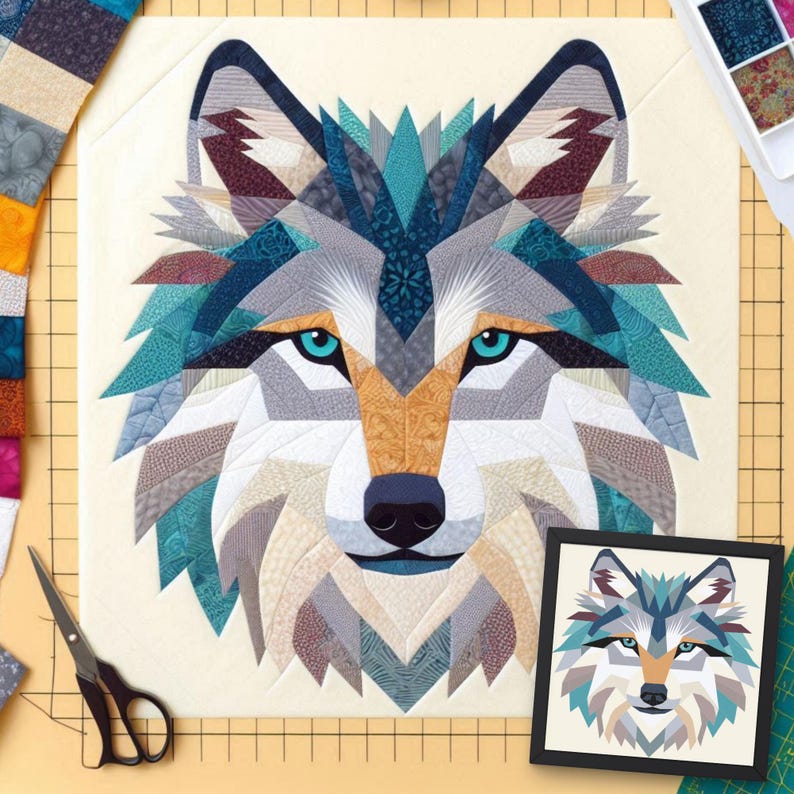
The Wolf patchwork sewing pattern is a breathtaking project that combines the spirit of the wild with the precision and creativity of quilting. In this article, we’ll explore how to bring this majestic animal to life through fabric, design, and your sewing machine. Whether you’re an experienced quilter or a curious beginner, the process of piecing together a wolf motif in patchwork is both rewarding and deeply artistic.
Using a Wolf patchwork sewing pattern allows you to tell a visual story with fabric. Each patch and stitch contributes to the final masterpiece, creating depth, texture, and character that capture the essence of the wolf. This guide will walk you through every step: from choosing fabrics and planning your design to making precise cuts and sewing the pieces together.
By following this complete tutorial, you’ll not only learn to sew a Wolf patchwork sewing pattern, but also gain insight into patchwork techniques that can be used for many other creative projects. Let’s dive into the details and discover how to craft a quilt that truly howls with style.
Planning your Wolf patchwork sewing pattern is the first and most exciting step of the journey. Start by deciding the overall size of your patchwork piece. A common finished size is around 40 x 40 inches, but you can adjust according to your wall space or quilt project. Remember, the larger the quilt, the more detailed your wolf design can be.
Select a design or sketch for your wolf. You can draw your own or find inspiration in existing patterns online, making sure to adapt them into patchwork-friendly blocks. Break down the wolf’s face and body into geometric shapes like triangles, rectangles, and squares, which are easier to cut and piece.
Next, choose your color palette carefully. A Wolf patchwork sewing pattern often looks stunning with shades of gray, black, cream, and a splash of earthy browns. Pick fabrics with subtle textures to give your wolf depth and character. Avoid overly busy prints that might distract from the overall image.
Prepare a materials list based on your design. Typically, you’ll need ½ yard each of dark gray and light gray, ¼ yard of black for details, ¼ yard of cream or white for highlights, and optional accent colors like rust or brown. You’ll also need background fabric—about 1 yard, depending on your finished size.
Using graph paper or digital design software, map out where each color will go in the wolf’s face and body. Label your blocks clearly, so you know what fabric each piece requires. This planning step is crucial for a balanced and striking design.
Finally, make sure you gather essential tools: rotary cutter, quilting ruler, cutting mat, pins, and a reliable sewing machine. Good preparation ensures your Wolf patchwork sewing pattern project runs smoothly from start to finish.
Cutting the fabric accurately is essential for your Wolf patchwork sewing pattern to come together beautifully. Use your design plan to know exactly which pieces to cut and from which fabrics. Let’s break down the common cuts you might need.
Start with the wolf’s face, which usually includes the largest blocks. Cut 4 squares measuring 4 x 4 inches from your light gray fabric. These will form the cheeks and parts of the forehead. Cut 2 rectangles measuring 2 x 4 inches from black fabric for the eyes.
For the muzzle, cut 2 squares measuring 3 x 3 inches from cream or white fabric. These highlight the wolf’s snout area. From the dark gray fabric, cut 4 triangles with sides of 4 inches each for the sides of the face and ears.
Move to the background fabric. Cut around 12 squares measuring 4 x 4 inches to frame the wolf’s head and give the quilt balance. These background blocks help the wolf stand out and make the quilt visually cohesive.
Add detail pieces to bring your Wolf patchwork sewing pattern to life. Cut smaller rectangles, about 1.5 x 3 inches, from black or dark brown fabric for shadows and outlines. You might also need a few tiny squares, about 1 x 1 inch, for eye details or highlights.
Label each piece carefully and keep them organized in containers or zip bags. This keeps your workspace tidy and prevents confusion when you start sewing. Precision in cutting ensures the pieces fit together like a puzzle, making your final wolf quilt both accurate and striking.
Begin assembling your Wolf patchwork sewing pattern by working on the center of the wolf’s face first. Lay out the pieces on a large table or design wall, following your planned design. This helps you see how the quilt will look and adjust colors if needed.
Start sewing rows horizontally. Take two adjacent blocks, right sides together, and stitch them with a ¼-inch seam allowance. Press the seams open or to the side to reduce bulk. Continue joining blocks until you complete each row.
Once the rows are ready, sew them together to create the main wolf face panel. Align the seams carefully where the eyes and nose meet to keep the design symmetrical. Press the seams after sewing each row to keep your work flat.
Now, add the background squares around the wolf’s face. This creates a frame and gives the quilt a balanced appearance. Join these background pieces into rows first, then attach them to the sides, top, and bottom of the wolf panel.
For details like the nose or eyes, use small appliqué pieces if desired. Sew them by hand or machine using a tight zigzag stitch. These small touches make your Wolf patchwork sewing pattern look more realistic and expressive.
Finish by adding borders if you want a larger quilt or to frame the wolf design further. A simple black or dark gray border about 2 inches wide often complements the wolf pattern beautifully and brings the whole design together.
With your Wolf patchwork sewing pattern fully pieced, it’s time to finish the quilt and make it ready for display or use. Start by creating a quilt sandwich: place the backing fabric face down, then add batting, and finally the quilt top, right side up.
Pin the layers together or use basting spray to prevent shifting. This step ensures your quilt stays flat while quilting. Choose a quilting design that complements your wolf pattern. Simple straight lines, echo quilting around the wolf shape, or gentle curves can all work beautifully.
Quilt slowly, starting from the center and working outward to avoid puckering. Use a walking foot on your sewing machine for even stitches, or quilt by hand if you prefer a traditional touch. The quilting adds texture and depth to your Wolf patchwork sewing pattern.
After quilting, trim the edges neatly to square the quilt. Then, create binding strips from black or dark gray fabric, about 2.5 inches wide. Fold and press them, then sew around the quilt’s edges to finish neatly.
If your quilt is for hanging, sew small fabric loops at the top or attach a hanging sleeve on the back. This lets you display your wolf masterpiece on a wall.
Finally, label your quilt with your name, date, and title. Celebrate completing a creative project that reflects your skill, patience, and love for patchwork. Your Wolf patchwork sewing pattern quilt is now ready to impress family, friends, and fellow quilters alike.
What fabric is best for a Wolf patchwork sewing pattern?
Choose 100% cotton quilting fabric in shades of gray, black, cream, and brown for best results. Cotton is easy to cut, press, and sew, giving sharp patchwork shapes.
How long does it take to complete?
Depending on your skill level and quilt size, it can take from a few days to several weeks, especially if you quilt by hand.
Can beginners make a Wolf patchwork sewing pattern?
Yes! Beginners can simplify the design into larger blocks and fewer details. Precision cutting and planning make it easier.
Should I wash the fabrics before starting?
Yes, pre-washing removes sizing and prevents shrinkage or color bleeding after the quilt is finished.
How do I design my own wolf pattern?
Sketch on graph paper, break the wolf into geometric shapes, and assign fabric colors. There are also software tools for designing patchwork.
Can I turn the pattern into a pillow or wall hanging?
Absolutely! Adjust the finished size and add borders or backing fabric to suit your project.
Crafting a Wolf patchwork sewing pattern is more than a sewing project—it’s an artistic journey that captures the wild spirit of the wolf in fabric and thread. By carefully planning, cutting, sewing, and finishing, you create a unique quilt that’s both functional and decorative. We hope this step-by-step guide inspires you to start your own wolf patchwork project. What other animals or themes would you love to see turned into patchwork? Share your ideas, and let’s keep sewing beautiful stories together!


