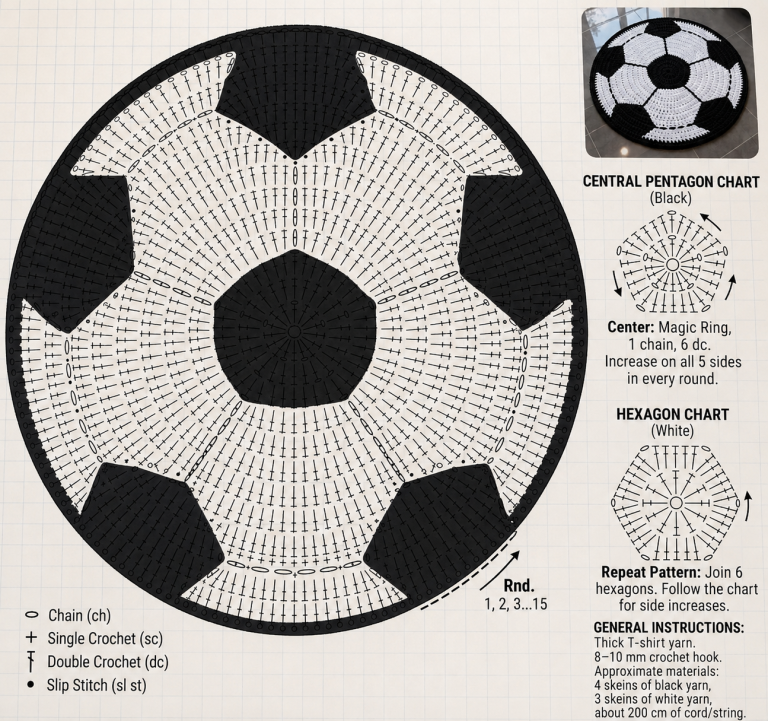
Crochet Soccer Ball Rug Pattern
Crafting a Baby Poncho crochet is a heartwarming way to wrap your baby in comfort and love. This handmade garment is not only adorable but also incredibly functional, making it a favorite among crochet lovers. Whether you’re a beginner or an experienced crocheter, creating a baby poncho offers both a creative challenge and a rewarding result.
The beauty of a Baby Poncho crochet pattern lies in its versatility. You can play with colors, textures, and yarn weights to create something unique every time. From soft pastel shades for newborns to vibrant colors for toddlers, this pattern allows full customization. Plus, it’s a great gift idea for baby showers, birthdays, or holidays.
In this article, you’ll discover a detailed step-by-step guide to crafting your very own Baby Poncho crochet, including all the necessary measurements and cuts. The structure is optimized for readability and SEO, ensuring that you’ll find helpful information with ease. Let’s begin this delightful journey into baby crochet fashion.

Baby Poncho crochet patterns have captured the hearts of many because of their practical charm and simple elegance. They are especially ideal for transitional seasons when babies need a light yet warm layer.
A poncho is easy to slip over a baby’s head, eliminating the hassle of sleeves and buttons. This makes dressing and undressing your baby a much smoother process. Additionally, the open structure allows for freedom of movement, which is crucial as babies grow and explore their surroundings.
Another reason Baby Poncho crochet is so popular is the creative freedom it offers. You can incorporate decorative stitches, tassels, fringes, or even small pockets to personalize your creation. Whether you prefer a boho style or a more classic look, the pattern adapts beautifully.
The design is also unisex. By simply adjusting the color scheme and embellishments, you can create a poncho suitable for any baby. This makes it an excellent go-to project for any crocheter looking to make handmade gifts that are thoughtful and stylish.
Best of all, the project is relatively quick to complete. Unlike larger crochet projects like blankets, a Baby Poncho crochet can be finished over a few evenings. This instant gratification is perfect for busy parents or last-minute gift makers.
Lastly, working on baby-sized items is a fantastic way to use leftover yarn from other projects. It’s a cost-effective, sustainable, and rewarding craft that brings warmth and joy in every stitch.
To begin your Baby Poncho crochet project, you’ll need a few basic materials. Start by choosing a soft, baby-friendly yarn such as a DK (double knitting) or worsted weight yarn. Cotton and acrylic blends are ideal as they are gentle on baby skin and easy to wash.
You will need approximately 250–350 yards (230–320 meters) of yarn depending on the size you’re making. For a newborn, stick closer to the 250-yard mark. For a 12-month-old baby, aim for 300–350 yards. Always purchase a little extra in case of errors or adjustments.
Next, you’ll need a crochet hook suited to your chosen yarn. Typically, a 4.5 mm (US 7) or 5.0 mm (H-8) hook works well for most Baby Poncho crochet patterns. Check your yarn label for the recommended hook size and always do a gauge swatch.
You may also want to gather scissors, stitch markers, a yarn needle, and decorative elements like buttons or pom-poms. These extras can elevate your project and give it a professional finish.
For decorative lining or optional fabric cuts, you can add a fleece lining for extra warmth. Cut two semi-circular fleece panels, each measuring 10 inches across by 8 inches deep for newborns. For older babies, increase each dimension by 2 inches.
If adding a hood, cut a rectangle of fabric or crochet a piece measuring 7” x 10” for newborns and 9” x 12” for older babies. Sew or crochet this to the neckline to finish off the look. This is especially practical for colder climates.
Let’s get into the fun part—creating your very own Baby Poncho crochet pattern. This guide uses basic stitches and techniques that are beginner-friendly but still charming in appearance.
Step 1: Foundation Chain
Begin by chaining 60 (for a newborn) or 70 (for a 12-month-old). Join with a slip stitch to form a ring, being careful not to twist the chain. This will form the neckline of the poncho.
Step 2: Create the Yoke
Work in rounds using double crochet (dc) stitches. In the first round, place a dc in each stitch. From the second round, increase 4 stitches evenly every round (at front, back, and shoulders). Continue this for 6 to 8 rounds until the work begins to take a flared shape.
Step 3: Divide for the Body
Stop increasing and start working evenly in dc for the body of the poncho. Continue in the round for 20 to 24 rounds, depending on desired length. Try it on the baby (if possible) to check the fit.
Step 4: Add Edging
Finish the bottom with a scalloped or shell stitch border for a delicate look. This adds weight and a decorative touch. You can alternate colors for extra charm.
Step 5: Add the Neckline Detail
You can create a ribbed neckline by working 2-3 rows of front and back post double crochet. This will make the poncho fit more snugly around the neck without discomfort.
Step 6: Embellishments and Finishing Touches
Sew in all loose ends with a yarn needle. Add a crocheted flower, a small button at the neck, or even tiny pockets to enhance the design. Optional tassels at the corners also look adorable on a Baby Poncho crochet.
Once you’ve finished crafting your Baby Poncho crochet, it’s time to think about how to style and care for this lovely piece. Proper care ensures your handmade work lasts for years, especially if it’s a keepsake or gift.
Pair the poncho with matching booties or a crocheted beanie to create a full outfit. This not only looks coordinated but also provides warmth from head to toe. Neutral ponchos work with many outfits, while brightly colored versions can stand out beautifully.
For a chic touch, you can add a hood or a pointed pixie-style collar. This adds both warmth and a whimsical look that’s perfect for photo sessions or special events. Hoods are particularly practical during cooler months.
Make sure to wash the Baby Poncho crochet in cold water on a gentle cycle or hand wash it to maintain its shape and softness. Lay flat to dry and avoid wringing the yarn, which can cause stretching or fraying.
If gifting the poncho, consider including a small label or tag with care instructions. This shows thoughtfulness and helps the recipient properly maintain the garment.
Store your crochet poncho in a clean, dry area. Avoid hanging it, as this can distort its shape over time. Instead, fold it neatly and store it in a fabric-lined box or drawer.
With a little care and love, your Baby Poncho crochet will remain a cherished piece, whether it’s worn daily or kept as a treasured memento from babyhood.
What size should I make the baby poncho?
Newborns typically need a poncho around 10–12 inches in length. For 6 to 12 months, aim for 14–16 inches. Always measure your baby for the most accurate sizing.
Can I use different stitches?
Absolutely! Once you understand the structure, you can incorporate bobble stitches, granny square motifs, or puff stitches for variety and texture.
Is the baby poncho safe for newborns?
Yes, as long as it’s made from soft, breathable yarn and doesn’t include choking hazards like loose buttons. Always supervise babies while they’re wearing it.
Can I sell ponchos I make using this pattern?
Yes, you can sell finished items, but please credit the pattern source if applicable. Handmade baby ponchos are popular items on platforms like Etsy.
How long does it take to complete a baby poncho?
A dedicated crocheter can complete a Baby Poncho crochet in 6–8 hours. Beginners might take a bit longer, but it’s a quick and satisfying project overall.
Can I add sleeves to the poncho?
While traditional ponchos don’t have sleeves, you can adapt the pattern by creating armholes and attaching simple sleeve tubes for added coverage.
Creating a Baby Poncho crochet is more than just a craft project—it’s an act of love. From choosing the softest yarn to adding those final decorative touches, every step allows you to express creativity while making something functional and heartfelt. Whether for your own child or as a gift, a handmade baby poncho becomes a cherished item that blends warmth, beauty, and practicality. Have you made a baby poncho before? Share your thoughts, tips, or favorite yarns in the comments—we’d love to hear from you!


