
Spiral Sunburst Quilt Pattern
If you’re passionate about quilting and looking for a stunning project to brighten up your creative space, the Falling Star Block Quilt Free Pattern is a perfect choice. This starry design brings a dynamic sense of motion and sparkle to any quilt. Whether you’re a beginner or a seasoned quilter, this pattern offers both visual interest and a rewarding sewing experience.
The Falling Star Block Quilt Free Pattern stands out for its radiant star shape that appears to be falling across the fabric. This movement effect is achieved through smart fabric placement and clever block construction. With the right combination of colors and precision in cutting, you can create a quilt that looks intricate yet is manageable to assemble.
In this blog post, we’ll explore the full step-by-step process to create your own Falling Star Block Quilt Free Pattern, complete with fabric requirements, cutting instructions, and assembly tips. Let’s get started on making this dazzling quilt come to life with your own personal touch.

The success of the Falling Star Block Quilt Free Pattern starts with the right choice of fabrics. For best results, use high-contrast fabrics that make the star stand out from the background. Think of a bold solid color for the star and a neutral or low-volume print for the background.
You’ll need four types of fabrics: one for the star points, one for the star center, one for the background, and an optional fourth for the border. The contrast between these elements is what gives the “falling” effect its dynamic appearance. Consider using deep blues, rich reds, or vibrant yellows against a white or gray background.
To make one Falling Star Block, you will need the following fabric cuts:
Pre-wash your fabrics if desired and press them well before cutting. This prevents shrinkage and ensures your cuts are accurate. Use a rotary cutter, ruler, and self-healing mat for precision. Accuracy in cutting plays a major role in the final alignment of your blocks.
Before sewing, lay out all your pieces to preview how the Falling Star Block Quilt Free Pattern will come together. Adjust placements as needed to ensure symmetry and balance. This is especially helpful when using printed fabrics with directional patterns.
A design wall or flat surface can help you visualize the final layout. If you’re making a larger quilt, repeat the block layout multiple times and mix up the fabric placements for added visual interest. The beauty of this pattern is in how it captures movement, so embrace creativity while maintaining a structured plan.
Now that your fabric pieces are cut, it’s time to sew the individual units that make up the Falling Star Block Quilt Free Pattern. Start with the star points, which are constructed using the half-square triangle (HST) method.
To make the HSTs, pair each 5″ background square with a 5″ star fabric square. Draw a diagonal line on the back of the background fabric, then sew ¼” on both sides of the line. Cut along the drawn line to yield two HSTs. Press the seams open or to the dark side, depending on your preference.
You should now have 8 HSTs for one block. Trim each to 4½” square to ensure consistency when assembling the block. Accuracy in this trimming stage will help all points align neatly during the final block assembly.
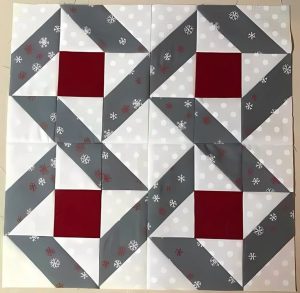
Arrange the HSTs around the center square to form the star shape. Place the 4½” background squares in the corners and align everything into a 3×3 grid. The star points should radiate outward from the center square, giving the impression of a falling or exploding star.
Sew each row of the block together using a ¼” seam allowance. Press seams in alternating directions for each row to make it easier to nest the seams when joining the rows together. Then, sew the rows together, aligning all intersections carefully.
Once the block is assembled, press it well and square it to 12½” x 12½”. This ensures that all your blocks will fit together evenly in the quilt top. Repeat the process for the desired number of blocks needed for your quilt size.
To build a full quilt using the Falling Star Block Quilt Free Pattern, decide how many blocks you’d like across and down. For example, a 4×5 layout (20 blocks) will give you a quilt measuring approximately 48″ x 60″, not including borders or sashing.
Lay out your blocks in rows, rotating or mixing them as needed for a scattered starfall look. You can add sashing between blocks if desired, using 2½” strips to separate them and give a floating appearance to each star.
Sew your blocks together in horizontal rows first. After sewing each row, press the seams. Then sew the rows to each other, matching the seams at intersections. Keep checking for consistent alignment and flat seams throughout the process.
At this point, you can decide to add a border. For a clean finish, cut two border strips 2½” wide by the width of the quilt (for the top and bottom), and two more the height of the quilt. Attach the top and bottom first, then the side borders.
Once the quilt top is assembled, give it a final press. This is a good time to inspect for any loose threads or uneven seams. Trim the edges of the quilt top to square it perfectly before layering it for quilting.
Now you’re ready for the final stages—quilting and binding. If you’re sending your quilt to a long-arm quilter, they will handle this step. Otherwise, baste the quilt sandwich (top, batting, backing) and quilt as desired. Simple straight-line quilting works beautifully with the Falling Star Block Quilt Free Pattern.
The quilting stage of your Falling Star Block Quilt Free Pattern is where your design truly comes to life. Choose a quilting pattern that enhances the star motif without overpowering the blocks. Stitch-in-the-ditch or echo quilting along the star shapes are popular choices.
Prepare your quilt sandwich by layering the quilt top, batting, and backing. Secure the layers with safety pins, basting spray, or hand-basting stitches. Smooth out wrinkles and ensure all layers are flat and aligned before quilting.
Use a walking foot for straight-line quilting, or a free-motion foot if you prefer to add swirls, loops, or stars to complement the design. Begin quilting from the center and work your way out to avoid puckering.
Once quilting is complete, trim the excess batting and backing. Prepare your binding strips—cut 2½” wide and long enough to go around the quilt’s perimeter. Join the strips with diagonal seams and press them in half lengthwise.
Attach the binding to the front of the quilt using a ¼” seam allowance, mitering the corners as you go. Fold it over to the back and hand-stitch or machine-stitch it in place. Take your time to ensure a clean and professional finish.
Finally, add a quilt label with the date and your name to mark your accomplishment. Your Falling Star Block Quilt Free Pattern project is now complete and ready to be enjoyed for years to come. Whether gifted or kept, it’s sure to shine in any space.
What size is each Falling Star quilt block?
Each block finishes at 12″ x 12″ once sewn, with a cut size of 12½” x 12½”.
Can I make this pattern using pre-cuts?
Yes! Charm packs (5″ squares) are perfect for making the half-square triangles in this pattern.
Is this pattern suitable for beginners?
Absolutely. The Falling Star Block Quilt Free Pattern uses basic techniques like HSTs and simple grid piecing, making it beginner-friendly.
How many blocks do I need for a throw-size quilt?
For a throw-size quilt (around 48″ x 60″), aim for 20 blocks in a 4×5 layout.
Can I make the stars scrappy?
Yes! Mixing different fabrics for the star points gives the quilt a fun, colorful effect.
Do I need to use a border?
Borders are optional. Without them, the quilt will have a more modern edge-to-edge look. With borders, you can increase the finished size and frame the stars nicely.
The Falling Star Block Quilt Free Pattern is a visually captivating project that’s both accessible and rewarding. With just a few basic quilting techniques and some thoughtful fabric choices, you can create a quilt that looks truly magical. From choosing your colors to sewing the final binding stitch, every step brings the quilt closer to life.
This pattern is perfect for quilters looking to expand their skills or simply enjoy a relaxing project with eye-catching results. Whether you’re making a gift or adding to your own collection, this star-studded quilt will be a favorite for years.
Let us know in the comments how your version of the Falling Star Block Quilt Free Pattern turned out. What colors did you choose? Did you add a border or keep it clean and modern? We’d love to hear your ideas and see your beautiful creations!


