
Spiral Sunburst Quilt Pattern
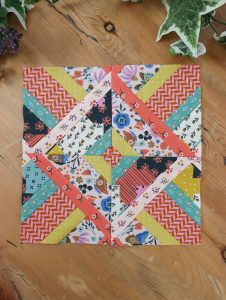
The Scrappy Star block quilt is a timeless and beloved pattern in the world of quilting, offering both visual beauty and a wonderful opportunity to use up leftover fabric scraps. This classic star design bursts with personality and texture, especially when made with a variety of prints and colors. For quilters who love creative freedom, this block is both fun and versatile.
Whether you’re a beginner or seasoned stitcher, the Scrappy Star block quilt brings joy to the process. It allows you to mix and match scraps, creating a unique quilt that tells a story. This is not only a practical project for using remnants but also a celebration of colors, memories, and textures gathered over time.
In this post, we’ll walk you through everything you need to know about creating your own Scrappy Star block quilt — from cutting fabric to assembling the blocks and quilting your finished masterpiece. Follow along and enjoy the process of making a quilt that’s both traditional and delightfully personal.

The Scrappy Star block quilt is built from a traditional eight-point star motif, made more dynamic by using assorted fabric scraps. The star typically features in the center of a square block, with contrasting background fabric that makes the star pop.
Each Scrappy Star block quilt is made up of a combination of squares and half-square triangles (HSTs), arranged to form the iconic star points. The scrappy effect comes from using a mix of prints and colors for the star, rather than a single fabric.
To ensure your blocks look cohesive despite using various fabrics, it’s helpful to keep the background consistent. Most quilters choose white, cream, or gray as a neutral base to highlight the scrappy stars.
You can scale your quilt depending on how many Scrappy Star blocks you create. Each block can stand alone as a mini quilt or be multiplied for a throw or bed-size quilt.
When selecting fabrics for your star points, aim for contrast with your background fabric. This contrast helps the star shape remain crisp and visible.
The beauty of this design is that it’s forgiving—perfect points aren’t required to make a beautiful finished quilt. This makes it ideal for beginners or for anyone who wants a low-pressure, creative sewing experience.
To make a 12.5″ unfinished Scrappy Star block quilt (12″ finished), you’ll need to cut your fabric as follows. This block size is ideal for mixing with other quilt blocks or creating a full quilt top.
Fabric cuts per block:
To construct the star points, pair your 3″ star fabric squares with 3″ background squares to create HSTs. You’ll need four of these HSTs for each block.
Once your HSTs are trimmed to 2.5″ square, you’ll assemble them along with the other cuts to form the block. A finished Scrappy Star block quilt layout includes a central square, four star point units, and filler rectangles to complete the block frame.
Multiply these cuts by the number of blocks you plan to make. For a 60″ x 72″ throw quilt, you would need 30 blocks arranged in 5 rows of 6.
This project is perfect for diving into your scrap bins—pull out brights, pastels, prints, or even holiday themes for a seasonal quilt. The more variety, the more charm your quilt will have.
Let’s walk through how to sew one full Scrappy Star block quilt unit from start to finish. Having accurate cuts and using a consistent seam allowance (¼”) is key to making your blocks uniform and easy to assemble.
Step 1: Make the Half-Square Triangles (HSTs)
Step 2: Prepare the Corner Units
Step 3: Assemble the Side Units
Step 4: Build the Center Row
Step 5: Final Block Assembly
Once you’ve mastered one Scrappy Star block, it’s easy to create many. You can chain-piece your blocks for efficiency or sew them individually if you enjoy watching each star come to life.
After you’ve completed all your blocks, it’s time to assemble your Scrappy Star block quilt top. Layout is important—try to space out colors and prints for balance. A design wall or floor layout will help visualize the finished piece.
Join the blocks into rows, then sew the rows together. Press all seams carefully, either nesting or open, depending on your preference. Consistent pressing improves your finished quilt’s look and ease of quilting.
Next, add borders if desired. A solid border helps frame the scrappy design, while a scrappy border keeps the theme going. For a 60″ x 72″ quilt, consider a 2″ inner border and a 4″ outer border.
Baste your quilt layers (top, batting, and backing) using your preferred method—pins, spray, or hand basting. Choose a quilting style that complements your design. Straight-line quilting, echoing the stars, or even free-motion swirls are all great choices.
Bind your quilt with a scrappy or solid binding. Many quilters use leftover fabric strips to make a colorful binding that continues the theme of the Scrappy Star block quilt.
Be sure to label your quilt with the date and your name. These personal touches add meaning and help document your quilting journey.
What is the best fabric for a Scrappy Star block quilt?
Cotton quilting fabric is ideal. Using scraps from past projects ensures consistency in weight and texture.
Can beginners make this quilt?
Yes! The Scrappy Star block quilt is beginner-friendly, especially because it’s forgiving of imperfections and allows creative freedom.
How many blocks do I need for a full-size quilt?
A full-size quilt typically requires around 56–63 blocks (7 rows of 8–9 blocks), depending on block size and border width.
Do I need special tools to make half-square triangles?
No special tools are required, but a ruler with a 45° line and a rotary cutter will help ensure accurate HSTs.
What is a good background color?
Neutrals like white, ivory, or gray allow the scrappy star points to shine and keep the design cohesive.
Can I make this quilt in seasonal or themed colors?
Absolutely. Try red and green for a holiday quilt, or pastels for spring—Scrappy Star block quilts adapt well to any palette.
The Scrappy Star block quilt is more than just a project—it’s a patchwork of memories, creativity, and color. Whether you’re using treasured fabric scraps or mixing bold new prints, this quilt brings together tradition and personal style in a beautiful way.
With easy-to-follow steps and flexible design options, this quilt is perfect for beginners and experienced quilters alike. You’ll enjoy every step of making your own Scrappy Star block quilt, from choosing fabrics to finishing the final stitch.
Have you made a Scrappy Star block quilt? Share your experience and tips in the comments—we’d love to hear from you and see your creations!


