
Spiral Sunburst Quilt Pattern
The Maria’s Star Block – Quilt Pattern is a stunning and timeless design that has been loved by quilters for generations. Known for its striking star shape and versatile style, this quilt block adds elegance and visual interest to any quilting project. Whether you are a beginner or an experienced quilter, this pattern offers the perfect balance of creativity and precision. With its classic geometry, the Maria’s Star Block – Quilt Pattern is both fun to create and visually rewarding, making it a must-try for anyone passionate about quilting.
One of the most appealing aspects of the Maria’s Star Block – Quilt Pattern is its adaptability. You can use it in a single-block project, like a pillow cover, or combine multiple blocks to create a breathtaking quilt. The star shape allows for endless fabric combinations, from soft pastels for a romantic look to bold, contrasting prints for a modern touch. By simply changing colors and fabrics, you can create countless variations of the same pattern, ensuring each project feels unique and personal.
This quilt pattern is also ideal for practicing precision piecing. The Maria’s Star Block – Quilt Pattern involves accurate cutting, matching points, and careful pressing, making it a great exercise in building essential quilting skills. If you’re new to quilting, this block can be a rewarding challenge that helps you refine your techniques. For experienced quilters, it offers an opportunity to play with design layouts and advanced color placement.
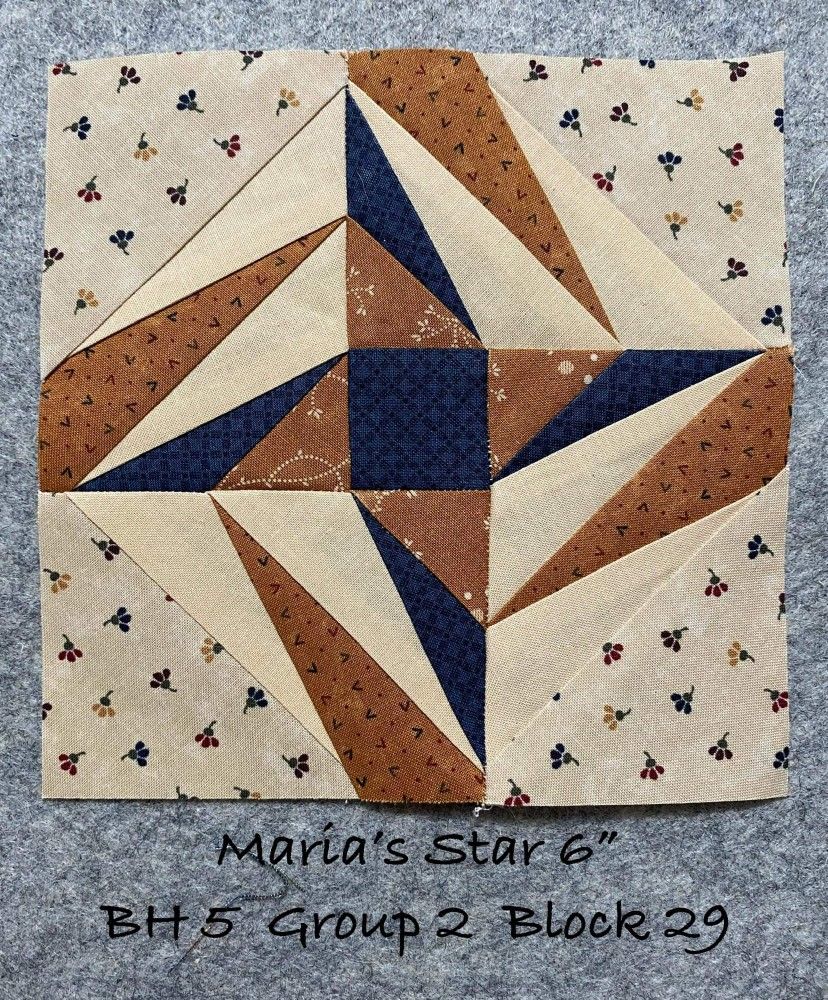
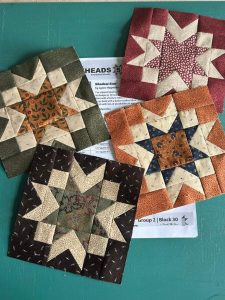
The Maria’s Star Block – Quilt Pattern is based on a combination of squares and triangles arranged in a way that creates a prominent star in the center. The design uses a traditional eight-point star layout, which has been a beloved motif in quilting for centuries. Each point of the star is made with carefully cut triangles, which fit together perfectly when sewn with precision.
One of the reasons this block stands out is its symmetry. When all pieces are aligned correctly, the Maria’s Star Block – Quilt Pattern has a balanced, harmonious look that instantly draws the eye. This symmetry allows the block to work well in both traditional and contemporary quilts. It’s a versatile pattern that blends seamlessly with other quilt blocks, making it an excellent choice for sampler quilts or themed projects.
Another benefit of the Maria’s Star Block – Quilt Pattern is its ability to showcase special fabrics. Because the block includes large triangles and squares, it provides plenty of space to highlight prints and patterns you want to feature. This makes it a fantastic choice for fabrics with floral motifs, geometric designs, or even novelty prints that you’d like to showcase.
When planning your quilt, it’s important to consider color placement. Light and dark fabrics positioned strategically will make the star shape stand out. Many quilters like to use a light background with darker star points, but you can experiment with inverted colors for a dramatic effect. Playing with color contrast is one of the most enjoyable parts of working with the Maria’s Star Block – Quilt Pattern.
The pattern also works beautifully when combined with sashing, borders, or alternate blocks. Adding sashing between each block can give the stars room to “shine,” while using an alternate block design can create secondary patterns across the quilt top. These design choices allow you to create a quilt that feels uniquely yours.
Finally, the construction process of this quilt block is an enjoyable mix of precision and creativity. It encourages quilters to slow down, measure carefully, and enjoy the process of watching a flat piece of fabric transform into a perfectly pieced star.
Creating the Maria’s Star Block – Quilt Pattern begins with choosing your fabrics. Select a combination of background fabric, star points, and center square fabric. Many quilters use three to four different fabrics for a dynamic look.
Step one is cutting your pieces accurately. For a standard 12-inch finished block, you’ll typically need four large squares for the background, four smaller squares for the star tips, and eight triangles for the star points. Using a rotary cutter and quilting ruler ensures your pieces are consistent in size.
Step two is sewing the star points. This usually involves pairing triangles with background pieces to form the “flying geese” units that make up the star. Accurate 1/4-inch seam allowances are essential here to ensure the pieces fit together without distortion.
Step three is assembling the block rows. Arrange the pieces on your work surface to visualize the final design. Sew the units together in horizontal rows, pressing the seams as you go. Pressing toward the darker fabric can help prevent shadows from showing through lighter fabrics.
Step four is joining the rows to complete the block. Take your time aligning points to keep the star crisp and symmetrical. Pinning carefully before sewing helps maintain alignment, especially where multiple seams meet.
Step five is giving the block a final press. A well-pressed block will lay flat, making it easier to join with other blocks in your quilt. At this stage, you can admire your work and start planning the next block.
By repeating this process, you can create as many Maria’s Star Block – Quilt Pattern units as needed for your project, whether it’s a small wall hanging or a full-sized quilt.
One of the keys to success with the Maria’s Star Block – Quilt Pattern is accurate cutting. Even small deviations can cause points to misalign, so take time to measure twice before cutting. A sharp rotary blade and a quality quilting ruler are essential tools for this task.
Consistent seam allowances are equally important. Use a 1/4-inch quilting foot on your sewing machine if possible, and test your seam allowance on scrap fabric before starting your block. This helps ensure your final block will be the correct size.
Pressing is another skill that can greatly impact the outcome of your block. Press seams after each step rather than waiting until the block is complete. This keeps the block flat and makes it easier to match points when assembling.
Fabric choice also plays a big role in the overall appearance of the Maria’s Star Block – Quilt Pattern. High-contrast fabrics will make the star pop, while low-contrast fabrics can create a softer, more subtle effect. Try auditioning fabric combinations before cutting by laying them out in the block arrangement.
If you’re new to quilting, consider starting with a larger block size. Larger pieces are easier to handle and sew accurately, reducing the frustration of mismatched points. As your skills improve, you can experiment with smaller block sizes for more intricate quilts.
Finally, don’t rush the process. The Maria’s Star Block – Quilt Pattern is as much about enjoying the creative journey as it is about the finished product. Take your time, enjoy choosing fabrics, and celebrate each completed block.
One fun way to personalize the Maria’s Star Block – Quilt Pattern is by playing with color gradients. Use fabrics that shift gradually from light to dark to create a sense of movement within the star. This technique can make your quilt look more dynamic and modern.
Another variation is to use scrappy fabrics for the star points. Instead of cutting all the points from the same fabric, mix and match small pieces from your scrap bin. This creates a charming, eclectic look that is perfect for cozy, vintage-style quilts.
You can also experiment with reversing the color placement. Make the star points from a light fabric and the background from a darker fabric. This unexpected twist can give the block a fresh and unique appearance.
For a festive touch, choose seasonal fabrics. Red, green, and gold fabrics can make the Maria’s Star Block – Quilt Pattern perfect for a Christmas quilt, while pastel florals work beautifully for spring-themed projects.
Some quilters like to add embroidery or applique details to the center square. This small touch can add personality and make your quilt truly one-of-a-kind.
Lastly, consider enlarging the block to make a single-block quilt or wall hanging. A large Maria’s Star Block – Quilt Pattern can serve as a striking focal point in any room.
Q: What size is best for the Maria’s Star Block?
A: The most common size is 12 inches finished, but you can adjust measurements to make larger or smaller blocks depending on your project.
Q: Is the Maria’s Star Block suitable for beginners?
A: Yes, with patience and attention to detail. Beginners can start with a larger block size to make cutting and sewing easier.
Q: Can I make the Maria’s Star Block with pre-cuts?
A: Absolutely! Pre-cuts like charm packs or layer cakes can work well, though you may need to trim pieces to fit the pattern.
Q: What fabrics work best for this pattern?
A: Cotton quilting fabrics are ideal. Choose high-contrast colors to highlight the star shape.
Q: How many blocks do I need for a quilt?
A: The number depends on your desired quilt size. Measure the finished block and calculate based on your quilt dimensions.
Q: Can I mix Maria’s Star Block with other quilt blocks?
A: Yes! It pairs beautifully with other traditional and modern blocks in sampler quilts.
The Maria’s Star Block – Quilt Pattern is a versatile and beautiful design that offers endless possibilities for quilters of all skill levels. From its classic star shape to the many ways it can be customized, this pattern is a joy to create and a stunning addition to any quilt. By following the tips and techniques in this guide, you can master this block and use it to make projects that reflect your personal style. If you try this pattern, share your experience—your honest feedback and suggestions are always welcome!


