
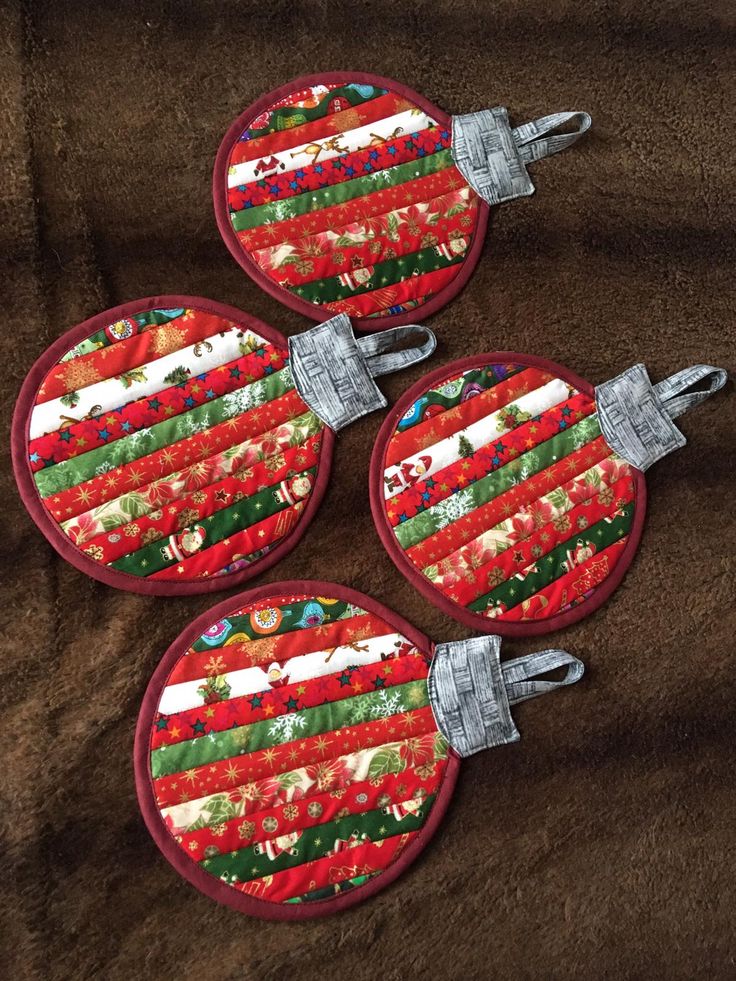
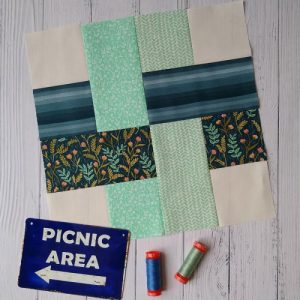
Spiral Sunburst Quilt Pattern
The Stripey Christmas Ornament – Quilt Pattern is a charming and festive design that captures the joyful spirit of the holiday season. This quilt pattern combines the elegance of Christmas ornaments with the timeless beauty of quilted textures, resulting in a project that is both decorative and functional. Whether you are making it as a wall hanging, a table topper, or part of a larger quilt, the stripey ornament motif adds a warm, handcrafted touch to your holiday décor. Quilters of all skill levels can enjoy working on this pattern, thanks to its straightforward construction and creative possibilities.
One of the best aspects of the Stripey Christmas Ornament – Quilt Pattern is its adaptability. You can use different fabric scraps, seasonal prints, and color schemes to match your home’s holiday theme. Traditional reds and greens create a classic Christmas look, while metallic golds, silvers, and icy blues can give a more modern, wintery vibe. Because the design is made with stripes, it’s a great way to use leftover fabric strips from other quilting projects. This makes it not only festive but also budget-friendly and environmentally conscious.
Another reason this pattern has become a favorite among quilting enthusiasts is that it allows for a high degree of personalization. You can vary the size of the ornaments, experiment with different stripe widths, and even embellish your design with embroidery, buttons, or small applique details. Whether you are preparing handmade gifts for loved ones or adding a unique touch to your own holiday space, the Stripey Christmas Ornament – Quilt Pattern is a delightful project to explore.
To get started with your Stripey Christmas Ornament – Quilt Pattern, you’ll need a small selection of basic quilting tools and materials. Gather your favorite festive fabrics in a mix of solid colors, prints, and metallic accents. Cotton quilting fabric is an excellent choice for its durability and ease of use. Make sure to choose fabrics with different contrasts so the stripes stand out clearly once pieced together.
A rotary cutter, cutting mat, and quilting ruler are essential for achieving straight, accurate cuts. Since the ornament design relies on stripes, precision is key to maintaining a clean, symmetrical look. A sewing machine with a straight stitch setting will speed up the assembly process, but hand-sewing is also possible for those who prefer a slower, more mindful approach.
Don’t forget to select a suitable thread color that blends nicely with your fabrics or provides an appealing contrast. For batting, a lightweight cotton or polyester batting works well, keeping the finished ornament soft yet structured. Finally, you’ll need a pressing iron to keep your seams crisp and a few pins or clips to hold fabric pieces in place during sewing.
Once your materials are ready, it’s helpful to organize them before beginning the cutting stage. Keeping your stripes sorted by color or size will make the piecing process much smoother. Having everything prepared ahead of time ensures that you can focus on enjoying the creative process rather than stopping repeatedly to search for supplies.
If you plan to make several ornaments, consider preparing all your fabric strips in one session. This batch-cutting method saves time and helps ensure consistency in size and shape. The Stripey Christmas Ornament – Quilt Pattern lends itself beautifully to assembly-line style quilting, making it perfect for producing multiple gifts at once.
Finally, remember that your materials and tools are the foundation of your project. Choosing quality fabrics and maintaining sharp, well-functioning tools will greatly enhance the final appearance of your quilted ornaments.
Start by cutting your chosen fabrics into strips of equal width. The width can vary depending on the look you want—narrow stripes create a delicate, intricate appearance, while wider stripes feel bold and modern. Arrange your strips in the order you want them to appear in the ornament, considering both color balance and contrast.
Sew the strips together along their long edges, pressing each seam open or to one side after sewing. This step is crucial for keeping the finished block smooth and flat. Once all your strips are joined, you will have a striped panel of fabric ready for shaping.
Next, use a template or a circular object to trace the ornament shape onto the striped panel. Cut out the shape carefully, making sure the stripes remain straight and evenly spaced. At this stage, you can also prepare a backing fabric and batting piece of the same size and shape.
Layer the ornament front, batting, and backing together, with the right sides of the fabric facing out. Secure the layers with pins or basting spray, then quilt along the stripe seams or in a decorative pattern of your choice. Quilting not only enhances the visual texture but also strengthens the overall structure.
Once the quilting is complete, finish the edges with bias binding or a zigzag stitch. If you’re making the ornament as an applique block for a larger quilt, you can skip the binding and stitch it directly onto your quilt top.
For an extra festive touch, sew a small fabric or ribbon loop to the top of the ornament. This allows it to be hung on a wall, Christmas tree, or door handle, adding instant seasonal charm to any space.
One of the joys of the Stripey Christmas Ornament – Quilt Pattern is the flexibility it offers in terms of design variations. You can create a coordinated set of ornaments by using the same color palette but varying the stripe arrangement. This creates visual interest while maintaining a harmonious look across your decorations.
Another fun variation is experimenting with diagonal stripes instead of horizontal or vertical ones. Diagonal lines can give the ornament a more dynamic and whimsical feel. You can achieve this by cutting your striped panel at an angle before shaping it into the ornament.
For a rustic, handmade style, use flannel or homespun fabrics in muted reds, greens, and creams. This gives the ornament a cozy, farmhouse-inspired aesthetic that pairs beautifully with natural wood and greenery in holiday décor.
You could also try incorporating metallic fabrics for a glamorous, elegant look. Gold and silver stripes catch the light beautifully, adding sparkle to your finished quilt block or hanging ornament.
If you love handwork, consider embellishing your finished ornament with embroidery stitches, beading, or applique snowflakes. These small details transform the design into a true heirloom piece that can be cherished for years to come.
Finally, for quilters who enjoy themed projects, create a set of stripey ornaments representing different holidays throughout the year. Simply change the colors and motifs, and you’ll have a versatile pattern that works beyond Christmas.
The key to a professional-looking Stripey Christmas Ornament – Quilt Pattern lies in careful planning and precise sewing. Take the time to cut your fabric strips accurately and keep your seam allowances consistent. Small inaccuracies can add up quickly, especially in striped designs, so attention to detail is essential.
When piecing your strips, press the seams carefully and consistently. A well-pressed quilt block lies flat, making it easier to layer, quilt, and finish. Using a pressing cloth can help protect delicate or metallic fabrics from heat damage.
Starch can be a helpful tool when working with lightweight fabrics or fabrics prone to fraying. It adds stability, making the cutting and sewing process smoother. Just remember to test it on a small piece first to ensure it doesn’t alter the fabric’s appearance.
If you’re quilting multiple ornaments, consider chain piecing—sewing multiple strip sets one after the other without cutting the thread in between. This saves time and keeps your workflow efficient.
For beginners, starting with a small ornament size can make the project more manageable. Once you’re comfortable with the process, you can experiment with larger designs or more complex stripe arrangements.
Lastly, remember that quilting is as much about creativity as it is about precision. Don’t be afraid to take design risks, mix unusual colors, or add unexpected embellishments. Your quilted ornament should reflect your personal style and holiday spirit.
Q: Is the Stripey Christmas Ornament – Quilt Pattern beginner-friendly?
A: Yes, this pattern is perfect for beginners. It uses simple strip piecing techniques and basic quilting skills, making it accessible to quilters of all levels.
Q: Can I make the ornament without a sewing machine?
A: Absolutely. While a sewing machine speeds up the process, you can sew the strips and layers by hand using a sturdy backstitch for durability.
Q: What size should the strips be?
A: The strip width is flexible. Common sizes range from 1 to 2 inches wide, but you can adjust this to suit your desired look.
Q: Can I use leftover fabric scraps for this pattern?
A: Yes, the Stripey Christmas Ornament – Quilt Pattern is ideal for using up scraps, especially small strips from previous quilting projects.
Q: How do I hang the finished ornament?
A: Simply attach a small ribbon or fabric loop to the top. This allows you to hang it on a tree, wall, or any festive display.
Q: Can I make a full quilt using just this ornament block?
A: Definitely. By repeating the block and varying the colors, you can create a stunning holiday-themed quilt.
The Stripey Christmas Ornament – Quilt Pattern is a delightful and versatile project that brings handmade warmth to your holiday season. With its simple construction, endless customization options, and festive charm, it’s a pattern that both beginners and experienced quilters can enjoy. Whether you make a single ornament as a special keepsake or a full quilt to brighten your home, this pattern will add joy and beauty to your celebrations. If you try this project, I’d love to hear your honest opinion and any suggestions you might have for future quilting ideas—your feedback helps keep the creative spirit alive.


