
Spiral Sunburst Quilt Pattern
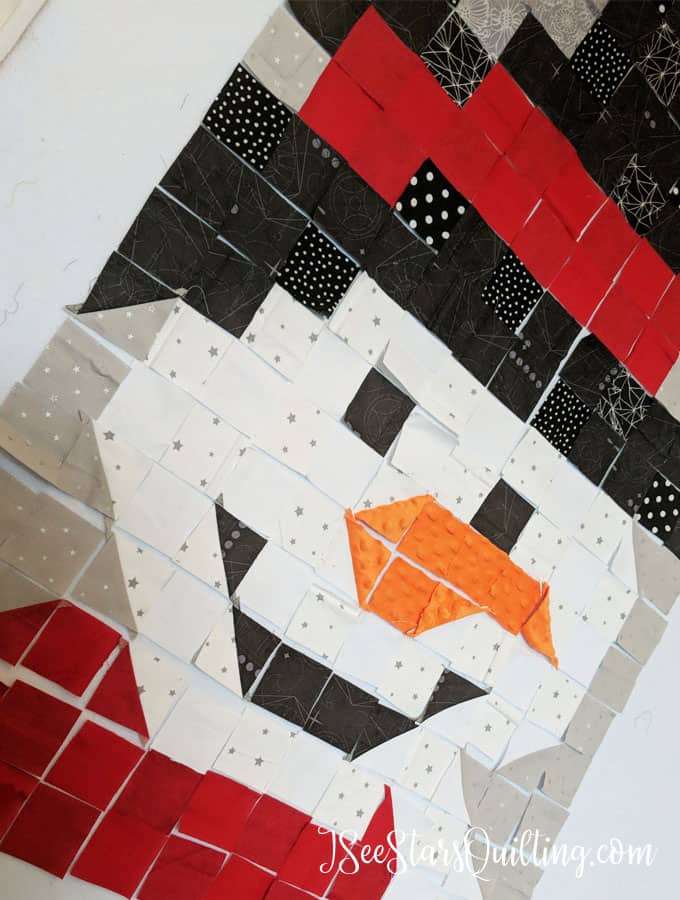
The Snowman Wall Hanging Quilt – Quilt Pattern is a delightful and festive project that adds warmth and charm to your winter and holiday décor. Whether you’re a beginner in quilting or an experienced crafter, creating this cheerful snowman design is a joyful way to bring the spirit of the season into your home. With its combination of creative fabric selection, precise piecing, and decorative stitching, this project can be both relaxing and rewarding. Not only is it a beautiful handmade decoration, but it also becomes a cherished keepsake that can be enjoyed year after year.
Quilts are more than just blankets; they are pieces of art that tell stories. A Snowman Wall Hanging Quilt – Quilt Pattern captures the magic of snowy days and the whimsical charm of a snowman. Because it is designed as a wall hanging, it serves as a decorative focal point rather than a functional bed cover. The design usually incorporates a jolly snowman with a carrot nose, cozy scarf, and perhaps even button eyes, surrounded by seasonal patterns like snowflakes or stars. This makes it perfect for holiday decorating or as a heartfelt handmade gift.
One of the great things about working on a Snowman Wall Hanging Quilt – Quilt Pattern is its versatility in size, colors, and embellishments. You can customize it with fabrics that match your home décor or choose a traditional holiday palette with reds, greens, and whites. Quilters often enjoy adding personal touches such as embroidered details, appliqué designs, or even small three-dimensional elements like tiny fabric scarves. In the following sections, we’ll explore step-by-step guidance for making this quilt, tips for fabric selection, techniques for assembly, and ideas to make your snowman truly unique.
When beginning your Snowman Wall Hanging Quilt – Quilt Pattern, selecting the right fabrics sets the tone for the entire project. The snowman’s body should be made from bright, crisp white or soft ivory fabric to represent fresh snow. Cotton fabrics are often preferred because they are easy to work with and offer a smooth finish for both piecing and quilting.
For the background, you can choose a deep blue fabric to represent a night sky, or a soft pastel to create a more whimsical and cozy atmosphere. The contrast between the snowman and background is essential to make the design stand out. Seasonal prints with tiny snowflakes, holly, or stars can enhance the theme.
The snowman’s accessories, such as the scarf and hat, are a fun way to incorporate colorful and patterned fabrics. Plaid or striped fabrics make excellent scarf designs, while solid or textured fabrics can be used for hats. This is also a great opportunity to use up fabric scraps from previous projects.
Adding fabric for embellishments like buttons, noses, and mittens is another creative element. Felt or wool works well for small details because it does not fray easily and adds texture. You may also use embroidery thread to stitch details such as eyes, smiles, or decorative outlines.
It’s important to pre-wash your fabrics before cutting, as this prevents shrinkage and removes any finishing chemicals. Pressing your fabrics before cutting ensures more precise measurements and sharper quilt assembly. A well-chosen fabric palette will bring your Snowman Wall Hanging Quilt – Quilt Pattern to life.
Finally, consider mixing textures for a more interesting finish. Combining smooth cottons with flannel or fleece adds depth to the quilt and makes it visually appealing when hung on a wall.
The first step in bringing the Snowman Wall Hanging Quilt – Quilt Pattern to life after selecting fabrics is accurate cutting. The snowman shape can be created using simple appliqué pieces or more intricate patchwork sections, depending on your chosen pattern style. Using a rotary cutter, self-healing cutting mat, and quilting ruler ensures precision.
For the snowman’s body, cut large circular or oval shapes. If your pattern includes separate head and body pieces, be sure to cut them proportionally so they align well. Remember to leave seam allowances on all pieces, typically a quarter-inch for quilting.
The background pieces can be cut as larger sections to frame the snowman or as smaller blocks to create a patchwork effect. Piecing the background in multiple fabrics can add visual interest and make the snowman pop.
Accessories such as hats, scarves, and mittens should be cut from contrasting fabrics. If you plan to add appliqué details like snowflakes or stars, cut these shapes carefully to avoid fraying. For small embellishments, using fusible web can help secure them before stitching.
Labeling each cut piece with small sticky notes or fabric-safe markers can help keep your project organized. This step prevents confusion during assembly and saves time later in the process.
Once all pieces are cut, press them flat to ensure they are crisp and easy to sew. This preparation stage is essential for creating neat seams and professional results in your Snowman Wall Hanging Quilt – Quilt Pattern.
Assembly begins by sewing the background pieces together. If you’re using a single background fabric, this step is quick, but if you’ve opted for a patchwork background, carefully align seams for a polished look. Once the background is ready, you can position the snowman pieces.
For appliqué snowmen, place each body part on the background fabric and secure them using pins or fusible web. Stitch around the edges with a zigzag or blanket stitch for a decorative finish. If using a pieced snowman, sew each section together before attaching it to the background.
Accessories such as scarves and hats can be sewn in place or left partially loose for a three-dimensional effect. Adding embroidery for eyes, smiles, and snowflake accents can make your snowman more expressive and unique.
Once the top layer of your Snowman Wall Hanging Quilt – Quilt Pattern is complete, prepare the quilt sandwich by layering the backing fabric, batting, and quilt top. Baste the layers together using pins or temporary spray adhesive.
Quilting can be done by hand or machine. Outlining the snowman with quilting stitches helps it stand out, while free-motion quilting in the background can add texture, such as swirling patterns to represent wind or snow.
Finish the quilt by trimming the edges and sewing on a binding. Adding a hanging sleeve to the back makes it easy to display your snowman on the wall during the holiday season.
The joy of making a Snowman Wall Hanging Quilt – Quilt Pattern lies in the details. Personal touches can turn a beautiful quilt into a treasured family heirloom. Adding embellishments such as real buttons, tiny pom-poms on the snowman’s hat, or hand-stitched snowflakes can make your quilt unique.
You can also incorporate fabric paint or embroidery to add depth and personality. For example, lightly shading the snowman’s edges with gray thread can create a 3D effect, while using metallic thread for snowflakes adds a subtle sparkle.
Consider adding a quilt label to the back with your name, the date, and a short note. This makes the quilt special and documents its creation for future generations. Some quilters like to write a holiday message or dedicate the quilt to a loved one.
Framing the quilt with a decorative border can enhance the overall design. Borders in contrasting colors or patterns draw attention to the center snowman and make the quilt feel complete.
If you want the quilt to match other holiday décor, use coordinating fabrics for pillows, table runners, or other items. This creates a cohesive and festive atmosphere in your home.
Finally, once your quilt is finished, take time to enjoy your work. Display it proudly during the winter months, and store it carefully to preserve it for years to come.
1. What size is a Snowman Wall Hanging Quilt?
Sizes vary depending on the pattern, but most wall hangings range from 20 to 40 inches in height.
2. Can beginners make a Snowman Wall Hanging Quilt – Quilt Pattern?
Yes, many patterns are beginner-friendly, especially appliqué styles that use simple shapes.
3. What type of fabric works best?
Cotton is most common, but mixing cotton with flannel or felt can add texture and interest.
4. Do I need a sewing machine?
A sewing machine speeds up the process, but you can also make a wall hanging quilt by hand.
5. How do I hang the quilt?
Adding a fabric sleeve or loops on the back allows you to use a dowel or decorative rod for hanging.
6. Can I wash my Snowman Wall Hanging Quilt?
Yes, but gentle washing is recommended to preserve details and embellishments.
7. How long does it take to make one?
Depending on the complexity, it can take anywhere from a weekend to several weeks.
Creating a Snowman Wall Hanging Quilt – Quilt Pattern is a rewarding way to celebrate the winter season with creativity and warmth. From selecting fabrics to adding personal details, each step allows you to infuse your own style and imagination into the project. This handmade decoration not only brightens your home but also carries sentimental value that grows over time. If you’ve made one before or are inspired to try, share your honest opinion and suggestions—I’d love to hear your creative ideas and experiences.


