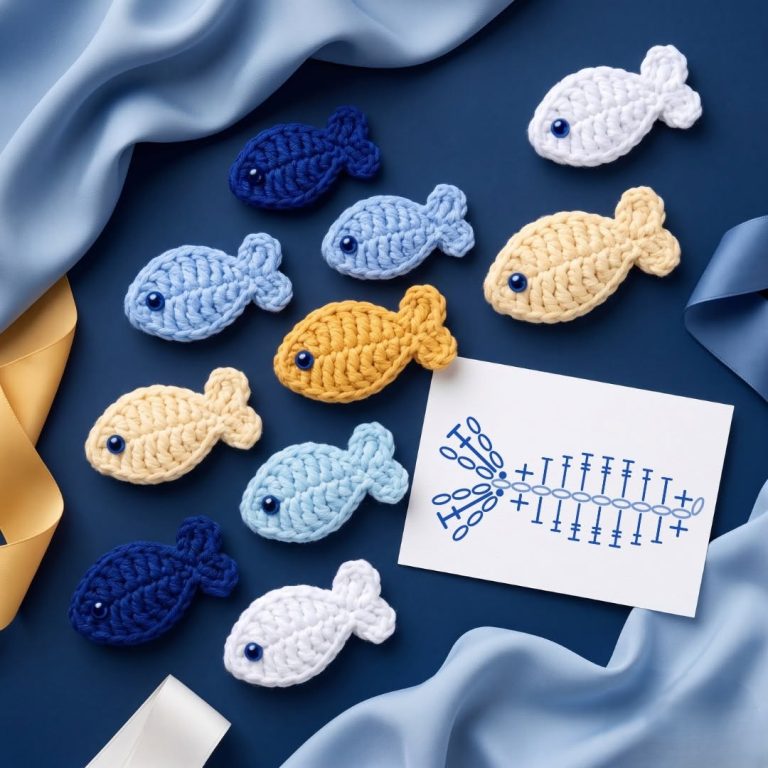
Crochet Easy Mini Fish Pattern
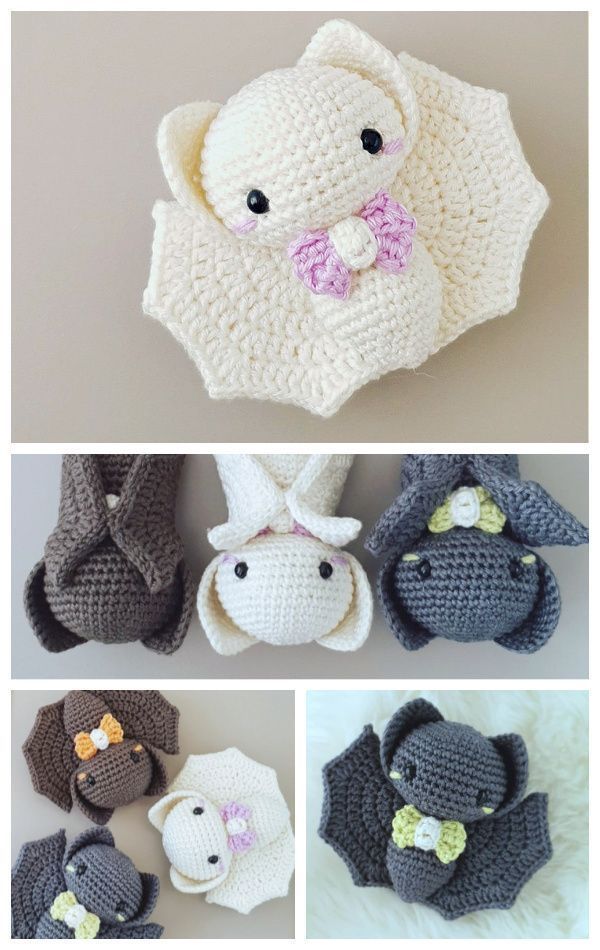
Crochet Baby Bat Tutorial is a creative and adorable way to combine crochet skills with playful design, resulting in a soft handmade bat perfect for babies, decorations, or gifts.
This Crochet Baby Bat Tutorial was designed to be beginner-friendly while still offering enough detail to help intermediate crocheters refine their technique. Handmade crochet toys are increasingly popular because they add a personal touch, are customizable, and allow crafters to control materials and quality from start to finish.
When following a Crochet Baby Bat Tutorial, you are not only creating a cute item but also learning important crochet fundamentals such as shaping, working in the round, and assembling amigurumi-style pieces. These skills are transferable to many other crochet projects, making this tutorial valuable beyond a single pattern. The baby bat design is especially loved for its rounded shapes, tiny wings, and soft texture that feels comforting and safe when made with the right yarn choices.
This Crochet Baby Bat Tutorial focuses on clarity, consistency, and creativity. By repeating the main steps and techniques throughout the article, you will gain confidence as you move forward. Whether you are crocheting for a baby shower, seasonal décor, or simply for fun, this tutorial provides a complete learning experience that respects best practices, craftsmanship, and creativity.
A Crochet Baby Bat Tutorial typically refers to a step-by-step guide for making a small, soft bat using crochet techniques. Unlike realistic bats, the baby bat design is intentionally cute, rounded, and friendly. This makes it suitable for decorative purposes and handmade gifts when crafted with appropriate materials.
The baby bat concept is popular in amigurumi crochet, which emphasizes small stuffed figures made using tight stitches. In a Crochet Baby Bat Tutorial, you will often work in continuous rounds, creating a smooth, seamless body. This technique is essential for achieving a polished and professional look.
Another key aspect of a Crochet Baby Bat Tutorial is proportional design. The head is usually larger than the body, while the wings are simplified and slightly curved. These proportions create a playful and non-threatening appearance that appeals to both children and adults.
Texture also plays an important role. A well-written Crochet Baby Bat Tutorial encourages the use of soft, baby-friendly yarns that enhance the final look and feel. Smooth stitches and even tension ensure that the bat maintains its shape over time.
Color choices are another defining feature. While traditional bats are dark, a Crochet Baby Bat Tutorial often suggests pastel, neutral, or whimsical colors. This flexibility allows crafters to personalize the project while maintaining its charm.
Finally, the concept of a crochet baby bat is rooted in creativity and storytelling. Each handmade bat can have its own personality, making the Crochet Baby Bat Tutorial a foundation for endless variations and artistic expression.
Every successful Crochet Baby Bat Tutorial begins with proper preparation and materials. Choosing the right yarn is crucial, as it affects both appearance and durability. Soft acrylic, cotton blends, or baby yarns are commonly recommended for this type of project.
Hook size is another essential consideration. In a Crochet Baby Bat Tutorial, a slightly smaller hook than recommended on the yarn label is often used. This helps create tighter stitches, preventing stuffing from showing through and ensuring a clean finish.
Stuffing material should be lightweight and evenly distributed. A good Crochet Baby Bat Tutorial emphasizes gentle shaping during stuffing to maintain symmetry. Overstuffing can distort the design, while understuffing may cause the bat to lose its form.
Stitch markers are highly useful when working in rounds. Many Crochet Baby Bat Tutorial guides recommend using them to track the beginning of each round. This simple tool helps maintain accuracy and reduces the risk of mistakes.
Before starting, it is also important to understand basic crochet abbreviations. A clear Crochet Baby Bat Tutorial explains common terms such as single crochet, increase, and decrease. Familiarity with these terms ensures smoother progress throughout the project.
Preparation also includes setting up a comfortable workspace. Good lighting, proper posture, and organized tools allow you to focus fully on the Crochet Baby Bat Tutorial, making the experience both productive and enjoyable.
The heart of any Crochet Baby Bat Tutorial lies in its step-by-step process. Typically, the project begins with the head, worked in a magic ring. This technique creates a tight center and forms the foundation for a round, plush shape.
As you continue following the Crochet Baby Bat Tutorial, increases are added gradually to shape the head. Maintaining consistent tension during this stage is essential for achieving a smooth surface without gaps.
Once the head is complete, the tutorial usually transitions into the body. In a well-structured Crochet Baby Bat Tutorial, the body is seamlessly connected to the head, minimizing the need for sewing and enhancing durability.
The wings are often crocheted separately. A detailed Crochet Baby Bat Tutorial explains how to create gentle curves and scalloped edges to mimic bat wings in a simplified and cute form. These wings are later attached securely to the body.
Facial details are added near the end of the process. A thoughtful Crochet Baby Bat Tutorial prioritizes safety by recommending embroidered features instead of small detachable pieces, especially when the bat is intended for babies.
Finally, assembly and finishing touches bring the project together. Following the Crochet Baby Bat Tutorial carefully during this stage ensures that all parts are aligned and securely fastened, resulting in a polished and professional-looking crochet baby bat.
Customization is one of the most enjoyable aspects of a Crochet Baby Bat Tutorial. By adjusting yarn colors, you can create unique bats that suit different themes, seasons, or personal preferences without altering the core pattern.
Size variation is another creative option. A flexible Crochet Baby Bat Tutorial allows you to change hook size or yarn weight to make smaller or larger versions of the same design. This makes the pattern versatile for different uses.
Adding small accessories can enhance the final result. Some crafters following a Crochet Baby Bat Tutorial include tiny bows, scarves, or embroidered details to give each bat a distinct personality.
Finishing techniques greatly influence the overall quality. A professional Crochet Baby Bat Tutorial emphasizes weaving in ends securely and smoothing out seams. These steps may seem minor but significantly impact durability and appearance.
Blocking is not always required, but gentle shaping with your hands can help refine the final form. Many Crochet Baby Bat Tutorial guides suggest lightly adjusting wings and ears before the project is fully complete.
Lastly, proper care instructions ensure longevity. A complete Crochet Baby Bat Tutorial reminds crafters to recommend gentle cleaning methods, preserving both shape and softness over time.
What skill level is required for a Crochet Baby Bat Tutorial?
Most Crochet Baby Bat Tutorial patterns are suitable for beginners with basic crochet knowledge, especially those familiar with working in the round.
What yarn is best for a Crochet Baby Bat Tutorial?
Soft baby yarn, cotton blends, or smooth acrylic yarns are ideal for a Crochet Baby Bat Tutorial, as they provide comfort and durability.
Is a Crochet Baby Bat safe for babies?
When made with embroidered features and securely attached parts, a Crochet Baby Bat Tutorial can produce a safe decorative or gift item.
How long does it take to complete a Crochet Baby Bat Tutorial?
Depending on experience, most people can complete a Crochet Baby Bat Tutorial project within a few hours to a day.
Can I sell items made from a Crochet Baby Bat Tutorial?
Many tutorials allow selling finished items, but it is important to respect the creator’s usage terms when following a Crochet Baby Bat Tutorial.
Can I customize the size of the Crochet Baby Bat?
Yes, adjusting yarn weight and hook size in a Crochet Baby Bat Tutorial allows easy customization of the final size.
This article has explored a complete Crochet Baby Bat Tutorial, from understanding the concept and gathering materials to following the step-by-step process and adding personal touches. By learning the techniques outlined here, you can confidently create a charming crochet baby bat while strengthening your overall crochet skills.
The Crochet Baby Bat Tutorial demonstrates how thoughtful design, proper preparation, and careful finishing come together in a rewarding handmade project. If you enjoyed this guide, leave your honest opinion and share your suggestions, as your feedback helps improve future tutorials and inspires new creative ideas.


