
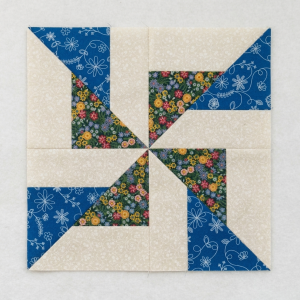
Spiral Sunburst Quilt Pattern
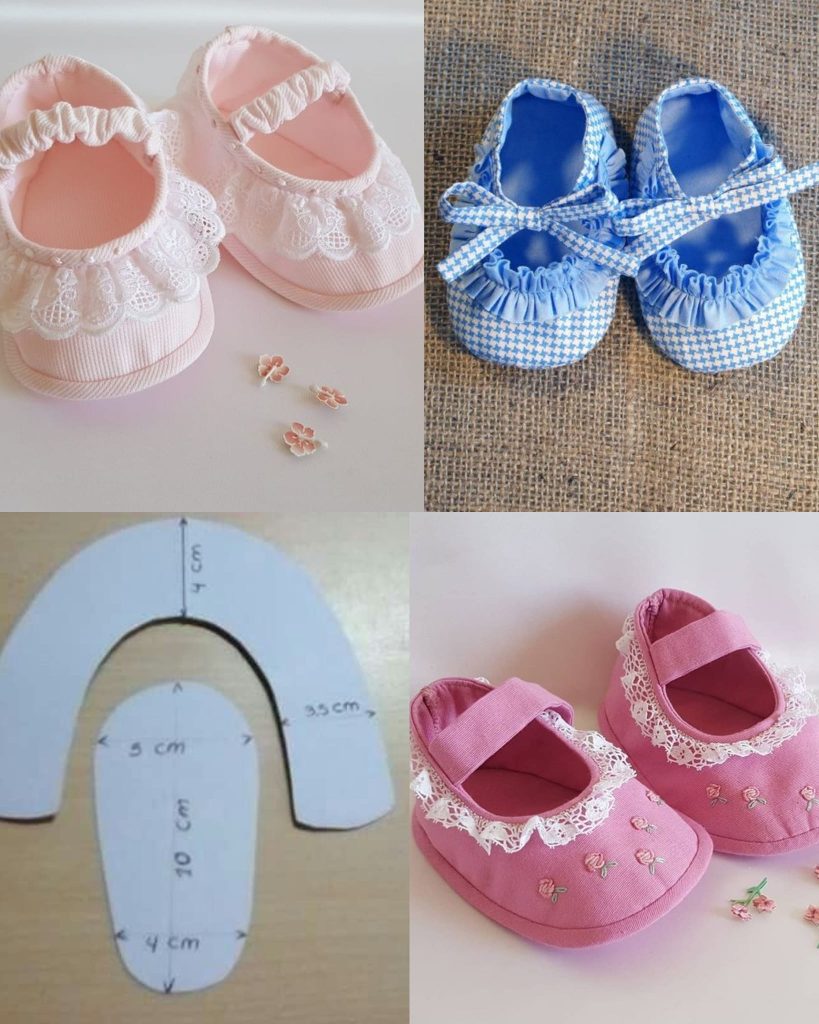
The DIY baby booties Pattern is one of the most beloved projects among crafters who enjoy creating handmade items for babies. These tiny shoes are not only adorable but also practical, making them a perfect gift for newborns and infants.
When you learn a DIY baby booties Pattern, you gain the ability to create personalized footwear that keeps little feet warm while showcasing your creativity. Many parents and crafters prefer handmade baby items because they can be customized in color, texture, and size to match the baby’s needs.
Another wonderful aspect of working with a DIY baby booties Pattern is how beginner-friendly it can be. Even if you are relatively new to crafting, learning this pattern allows you to practice essential techniques while producing something meaningful. Handmade baby booties often become cherished keepsakes, especially when they are created with care and attention to detail. This is one reason why the DIY baby booties Pattern has become such a popular project in crafting communities around the world.
Beyond being a fun craft, the DIY baby booties Pattern also offers a relaxing and rewarding creative experience. Crafting by hand encourages mindfulness and patience, and the final product is something both beautiful and useful. Whether you are making booties for your own baby, a friend’s newborn, or even to sell as handmade products, understanding how a DIY baby booties Pattern works will help you achieve consistent and professional-looking results.
Before starting a DIY baby booties Pattern, it is important to understand the basic structure of baby booties. Most designs consist of three main sections: the sole, the upper part of the bootie, and the cuff or ankle area. Each section plays an important role in ensuring the booties fit comfortably and stay secure on the baby’s feet.
The sole is usually the first part created in a DIY baby booties Pattern. It forms the base of the bootie and determines the overall size. A well-shaped sole provides stability and comfort for the baby. Many patterns begin with simple stitches or rows that gradually expand to create an oval or rounded shape.
The upper part of the bootie is attached to the sole and begins to form the body of the shoe. This stage of the DIY baby booties Pattern is where the bootie begins to look like a real shoe. Adjusting stitch density and shaping helps create a snug but comfortable fit.
Another important component of the DIY baby booties Pattern is the cuff or ankle section. This part keeps the booties from slipping off the baby’s feet. Some designs use ribbing or elastic-like stitches that allow flexibility while maintaining structure.
Materials also play a crucial role in a successful DIY baby booties Pattern. Soft yarns or fabrics are recommended because babies have sensitive skin. Choosing breathable and lightweight materials ensures comfort and safety.
Understanding these structural elements helps crafters follow a DIY baby booties Pattern more confidently. Once you know how each section works, it becomes easier to adapt patterns and create custom variations.
Selecting the right materials is essential when working with a DIY baby booties Pattern. Babies require soft, gentle fabrics that will not irritate their delicate skin. Cotton yarn, bamboo blends, and soft acrylic yarns are commonly used because they are both comfortable and easy to maintain.
When following a DIY baby booties Pattern, yarn weight or fabric thickness can affect the final size and texture of the booties. Lightweight yarns create delicate and breathable shoes, while slightly thicker yarns offer more warmth. Choosing the correct weight ensures the booties match the intended design.
Color selection is another fun part of creating a DIY baby booties Pattern. Many crafters choose pastel shades such as baby blue, soft pink, mint green, or creamy white. However, modern baby booties can also feature vibrant colors or playful combinations that make the design stand out.
Tools are equally important for achieving a clean finish in a DIY baby booties Pattern. Depending on the crafting method, you may need crochet hooks, knitting needles, or sewing tools. Using the correct size tool ensures the stitches remain even and consistent.
Safety is also a key factor when selecting materials for a DIY baby booties Pattern. Avoid small detachable decorations that could pose a choking hazard. Instead, consider embroidered details or securely stitched embellishments.
By carefully choosing high-quality materials, you improve both the appearance and durability of your DIY baby booties Pattern project. The result is a comfortable pair of baby shoes that are safe and long-lasting.
Following a step-by-step approach helps ensure success when working on a DIY baby booties Pattern. Starting with preparation makes the process smoother and more enjoyable. Begin by gathering all the materials and tools you will need before starting the project.
The first step in most DIY baby booties Pattern instructions is creating the sole. This part usually involves increasing stitches gradually to form the shape of the baby’s foot. Careful counting of stitches ensures symmetry and balance.
Once the sole is complete, the next stage of the DIY baby booties Pattern focuses on building the sides. Stitches are worked around the sole to create the walls of the bootie. This technique gives the design depth and structure.
The toe area is often shaped using gradual decreases in the DIY baby booties Pattern. This shaping helps create the curved front that resembles a tiny shoe. Proper shaping is essential for achieving a comfortable fit.
After shaping the toe, the cuff or ankle section is created. This stage of the DIY baby booties Pattern provides both style and functionality. Some cuffs are folded for a decorative look, while others remain upright for a classic style.
Finally, finishing touches complete the DIY baby booties Pattern. This may include weaving in loose ends, smoothing seams, and checking that the booties are symmetrical. These small details elevate the overall quality of the handmade item.
One of the best things about working with a DIY baby booties Pattern is the opportunity for creativity. Once you understand the basic design, you can easily experiment with colors, textures, and decorative elements.
Many crafters personalize a DIY baby booties Pattern by adding small bows, flower accents, or contrasting trims. These decorative features make the booties unique and perfect for special occasions like baby showers or birthdays.
Another creative idea for a DIY baby booties Pattern is experimenting with textured stitches. Patterns that include raised stitches or layered designs add visual interest and make the booties look more sophisticated.
Seasonal themes can also inspire variations in a DIY baby booties Pattern. For example, winter designs may include thicker yarn and cozy cuffs, while summer versions might use lightweight cotton for better breathability.
Personalization can go even further by adjusting the size within a DIY baby booties Pattern. By slightly modifying stitch counts or measurements, you can create booties suitable for newborns, infants, or slightly older babies.
These creative possibilities make the DIY baby booties Pattern an endlessly enjoyable project. Each new pair can reflect your personal style and creativity while remaining functional and adorable.
What skill level is required for a DIY baby booties Pattern?
Most DIY baby booties Pattern designs are suitable for beginners or intermediate crafters. Basic knowledge of stitches and simple shaping techniques is usually enough to complete the project successfully.
How long does it take to complete a pair of baby booties?
A typical DIY baby booties Pattern can be completed in a few hours depending on your experience level and the complexity of the design. Many crafters enjoy finishing a pair in a single crafting session.
What size should baby booties be?
Sizing in a DIY baby booties Pattern usually depends on the baby’s age. Patterns often include measurements for newborns, 3–6 months, and sometimes older babies. Checking the sole length is the best way to ensure the correct fit.
Can I wash handmade baby booties?
Yes, most DIY baby booties Pattern projects can be washed, especially if made with machine-washable yarn. However, gentle washing and air drying are recommended to maintain shape and softness.
Are handmade baby booties safe for infants?
A properly made DIY baby booties Pattern is generally safe as long as all parts are securely stitched and no loose decorations are attached. Safety and comfort should always be a priority when making baby items.
Can I sell baby booties made from a DIY pattern?
Many crafters create products from a DIY baby booties Pattern to sell as handmade items. However, it is important to ensure the design is your own or that the pattern allows commercial use.
Learning a DIY baby booties Pattern is a rewarding and creative experience that allows you to craft beautiful handmade shoes for babies. Throughout this guide, we explored the basic structure of baby booties, the importance of choosing the right materials, the step-by-step process for creating them, and creative ways to personalize your designs. Each stage of the DIY baby booties Pattern contributes to a final product that is both functional and charming.
Handmade baby booties are more than just small shoes—they represent care, creativity, and attention to detail. By mastering a DIY baby booties Pattern, you can create thoughtful gifts, memorable keepsakes, or even products for a handmade business.
If you enjoyed this guide, feel free to share your honest opinion about the article and leave suggestions for future crafting topics. Your feedback helps improve content and inspires even more creative ideas for new patterns and tutorials.


