
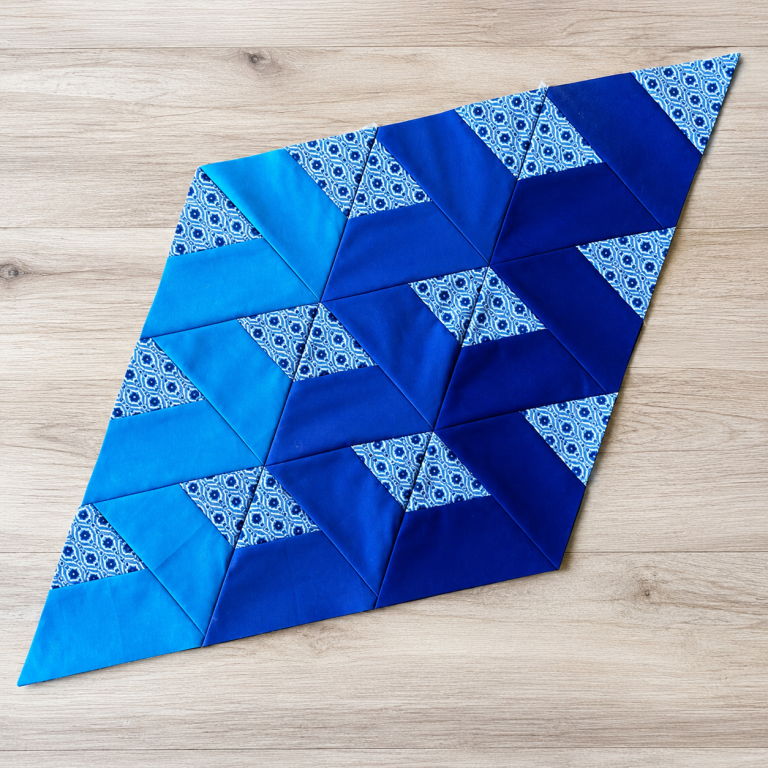
Star Oklohama Quilt Block Pattern
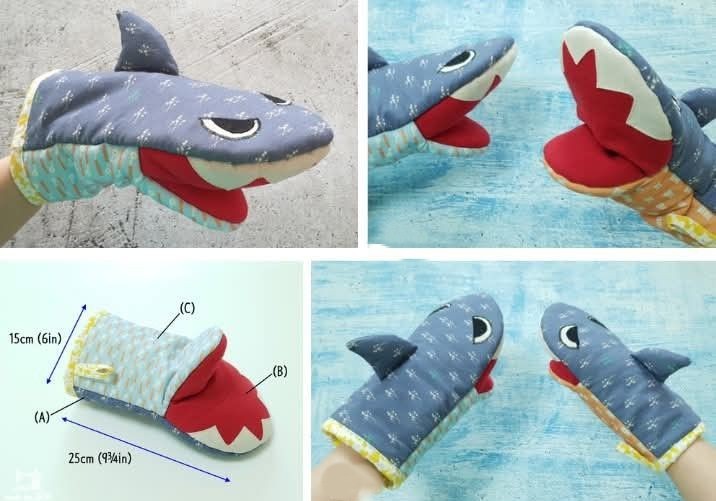
How to Make Shark Oven Gloves Mitts Pattern is a fun and creative sewing project that combines practicality with a playful design.
If you love crafting unique kitchen accessories, this tutorial-style guide will walk you through everything you need to know to create your own shark-themed oven mitts.
Not only are these mitts functional for protecting your hands from heat, but they also add personality and charm to your kitchen space.Creating handmade items like oven mitts allows you to express your creativity while producing something useful. Whether you are an experienced sewer or a beginner looking for a new project, learning How to Make Shark Oven Gloves Mitts Pattern can be both enjoyable and rewarding. With the right materials and guidance, you can transform simple fabrics into eye-catching kitchen essentials that also make great gifts.
In addition, incorporating trending sewing concepts such as the Fabric Baby bonnets Pattern into your learning journey can expand your skills and inspire new ideas. While this article focuses on shark oven mitts, understanding different patterns and techniques will help you grow as a crafter and confidently tackle various sewing projects.
To begin learning How to Make Shark Oven Gloves Mitts Pattern, gathering the right materials is essential. Choosing high-quality fabrics ensures durability and heat resistance, which are crucial for oven mitts. Cotton fabric is highly recommended because it is breathable and easy to sew.
You will also need heat-resistant batting or insulating material. This layer protects your hands from high temperatures and adds structure to the mitts. Without proper insulation, your oven gloves may not serve their purpose effectively.
Basic sewing tools are equally important. Make sure you have scissors, pins, a sewing machine, and matching thread. These tools will help you achieve clean seams and a professional finish in your project.
For the shark design, consider using different fabric colors. Gray or blue works well for the shark body, while white fabric can be used for the teeth and inner mouth. This contrast brings your design to life and makes it visually appealing.
Pattern templates are another key component. You can draw your own or adapt ideas inspired by projects like the Fabric Baby bonnets Pattern, which also rely on structured shapes and careful cutting techniques.
Lastly, don’t forget marking tools such as chalk or fabric pens. These help you trace your pattern accurately onto the fabric, ensuring precise cuts and a better final result.
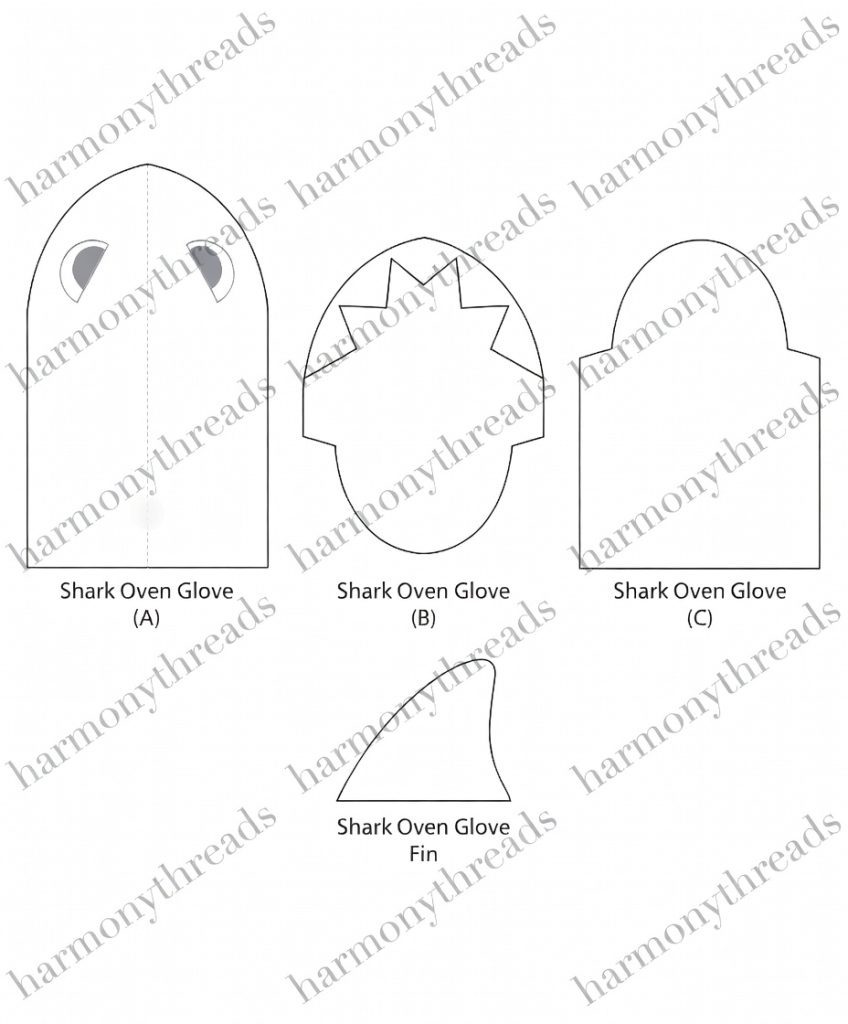
The first step in How to Make Shark Oven Gloves Mitts Pattern is cutting your fabric pieces. Use your pattern template to cut two identical outer pieces, two lining pieces, and two insulating layers. Accuracy here is essential for proper assembly.
Next, prepare the shark details. Cut small triangular shapes for the teeth using white fabric. You may also cut a contrasting piece for the inside of the shark’s mouth to enhance the design.
Begin assembling the outer layer by attaching the teeth between the top and bottom sections of the shark mouth. Carefully pin them in place before sewing to ensure they remain aligned during stitching.
After that, layer your fabrics. Place the outer fabric, insulating layer, and lining together. Make sure the right sides of the fabric are facing inward so that the seams will be hidden once turned.
Sew around the edges, leaving a small opening for turning the mitt inside out. This step is crucial for achieving a clean and professional look without visible raw edges.
Finally, turn the mitt right side out and close the opening with a neat stitch. Your shark oven glove will begin to take shape, showcasing both functionality and creativity.
When exploring How to Make Shark Oven Gloves Mitts Pattern, customization is where your creativity truly shines. You can experiment with different colors, textures, and embellishments to make your mitts unique.
Consider adding embroidered eyes or fabric appliqués to give your shark more personality. Small details like these can transform a simple mitt into a standout piece.
You can also adjust the size of the mitts. Whether you need larger gloves for better coverage or smaller ones for a snug fit, modifying the pattern ensures comfort and usability.
Inspiration from other sewing projects, such as the Fabric Baby bonnets Pattern, can introduce new techniques like curved seams and decorative stitching. Applying these ideas enhances both the look and craftsmanship of your mitts.
Another idea is to create matching kitchen sets. Pair your shark oven mitts with coordinating aprons or pot holders to achieve a cohesive theme in your kitchen.
Lastly, consider using eco-friendly or recycled fabrics. This not only reduces waste but also adds a meaningful touch to your handmade creations.
One common mistake when learning How to Make Shark Oven Gloves Mitts Pattern is choosing the wrong fabric. Thin or synthetic materials may not provide adequate heat protection and can compromise safety.
Another issue is skipping the insulating layer. Even if your mitt looks great, it won’t function properly without proper heat resistance. Always include a quality batting layer.
Improper measurements can also lead to poorly fitting mitts. Take your time when cutting fabric and double-check your pattern to avoid mismatched pieces.
Rushing through the sewing process often results in uneven seams. Slow and steady stitching ensures a polished and durable final product.
Neglecting reinforcement in high-stress areas is another mistake. Areas like the thumb and edges should be securely stitched to prevent wear and tear over time.
Finally, forgetting to test your mitt before use can be risky. Always check its heat resistance carefully to ensure it provides adequate protection in the kitchen.
What fabric is best for shark oven mitts?
Cotton fabric combined with heat-resistant batting is the best choice. It ensures both comfort and safety during use.
Can beginners learn How to Make Shark Oven Gloves Mitts Pattern?
Yes, beginners can successfully complete this project by following step-by-step instructions and practicing basic sewing techniques.
How long does it take to make a pair of oven mitts?
On average, it takes a few hours, depending on your experience level and the complexity of your design.
Can I wash handmade oven mitts?
Yes, most cotton-based mitts are machine washable. However, always check the materials used to ensure proper care.
How can I make my mitts more durable?
Use high-quality materials, reinforce seams, and include proper insulation to increase durability.
Is it possible to sell shark oven mitts?
Yes, handmade items like these can be sold, provided you use original designs and follow marketplace guidelines.
In this guide on How to Make Shark Oven Gloves Mitts Pattern, you learned how to create a functional and creative kitchen accessory from start to finish. From selecting the right materials to assembling and customizing your mitts, each step plays an important role in achieving a high-quality result.
By also exploring concepts inspired by the Fabric Baby bonnets Pattern, you can expand your sewing skills and gain confidence in working with different designs and techniques. This project is not only practical but also a great way to express your creativity and make personalized items for your home or as gifts.
Now it’s your turn to try making your own shark oven mitts. Share your honest opinion about this guide and feel free to leave suggestions or ideas for future projects. Your feedback is always welcome and helps improve the crafting experience for everyone.


