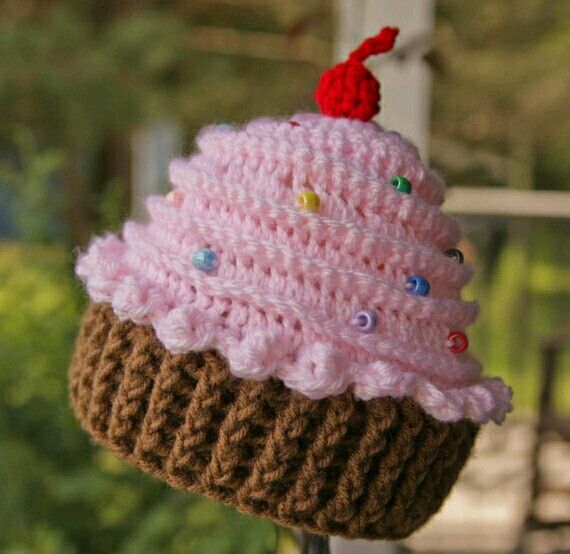
Crochet Cupcake Hat Pattern

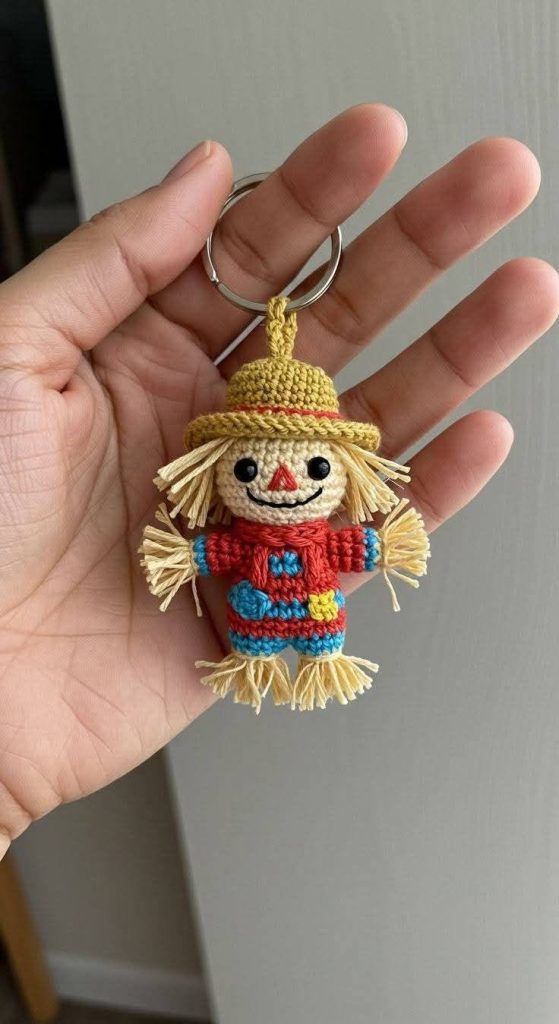
The Crochet Mini Scarecrow Pattern is a charming and creative project that brings together the beauty of autumn and the timeless appeal of handmade crochet. Whether you are looking for a seasonal decoration, a thoughtful handmade gift, or a cute keychain accessory, this miniature scarecrow is the perfect project.
Its adorable smile, tiny straw details, colorful outfit, and classic hat make it a delightful piece for every crochet enthusiast. Best of all, this project is beginner-friendly while still offering enough interesting techniques to keep experienced crocheters engaged.
Creating a Crochet Mini Scarecrow Pattern is also a wonderful opportunity to practice working in continuous rounds, color changes, shaping, and assembling amigurumi pieces. The finished doll is lightweight, durable, and easy to customize with different clothing colors or facial expressions. Since it requires only small amounts of yarn, it is also an excellent stash-busting project that allows you to transform leftover yarn into something beautiful and practical. With a little patience and creativity, you can make a unique scarecrow that reflects your personal style.
Another reason why the Crochet Mini Scarecrow Pattern has become increasingly popular is its versatility. It can be used as a keychain, backpack charm, fall ornament, gift topper, or even part of a larger autumn decoration. Handmade crochet items have a special charm because every stitch tells a story. Throughout this tutorial, you will learn each step using standard US crochet terminology, making it easy for crocheters in the United States and around the world to follow along confidently.
Before starting your Crochet Mini Scarecrow Pattern, gather all the materials you will need. Prepare lightweight cotton yarn in beige, tan, yellow, red, turquoise, black, orange, and a small amount of brown. You will also need a 2.0 mm or 2.25 mm crochet hook, polyester fiberfill, stitch markers, embroidery needle, scissors, safety eyes (6 mm), and a metal key ring.
Using cotton yarn helps the stitches remain firm and well defined. Tight stitches prevent the stuffing from showing through and give the scarecrow a polished appearance. If you crochet loosely, consider using a slightly smaller hook than recommended.
Throughout this project, the following US crochet abbreviations will be used:
MR = Magic Ring
ch = Chain
sl st = Slip Stitch
sc = Single Crochet
inc = Increase (2 sc in same stitch)
dec = Invisible Decrease
hdc = Half Double Crochet
dc = Double Crochet
BLO = Back Loop Only
FLO = Front Loop Only
FO = Fasten Off
Always use a stitch marker at the beginning of each round. Since amigurumi is usually worked in continuous spirals, the marker helps you keep track of the beginning of every round without confusion.
Stuff each section gradually rather than waiting until the end. This creates a smoother shape and prevents lumps. Add small amounts of fiberfill as you crochet upward, gently shaping the body with your fingers.
Before moving to assembly, make sure every piece is securely finished and all yarn tails are left long enough for sewing. Organized preparation makes the final construction much easier.
Begin with the head using beige yarn.
Head
Rnd 1: MR, 6 sc. (6)
Rnd 2: Inc in each st around. (12)
Rnd 3: (1 sc, inc) repeat around. (18)
Rnd 4: (2 sc, inc) repeat around. (24)
Rnd 5: (3 sc, inc) repeat around. (30)
Rnd 6-10: Sc in each stitch around. (30)
Insert the safety eyes between Rounds 7 and 8 with approximately six stitches between them. Embroider the small orange triangle nose after attaching the eyes.
Rnd 11: (3 sc, dec) repeat around. (24)
Rnd 12: (2 sc, dec) repeat around. (18)
Begin stuffing firmly.
Rnd 13: (1 sc, dec) repeat around. (12)
Rnd 14: Dec around. (6)
FO and close the opening.
For the smile, embroider black yarn just below the nose using small curved backstitches. This simple expression gives the scarecrow its friendly personality.
Next, create the body using red yarn.
Rnd 1: MR, 6 sc.
Rnd 2: Inc around. (12)
Rnd 3: (1 sc, inc) repeat. (18)
Rnd 4-8: Sc around.
Change colors to turquoise where desired to create decorative stripes. Small embroidered patches using yellow yarn can also be added later to resemble sewn fabric patches.
Stuff lightly while working to keep the body soft yet stable.
Continue with the arms.
Using red yarn:
Rnd 1: MR, 6 sc.
Rnd 2-5: Sc around.
Change to turquoise for one round if desired.
Insert small strands of raffia-colored yarn or fringe at the wrist before closing the arm. This creates the classic straw effect found on traditional scarecrows.
Make two identical arms.
For the legs:
Using turquoise yarn:
Rnd 1: MR, 6 sc.
Rnd 2-5: Sc around.
Attach beige or raffia fringe to the bottom before sewing them to the body. These straw “boots” complete the rustic appearance.
Create the hat using tan yarn.
Rnd 1: MR, 6 sc.
Rnd 2: Inc around.
Rnd 3: (1 sc, inc) repeat.
Continue increasing evenly until the crown reaches the desired diameter.
Work several rounds evenly to build the height.
For the brim:
Work one round in FLO.
Then make one increase every third stitch for two rounds to allow the brim to flare naturally.
Finish with a decorative red band embroidered around the base of the hat.
Create the hanging loop.
Using tan yarn:
Ch 18.
Sl st back along the chain.
Attach securely to the top center of the hat before connecting the key ring.
For the hair, cut several equal strands of raffia-colored yarn or light beige yarn.
Fold each strand in half.
Attach around the sides of the head using a lark’s head knot or by pulling the folded strand through stitches with the crochet hook.
Trim evenly to create a neat hairstyle.
Finally, assemble the scarecrow.
Sew the head securely onto the body.
Attach both arms evenly at shoulder level.
Position both legs symmetrically underneath the body.
Sew the hat firmly to the head.
Attach the hanging loop through the key ring.
Embroider tiny decorative patches, belt details, or buttons using contrasting yarn colors for additional personality.
Once assembled, gently shape the doll with your hands to distribute the stuffing evenly and ensure all pieces are aligned. Your finished Crochet Mini Scarecrow Pattern is now ready to brighten backpacks, keys, handbags, autumn wreaths, or seasonal displays while showcasing beautiful handmade craftsmanship.
One of the best things about the Crochet Mini Scarecrow Pattern is how easily it can be personalized. While the classic version features a tan hat, red shirt, turquoise overalls, and straw accents, you can experiment with endless color combinations. Try earthy browns, forest greens, mustard yellow, pumpkin orange, or burgundy to create an authentic autumn palette. Every change in color gives your miniature scarecrow a unique personality.
Another fun idea is to add tiny accessories. A miniature sunflower sewn onto the hat, a tiny crocheted pumpkin attached to one hand, or a little burlap bow around the neck can make your finished piece even more charming. Small embroidered leaves or tiny buttons also create beautiful rustic details without making the project overly complicated.
If you are making several scarecrows, consider giving each one a different facial expression. Some can have embroidered sleepy eyes, while others can feature cheerful smiles or rosy cheeks made with a touch of pink embroidery floss. These small variations make every handmade piece truly one of a kind.
This Crochet Mini Scarecrow Pattern also works wonderfully for craft fairs. Customers often appreciate small handmade items that are affordable, seasonal, and easy to carry. Keychains, backpack charms, zipper pulls, and ornaments are always popular because they make thoughtful gifts without requiring a large investment.
You can even create a complete autumn collection by pairing your scarecrow with crocheted pumpkins, sunflowers, corn, crows, apples, or miniature hay bales. Displayed together, these pieces create a beautiful seasonal theme that appeals to crochet lovers of every age.
Remember that handmade projects become even more meaningful when they reflect your creativity. Do not be afraid to experiment with yarn textures, embroidery details, or decorative trims. Every finished Crochet Mini Scarecrow Pattern tells its own story through the colors, stitches, and finishing touches you choose.
Neat finishing is what transforms a good crochet project into an exceptional one. After sewing every piece together, spend a few extra minutes checking the symmetry of the arms, legs, hat, and facial features. Small adjustments before securing the final stitches can greatly improve the overall appearance of your Crochet Mini Scarecrow Pattern.
When sewing amigurumi parts together, always use the same yarn color as the section you are attaching. Invisible whip stitches produce a cleaner finish than large visible stitches. Pull the yarn firmly enough to secure the pieces, but avoid tightening so much that the stuffing becomes distorted.
The straw effect is one of the defining characteristics of this project. To create realistic straw, cut multiple equal strands of beige or raffia-colored yarn. Attach them to the sleeves, pant legs, and both sides of the head. Once attached, gently brush the yarn with a fine-tooth comb or a small pet brush to separate the fibers and create a fuller, softer appearance.
To make the hat more structured, crochet with slightly tighter tension or insert a thin circle of plastic canvas inside the brim before sewing it permanently onto the head. This simple technique helps the brim maintain its shape while still remaining flexible enough for everyday use as a keychain.
If your scarecrow will be used frequently, reinforce high-stress areas such as the hanging loop and key ring attachment with several extra stitches. These additional stitches significantly increase durability and help prevent wear over time.
Cleaning your finished Crochet Mini Scarecrow Pattern is simple. Hand wash gently using cool water and mild soap, avoid twisting the project, squeeze out excess water using a towel, reshape it carefully, and allow it to air dry completely. This helps preserve both the shape and the vibrant yarn colors for many seasons.
1. Is the Crochet Mini Scarecrow Pattern suitable for beginners?
Yes. The Crochet Mini Scarecrow Pattern is an excellent project for adventurous beginners who already know the basic stitches. Since it mainly uses single crochet (sc) worked in continuous rounds, it provides great practice for shaping, increasing, decreasing, and assembling amigurumi. Even if you have never made a miniature doll before, taking your time and following each step carefully will lead to beautiful results.
2. What type of yarn works best for this project?
Lightweight cotton yarn is highly recommended because it creates neat, well-defined stitches and helps the finished scarecrow keep its shape. Mercerized cotton also gives a clean finish and excellent stitch definition. However, soft acrylic yarn can also be used if you prefer a slightly plush appearance.
3. Which crochet hook should I use?
A 2.0 mm to 2.5 mm crochet hook usually works well with lightweight cotton yarn. The goal is to produce tight stitches so the stuffing does not show through. If your crochet tension is naturally loose, choose a hook one size smaller.
4. Can I make this project without safety eyes?
Absolutely. If the keychain is intended for young children, embroidered eyes are the safest choice. Use black embroidery floss or black yarn to stitch small curved eyes and a smiling mouth. Embroidered features also give the scarecrow a charming handmade appearance.
5. How do I make the straw hair look more realistic?
After attaching the strands of beige yarn, gently brush them using a fine comb or small craft brush. This separates the fibers and creates a fuller straw-like texture. Trim the strands evenly after brushing to achieve a neat and balanced hairstyle.
6. Can I customize the clothing colors?
Definitely. One of the most enjoyable aspects of the Crochet Mini Scarecrow Pattern is its flexibility. Try classic autumn shades such as mustard yellow, burnt orange, olive green, burgundy, chocolate brown, or even pastel colors for a softer seasonal look. Every color combination creates a unique scarecrow.
7. What other accessories can I add?
Tiny crocheted pumpkins, miniature sunflowers, little leaves, embroidered patches, bows, scarves, buttons, or even a miniature bird sitting on the hat can all add extra personality. Small details help transform every scarecrow into a truly original handmade creation.
8. How should I store the finished scarecrow?
Store your finished Crochet Mini Scarecrow Pattern in a clean, dry place away from direct sunlight. If it is used only as seasonal décor, placing it inside a small fabric bag or storage box during the off-season will help preserve its colors and shape.
Video Tutorial:
The Crochet Mini Scarecrow Pattern is much more than a simple crochet project—it is a delightful way to celebrate the beauty of autumn while creating a handmade keepsake that can be treasured for years. Throughout this tutorial, you learned how to prepare the necessary materials, understand the essential US crochet abbreviations, crochet each section of the scarecrow step by step, assemble every piece with confidence, and add beautiful finishing details that bring the character to life.
By following the pattern carefully, practicing neat stitching, and taking your time during assembly, you can create an adorable miniature scarecrow that works perfectly as a keychain, bag charm, fall decoration, gift topper, or handmade collectible. The project is also highly customizable, allowing you to experiment with different colors, facial expressions, accessories, and decorative embroidery to make each scarecrow completely unique.
Crochet is a wonderful craft that combines creativity, patience, and relaxation. Every stitch contributes to something meaningful, and even small projects like this one help improve your skills while providing the satisfaction of making something by hand. Whether you are crocheting for yourself, your family, or your customers, this Crochet Mini Scarecrow Pattern is a charming addition to any autumn crochet collection.
Thank you for reading this complete guide. I sincerely hope this tutorial has inspired you to pick up your hook and enjoy every step of creating your own adorable scarecrow. If you make this project, please leave your honest opinion in the comments and share your suggestions. Your feedback, ideas, and creative variations can inspire other crocheters and help our crochet community continue to grow together. Happy crocheting!