Crochet Dangling Opossum Pattern

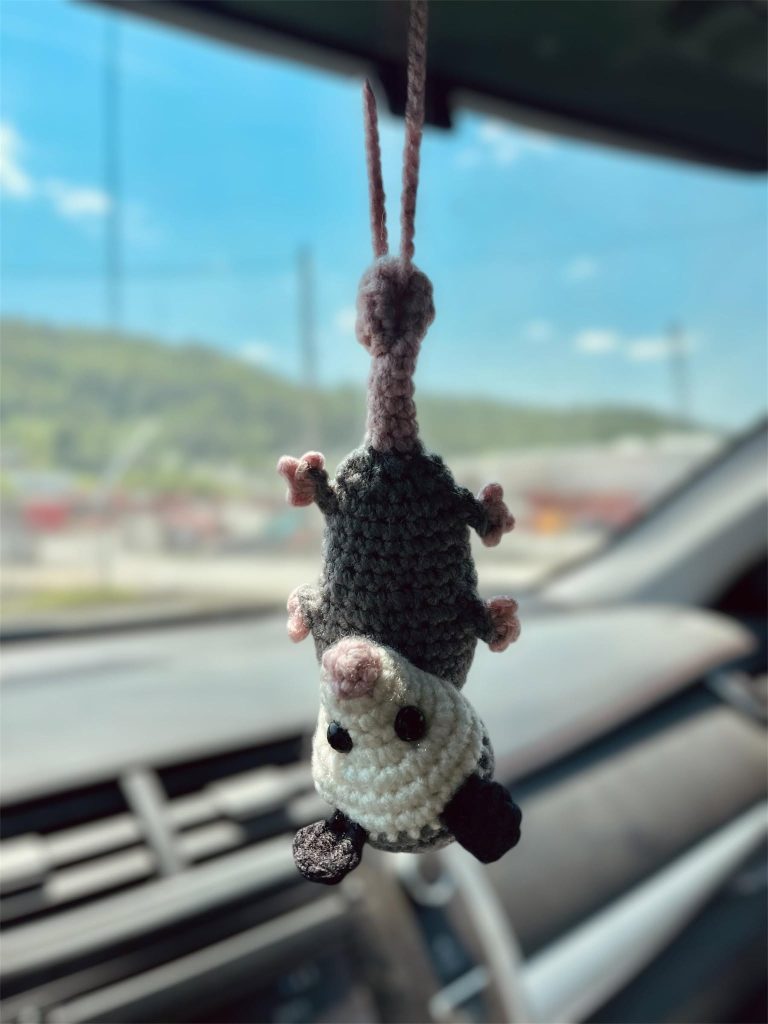
The Crochet Dangling Opossum Pattern is a charming amigurumi project that combines creativity, practical crochet skills, and adorable design into one delightful handmade decoration. Whether you want to create a hanging ornament for your car, backpack, nursery, office, or home, this Crochet Dangling Opossum Pattern offers an enjoyable project suitable for confident beginners as well as experienced crocheters.
Its playful upside-down pose captures the unique personality of a real opossum while allowing you to practice shaping, color changes, and assembly techniques using standard US crochet terminology.Crocheting miniature animals has become increasingly popular because they require only small amounts of yarn while producing impressive results.
The Crochet Dangling Opossum Pattern is especially appealing because it combines realistic features with a cute cartoon-inspired appearance. The long hanging tail, rounded body, tiny paws, expressive face, and textured ears create a finished project that immediately catches attention. Best of all, this project can easily be customized by changing yarn colors, facial expressions, or decorative accessories.
In this complete guide, you will learn how to make the Crochet Dangling Opossum Pattern step by step using US crochet abbreviations and stitch instructions. Each section explains the construction process clearly while sharing useful tips that help create even stitches, neat shaping, and secure assembly. By the end of the tutorial, you will have a beautiful handmade crochet opossum ready to hang anywhere you like while also improving your amigurumi skills for future projects.
Before starting your Crochet Dangling Opossum Pattern, gather all necessary supplies. Using quality materials will help produce cleaner stitches and a longer-lasting finished project.
Recommended materials include worsted weight cotton or cotton blend yarn in gray, white, pale pink, black, and a small amount of dark gray. You will also need a 2.75 mm or 3.0 mm crochet hook, polyester fiberfill stuffing, 8 mm safety eyes, stitch markers, yarn needle, scissors, and optional fabric glue for extra security.
The body is worked primarily in continuous rounds without joining. A stitch marker helps identify the beginning of each round and prevents counting mistakes.
The hanging tail is crocheted separately before attaching it securely to the body. This creates the signature dangling appearance that makes the design so distinctive.
The head and body are crocheted as one continuous piece, reducing sewing and producing smoother shaping throughout the finished project.
Small details such as ears, paws, nose, and feet are made separately before final assembly. Taking time with these details gives the opossum much more personality.
Using invisible decreases instead of standard decreases creates smoother shaping and improves the professional appearance of the finished amigurumi.
Begin the Crochet Dangling Opossum Pattern by creating the hanging tail.
Tail Pattern
Foundation:
MR (Magic Ring)
Round 1:
6 sc in MR (6)
Round 2:
sc around (6)
Rounds 3–35:
Repeat:
6 sc
Stuff only the upper third lightly so the tail remains flexible while supporting the finished ornament.
Leave a long yarn tail for attaching later.
Next, crochet the main body.
Foundation:
MR
Round 1:
6 sc in MR (6)
Round 2:
Inc around (12)
Round 3:
(sc, inc) ×6 (18)
Round 4:
(2 sc, inc) ×6 (24)
Rounds 5–12:
24 sc
Round 13:
(2 sc, dec) ×6 (18)
Round 14:
18 sc
Stuff firmly.
Continue into the head.
Round 15:
(sc, inc) ×9 (27)
Rounds 16–21:
27 sc
Insert safety eyes between Rounds 18 and 19 with approximately six stitches between them.
Begin facial shaping.
Round 22:
(2 sc, dec) ×6, 3 sc
Round 23:
(sc, dec) ×9
Stuff firmly.
Round 24:
Dec around.
Fasten off and close remaining opening.
Crochet the muzzle.
MR
Round 1:
6 sc
Round 2:
Inc around (12)
Round 3:
12 sc
Sew centered beneath the eyes.
Embroider the nose using black yarn.
The tiny details transform a simple crochet shape into an expressive Crochet Dangling Opossum Pattern.
For each ear:
MR
6 sc
Round 2:
(sc, inc) ×3
Fold flat and sew to the top sides of the head.
Using pale pink yarn inside the ears adds a realistic appearance.
Each arm begins with six single crochet stitches worked into a magic ring.
Continue working six single crochet stitches for approximately five rounds before lightly stuffing the upper section.
The tiny hands may be embroidered using pale pink yarn or created with small picot stitches to imitate little fingers.
Repeat the same process for both legs, making them slightly shorter than the arms for balanced proportions.
Attach the legs underneath the body so the opossum naturally hangs upside down when suspended by its tail.
Finally, sew the tail securely to the top center of the body using several reinforced stitches. Because the tail supports the entire ornament, double-check every stitch before finishing.
Once all pieces are assembled, examine your Crochet Dangling Opossum Pattern from every angle. Small adjustments often make a huge difference in the finished appearance.
If one ear appears lower than the other, remove only a few stitches and reposition it before weaving in the yarn completely.
Use a small brush or your fingertips to gently shape the stuffing until the body becomes evenly rounded.
Embroidery allows endless personality. A tiny smiling mouth creates a cheerful look, while a neutral expression makes the opossum appear sleepy and relaxed.
You can personalize your project by changing the body color to charcoal gray, light gray, brown, cream, or even fantasy colors for a whimsical version.
Add a miniature scarf, tiny flower, little bow, or seasonal accessories to create unique gifts throughout the year.
Because the finished ornament is lightweight, it works beautifully as a car mirror charm, keychain decoration, backpack accessory, nursery ornament, Christmas decoration, or handmade gift for animal lovers.
Maintaining consistent stitch tension throughout the project helps preserve the smooth curves that make amigurumi attractive.
Always count stitches after every increase and decrease round to avoid uneven shaping later in the project.
Invisible decreases produce much cleaner shaping than traditional decreases, especially around the head.
When sewing pieces together, use matching yarn whenever possible so the seams disappear into the crochet fabric.
Weave yarn ends inside the stuffing instead of trimming them too closely. This provides additional security and prevents loose ends from working free over time.
Take your time during assembly. Many experienced crocheters spend almost as much time positioning facial features as they do crocheting the individual pieces.
Practice stuffing gradually instead of adding all the fiberfill at once. Even stuffing creates smoother curves and prevents lumps from appearing in the finished toy.
If making this project for decoration only, safety eyes work wonderfully. If making it for young children, embroidered eyes are generally the safer choice.
Creating multiple versions of the Crochet Dangling Opossum Pattern allows you to experiment with different yarn textures, hook sizes, and facial expressions while improving your crochet confidence.
Is the Crochet Dangling Opossum Pattern suitable for beginners?
Yes. Beginners who already know the basic amigurumi techniques such as the magic ring, single crochet, increases, and decreases can complete this project successfully.
Which yarn works best?
Cotton or cotton-blend yarn provides excellent stitch definition and helps the finished opossum maintain its shape.
What crochet hook should I use?
A 2.75 mm or 3.0 mm hook works well with worsted weight cotton yarn for a tightly stitched amigurumi.
How long does it take to finish?
Most crocheters can complete the project in one afternoon or over a relaxing weekend.
Can I make it larger?
Absolutely. Simply use thicker yarn and a larger crochet hook while following the same stitch counts.
Can I customize the colors?
Yes. Although gray and white resemble a traditional opossum, you can create pastel, colorful, or holiday-themed versions.
Can this be used as a car charm?
Yes. Its lightweight design makes it perfect for hanging from a rearview mirror, provided local traffic regulations permit decorative items.
How should I clean the finished crochet opossum?
Spot cleaning with mild soap and cool water is recommended. Allow it to air dry completely before using again.
Video Tutorial:
The Crochet Dangling Opossum Pattern is a rewarding amigurumi project that combines simple crochet techniques with thoughtful shaping and charming details to create an adorable hanging decoration. Throughout this tutorial, you learned how to select the right materials, crochet the tail, body, head, muzzle, ears, arms, and legs using US crochet terminology, assemble each component securely, and personalize the finished design with your own creative touches. By following the step-by-step instructions and practicing consistent tension, careful stuffing, and neat finishing techniques, you can produce a durable and eye-catching crochet opossum that makes a wonderful gift or personal keepsake.
Thank you for reading this complete guide. If you make your own Crochet Dangling Opossum Pattern, please leave your honest opinion about the tutorial and share your suggestions. Your feedback and creative ideas help inspire future crochet patterns and make every new project even better.