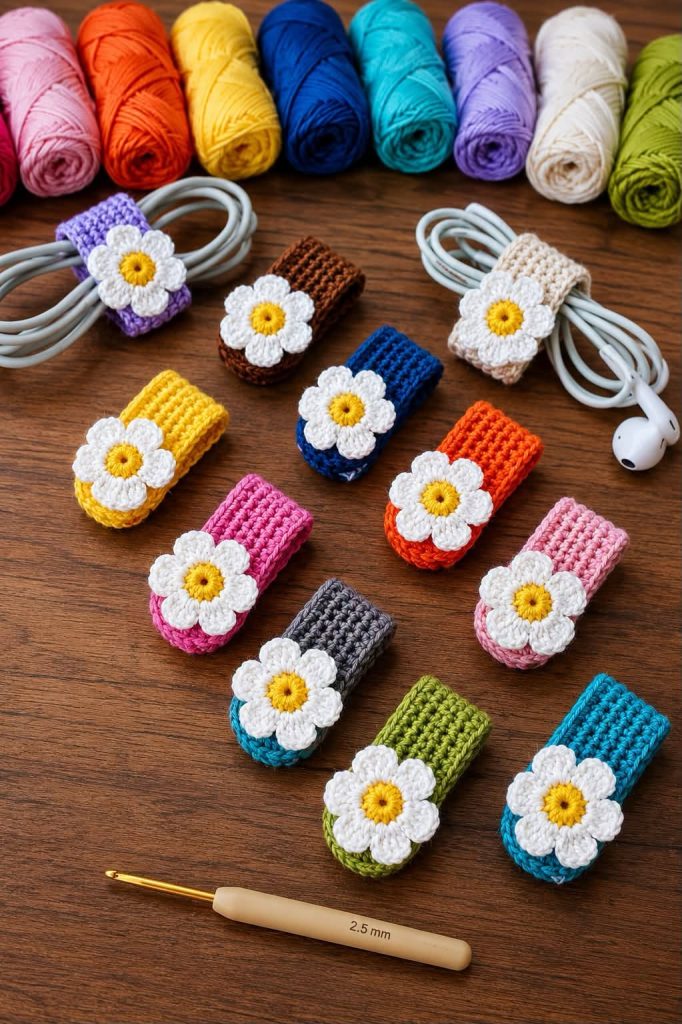
Crochet Flower Cable Organizer Pattern

Crochet Flower Cable Organizer Pattern is a practical and beautiful crochet project that combines organization with handmade charm. If you have charging cables, earphones, USB cords, or small electronic accessories scattered around your home or bag, this adorable Crochet Flower Cable Organizer Pattern is the perfect solution.
It is beginner-friendly, quick to complete, and makes an excellent handmade gift for family, friends, teachers, or craft fair customers. Throughout this tutorial, you will learn every important step using US crochet terms, making the project easy to follow while improving your crochet skills.
Crochet accessories have become increasingly popular because they are reusable, customizable, and environmentally friendly. Instead of purchasing plastic organizers, you can create something unique with just a small amount of yarn. One of the greatest advantages of this project is that it uses leftover yarn from previous crochet creations, making it both economical and sustainable. Besides organizing your cables, these little flower organizers can also be used to hold ribbons, headphone cords, charging wires, sewing tape measures, and even rolled-up craft supplies.
Another reason why crafters love this project is the opportunity to personalize every piece. You can experiment with different yarn colors, flower combinations, button styles, and edging techniques to match your personality or seasonal decorations. Whether you prefer soft pastel shades, bright rainbow colors, or elegant neutral tones, your finished organizer will be both useful and decorative. Because it works up quickly, this project is also ideal for creating handmade gifts, stocking stuffers, market inventory, or last-minute presents.
Before starting your Crochet Flower Cable Organizer Pattern, gather all your materials. Medium cotton yarn works especially well because it provides durability while maintaining enough flexibility to wrap comfortably around cables. Cotton yarn also helps the organizer keep its shape after repeated use.
Recommended materials include:
The finished organizer shown measures approximately 10–12 cm long when folded, although you can easily adjust the size by adding or removing rows.
Below are the US Crochet Abbreviations used throughout the project:
Begin by creating the rectangular strap.
Foundation Row
Make ch 11.
Row 1:
Starting in the second chain from the hook, work:
10 sc
Turn.
Row 2:
ch 1
10 sc
Turn.
Repeat Row 2 until the strap measures approximately 18 cm.
To create the rounded flap:
Row Next:
Work 5 sc, then 3 sc in next stitch, continue 4 sc.
Turn the work around the opposite edge and crochet evenly along the other side until reaching the beginning.
Finish with sl st.
Fasten off.
The daisy flower is what makes the Crochet Flower Cable Organizer Pattern so charming. Although it looks detailed, it is surprisingly simple to crochet.
Using yellow yarn:
Create a MR.
Round 1:
6 sc inside the ring.
Join with sl st.
Round 2:
Work 2 sc in each stitch.
Total: 12 stitches.
Fasten off.
Switch to white yarn.
Attach white yarn to any stitch.
Each petal is worked separately.
Petal Pattern:
ch 3
3 dc
ch 3
sl st into the same stitch.
Repeat around the flower.
Continue until eight petals have been completed.
Fasten off leaving a long tail.
Using the yarn needle, sew the flower securely onto the rounded flap of the organizer.
Make several stitches through the flower center so it remains durable during everyday use.
If desired, lightly steam block the flower to help the petals lay evenly.
You may also experiment with different flower styles by replacing the daisy petals with puff stitches, popcorn stitches, layered flowers, or tiny sunflower motifs.
Changing the flower colors creates beautiful seasonal variations. White petals with yellow centers give a classic daisy appearance, while pink, lavender, blue, coral, or rainbow petals offer a playful modern look.
Once both pieces have been completed, it’s time to assemble your organizer.
Locate the opposite end of the strap.
Sew a small button securely in the center.
Fold the rounded flower flap over the button.
Using your yarn needle, create a neat buttonhole by stitching a reinforced opening large enough to slide comfortably over the button.
Alternatively, you may crochet a button loop.
Button Loop:
Attach yarn.
ch 8
Join with sl st
Fasten off.
Test the fit before weaving in the ends.
The organizer should wrap comfortably around a rolled cable without feeling too tight.
Weave all loose yarn ends carefully through several stitches.
Trim any excess yarn.
Lightly block the finished organizer if desired.
Your organizer is now ready for everyday use.
These organizers are perfect for:
Because the project requires very little yarn, you can easily make an entire matching collection in one afternoon.
One of the best features of the Crochet Flower Cable Organizer Pattern is its flexibility. Once you understand the basic construction, you can easily customize nearly every element.
For larger charging cables, simply crochet additional rows before shaping the rounded flap. For thinner cords such as earbuds, shorten the strap by several rows for a more secure fit.
Cotton yarn remains the best choice because it stretches less than acrylic, helping the organizer maintain its shape over time. However, soft acrylic yarn may also be used for decorative organizers intended for light use.
Color combinations offer endless creative opportunities. Bright rainbow collections are popular for children, while neutral beige, cream, gray, navy, and sage green create elegant organizers suitable for office environments.
Seasonal themes also work beautifully. Red and green flowers are perfect for Christmas, pastel shades celebrate spring, orange and brown suit autumn decorations, and bright floral colors capture the feeling of summer.
If you’re selling your handmade creations, consistency is important. Measure every strap before assembly to ensure each organizer has the same finished size. Neatly woven ends and securely attached buttons will also improve durability and customer satisfaction.
This project is excellent for beginner crocheters because it teaches several valuable techniques in a small amount of time. You’ll practice foundation chains, single crochet, increasing, shaping rounded edges, crocheting in continuous rows, working in the round, creating flower motifs, sewing crochet pieces together, attaching buttons, and finishing techniques. These are transferable skills that will help you confidently complete many future crochet projects.
Another useful idea is creating coordinated sets. Pair several cable organizers in matching colors with a crochet pouch, laptop sleeve, or notions bag for a thoughtful handmade gift. Teachers, students, travelers, office workers, and crafters all appreciate practical accessories that are both functional and attractive.
Don’t hesitate to personalize every organizer with embroidered initials, tiny appliqués, decorative edging, or different flower styles. Handmade projects become even more meaningful when they reflect your creativity and personal style. Even small design changes can transform the overall appearance while keeping the same basic construction method.
Finally, remember that practice makes every stitch more even. Your first organizer may already look wonderful, but each additional one will improve your tension, consistency, and finishing skills. Before long, you’ll be able to complete these organizers quickly while producing beautiful, professional-looking results.
Can beginners make this Crochet Flower Cable Organizer Pattern?
Yes. This project uses basic crochet stitches and is an excellent introduction to shaping, appliqués, and simple assembly.
What yarn works best?
Cotton yarn is highly recommended because it is durable, washable, and holds its shape well after repeated use.
Can I adjust the size?
Absolutely. Simply add or remove rows from the strap before creating the rounded flap to fit different cable sizes.
Can I replace the flower with another decoration?
Yes. Hearts, stars, butterflies, leaves, bows, or other crochet appliqués can easily replace the flower while using the same organizer base.
How long does this project take?
Most crocheters can complete one organizer in approximately 30 to 60 minutes, depending on experience.
Can I sell finished organizers?
Yes. Handmade cable organizers are popular at craft fairs, online marketplaces, and gift shops. Always ensure your work is neatly finished and durable.
Is this a good stash-busting project?
Definitely. The organizer requires only small amounts of yarn, making it ideal for using leftover yarn from larger crochet projects.
Can children use these organizers?
Yes. They are useful for organizing headphone cables, charging cords, and school accessories, though young children should always be supervised around small buttons.
Video Tutorial:
The Crochet Flower Cable Organizer Pattern is a simple yet rewarding crochet project that combines beauty, practicality, and creativity in one handmade accessory. Throughout this article, you learned how to choose the right materials, use essential US crochet abbreviations, crochet the organizer strap, create a charming daisy flower, assemble the finished piece, and customize it with different colors and sizes. You also discovered helpful finishing techniques, practical uses, and creative ideas for making personalized organizers for yourself, gifts, or craft sales.
With only a small amount of yarn and basic crochet skills, you can create an attractive organizer that keeps everyday cables tidy while showcasing your handmade craftsmanship. Whether you make one or an entire colorful collection, this project is an enjoyable way to improve your crochet skills and create something both useful and beautiful.
If you enjoyed this tutorial, please leave your sincere opinion in the comments and share your suggestions or creative ideas. Your feedback helps inspire new crochet projects and encourages other makers to begin their own Crochet Flower Cable Organizer Pattern journey.