Crochet Bottle Holder Pattern

Crochet Bottle Holder Pattern is a practical and playful crochet project that turns an everyday water bottle or travel tumbler into a comfortable accessory with handmade personality. Inspired by the photo, this design combines a fitted crochet band with a long shoulder strap and an optional animal face, allowing the bottle to be carried while keeping your hands free.
The basic construction is approachable for beginners because most of the holder can be worked with simple U.S. crochet stitches such as chain (ch), single crochet (sc), and slip stitch (sl st). Once you understand the basic structure, the same method can be adapted for bottles of many different shapes and sizes.
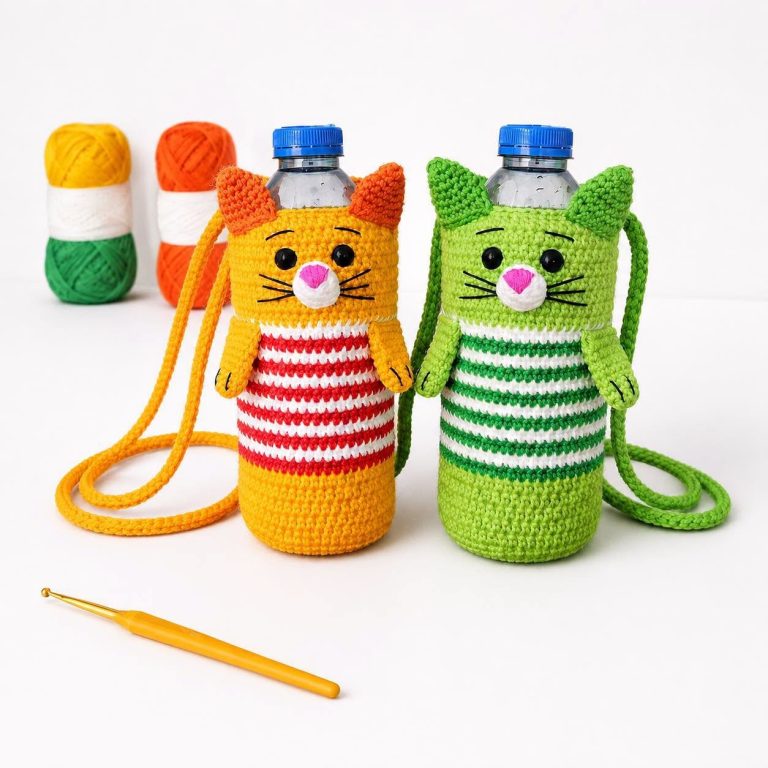
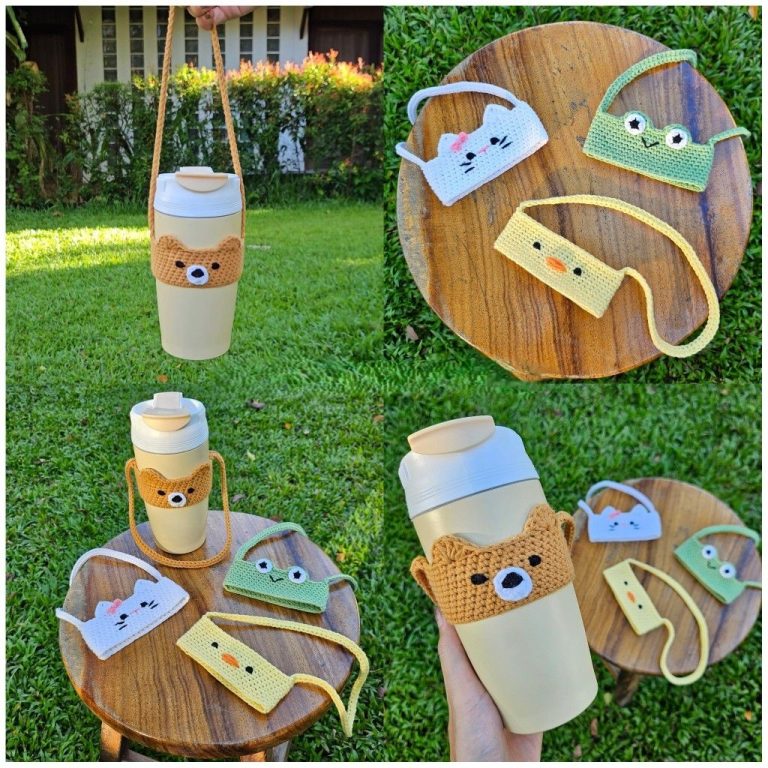
One of the most appealing features of this Crochet Bottle Holder Pattern is its versatility. The photographed examples show how a simple rectangular crochet band can become a bear, cat, frog, or chick by changing the yarn colors and adding small decorative details. Instead of needing an entirely different construction for every character, you can create one reliable foundation and personalize the face afterward. The long crochet shoulder strap can also be adjusted for children or adults, while the band itself can be measured directly around the bottle for a more accurate fit. This makes the project useful for reusable water bottles, insulated tumblers, lightweight drink containers, and similar everyday items.
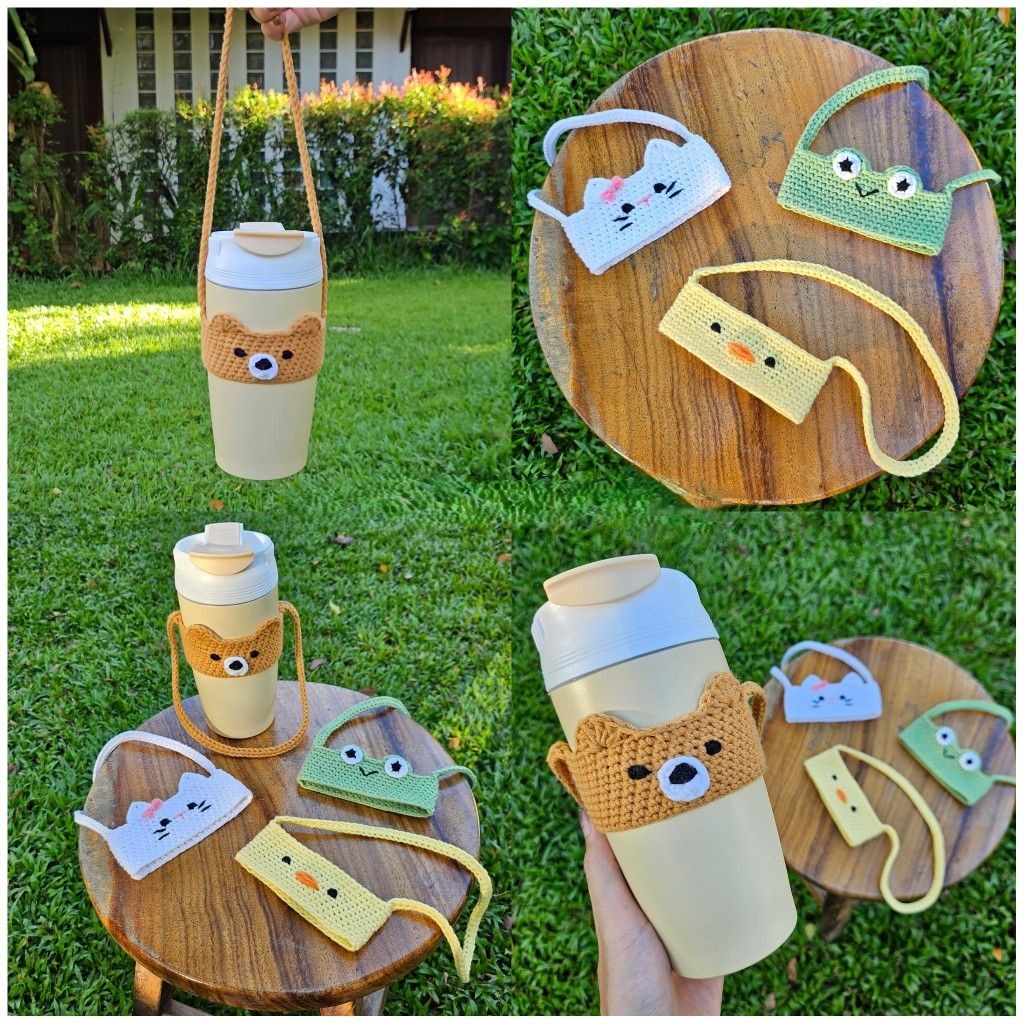
For this tutorial, the goal is to create a holder inspired by the structure visible in the photo rather than duplicate an exact commercial pattern. You will learn how to measure the bottle, crochet a firm rectangular band, join it securely, create a comfortable strap, and add an optional bear-style face. Because bottle dimensions and yarn thickness vary, measurements should always be checked against the actual container while crocheting. The instructions use standard U.S. crochet terminology, and the stitch counts can easily be increased or decreased. This measurement-based approach makes the Crochet Bottle Holder Pattern easier to customize and much more useful for crocheters working with supplies they already have.
For the main crochet bottle holder, choose a medium-weight cotton or cotton-blend yarn. Cotton is especially useful because it produces defined stitches and a relatively sturdy fabric. For a holder similar to the brown bear shown in the photo, use tan or caramel yarn for the main section, plus small amounts of white, black, and possibly a darker brown. Other color combinations can create the white cat, green frog, or yellow chick variations.
A crochet hook around 3.5 mm to 4.0 mm is a useful starting point with medium-weight yarn, although you should always choose a hook appropriate for your particular yarn. You will also need scissors, a yarn needle, stitch markers, and a flexible measuring tape. Small decorative pieces can be crocheted or embroidered so the finished project remains soft and lightweight.
The most important abbreviation is ch (chain). To make a chain, create a slip knot on your hook, yarn over, and pull the yarn through the loop. Chains form the foundation of many crochet projects. In this pattern, they are used both for beginning the main rectangle and for establishing the long carrying strap.
The abbreviation sc (single crochet) refers to the primary stitch used for the bottle band. Insert the hook into the designated stitch, yarn over, and pull up a loop. You should now have two loops on the hook. Yarn over once more and pull through both loops. Single crochet creates a compact fabric that is ideal for a supportive bottle accessory.
You will also use sl st (slip stitch). Insert the hook into the required stitch, yarn over, and pull the yarn directly through both the stitch and the loop already on your hook. A slip stitch adds very little height, making it excellent for joining sections and finishing edges neatly.
Before starting, measure the circumference of your bottle where the crochet band will sit. Measure its height as well and decide how wide you want the band to be. For the style pictured, the band covers only part of the bottle rather than forming a complete pouch. Make a small gauge swatch in single crochet so you can determine approximately how many stitches are needed for your particular bottle and yarn.
Begin the Crochet Bottle Holder Pattern with a foundation chain long enough to create the desired height of your band. For a medium tumbler, you might begin with approximately ch 13 to ch 17, depending on yarn thickness and desired coverage. This is only a starting suggestion. Hold the chain vertically against your bottle before continuing and add or remove chains if necessary.
For Row 1, insert your hook into the second chain from the hook and work 1 sc in each ch across. Turn your work. For Row 2, make ch 1, which functions as the turning chain, then work 1 sc in each stitch across. Turn again. Keep your stitches moderately firm because the finished band needs enough structure to support the bottle without stretching excessively.
Continue repeating Row 2 until the rectangle is long enough to wrap around the bottle. Frequently place the crochet piece around the container as you work. Ideally, the short ends should meet comfortably with a small amount of stretch. A slightly snug fit is generally preferable to a loose one because crochet fabric can relax after repeated use.
Once the rectangle fits correctly, fasten off while leaving a long yarn tail. Bring the two short ends together and use your yarn needle to sew them securely, creating a cylindrical band. Alternatively, you can join them with sl st through corresponding stitches. Turn the seam toward the inside so the exterior looks clean.
Try the completed band on the bottle before adding decorative features. It should sit firmly without sliding down easily, but it should not be so tight that removing it becomes difficult. If the band is noticeably loose, undo the seam and remove one or more rows. If it is too tight, add additional rows before joining.
For the bear-inspired version, you can add two small ears along the upper edge. Join the tan yarn near one upper corner and work a small cluster such as sc, hdc, dc, hdc, sc over several stitches to form a rounded ear. Here, hdc (half double crochet) means yarn over, insert the hook, pull up a loop, yarn over again, and pull through all three loops. Dc (double crochet) means yarn over, insert the hook, pull up a loop, yarn over and pull through two loops, then yarn over and pull through the final two loops. Repeat on the opposite side.
The long strap is what transforms the crochet band into a functional crochet bottle carrier. Attach the main-color yarn firmly to one side of the band. Make a chain until the strap reaches the desired length. A shorter strap works for hand or shoulder carrying, while a longer chain can create a crossbody-style holder. Remember that crochet straps can stretch once weight is added.
Instead of leaving the strap as a simple chain, strengthen it by working back along its length. Beginning in the second chain from your hook, work 1 sl st or 1 sc in each chain. Single crochet creates a thicker strap, while slip stitches produce a narrower cord. When you reach the opposite end, attach it securely to the other side of the bottle band.
Test the strap with the bottle inside before weaving in the ends. If the strap stretches too much, reinforce it with another row of sc or work a second strand alongside the first. The attachment points should also be reinforced with several stitches because these areas receive the greatest amount of tension during use.
To make the bear face suggested by the photograph, crochet a small white muzzle. Start with ch 4. Work 1 sc in the second ch from hook, sc across, then work several sc into the final chain so you can continue around the opposite side of the foundation. Crochet around the piece to create a small oval. Fasten off and sew the muzzle to the center of the band.
The nose can be embroidered using black yarn. Create a small triangular or oval shape near the center of the white muzzle and add a short vertical stitch underneath if desired. The eyes can also be embroidered directly onto the fabric using several careful black yarn stitches. Embroidery is an easy way to customize facial expressions without adding bulky components.
The same Crochet Bottle Holder Pattern can become other animals with only minor modifications. Use white yarn, triangular ears, pink cheeks, and embroidered whiskers for a cat. Choose green yarn and two raised eye circles for a frog. Yellow yarn with black eyes and a small orange embroidered beak creates a chick. These variations demonstrate how one crochet foundation can support many creative designs.
After completing the crochet work, inspect every connection carefully. The seam joining the band and the two strap attachment points should be particularly secure. Use a yarn needle to weave each loose end through several stitches on the wrong side of the fabric, change direction, and weave through additional stitches before trimming the excess yarn.
If your bottle has tapered sides, you may need to modify the basic rectangular construction. A strongly tapered bottle can benefit from occasional decreases near the upper edge. A standard sc2tog (single crochet two together) decrease is made by inserting the hook into the first stitch and pulling up a loop, inserting it into the next stitch and pulling up another loop, then yarning over and pulling through all loops on the hook.
You can also create a wider band for additional stability. Simply begin with more foundation chains before working the rectangle. A narrow band provides the minimalist appearance seen in the photo, whereas a wider band gives you additional room for decorative crochet motifs, stripes, colorwork, names, or embroidered details.
Color customization is one of the easiest ways to make this Crochet Bottle Holder Pattern distinctive. Neutral tan and cream yarns create a cozy bear theme, while pastel green works beautifully for a frog. White with pink accents creates a sweet cat design, and bright yellow naturally suits a chick. Scrap yarn is especially useful for noses, eyes, cheeks, ears, and other tiny details.
For routine cleaning, follow the washing recommendations printed on your yarn label. Cotton crochet accessories can often be gently hand washed in cool or lukewarm water, reshaped, and laid flat to dry. Avoid aggressive wringing because it can distort the band or stretch the strap. Remove the holder from the bottle before washing it.
Finally, remember that this project is intended primarily as a convenient decorative carrier for an appropriate lightweight bottle. Check the strap and seams periodically, particularly if the holder is used frequently. Handmade crochet naturally experiences wear over time, and a few reinforcing stitches can extend the useful life of the project.
What skill level is required for this Crochet Bottle Holder Pattern?
This project is suitable for an adventurous beginner. The primary skills are chain (ch), single crochet (sc), slip stitch (sl st), fastening off, and sewing crochet pieces together. Decorative ears and facial features introduce a few additional techniques, but they can be simplified or omitted.
How do I make the holder fit my specific water bottle?
Measure the bottle instead of relying entirely on a fixed stitch count. Crochet the rectangular band until it wraps snugly around the desired section of your bottle. Because yarn, hook size, tension, and bottle dimensions differ, direct measurement provides a more dependable result.
What is the best yarn for a crochet bottle holder?
A sturdy cotton or cotton-blend yarn is an excellent choice. Cotton gives good stitch definition and usually has less elasticity than very soft acrylic yarn. Medium-weight yarn also makes the project relatively quick while providing enough structure for the band and strap.
Can I make the strap longer?
Yes. Simply add more chains when creating the strap. For a crossbody crochet bottle holder, test the chain against the intended wearer before working the reinforcing stitches. Keep in mind that the finished strap may become slightly longer when the bottle’s weight is added.
How can I prevent the crochet strap from stretching?
Work the strap tightly and reinforce the foundation chain with single crochet or slip stitches. You can also work multiple rows for a wider strap. Cotton yarn tends to provide a relatively stable result, although virtually all crochet fabric can stretch somewhat under prolonged weight.
Can I make the cat, frog, and chick versions shown in the inspiration photo?
Absolutely. The underlying construction can remain almost identical. Change the main yarn color and customize the ears, eyes, muzzle, cheeks, beak, or other facial details. A white band can become a cat, green can become a frog, and yellow can become a chick.
What if my bottle holder keeps sliding down?
The band is probably too loose for the bottle. Reduce the circumference by removing a few rows from the rectangle before joining it. You can also use a slightly smaller hook to create firmer stitches. The finished band should stretch gently around the container rather than hanging loosely.
Can I make the band taller?
Yes. Add more chains to your foundation chain. Since those chains establish the height of this particular rectangular construction, increasing them creates a wider area around the bottle. This is useful when you want more support or additional space for decorative details.
Do I have to crochet the animal face?
No. The basic pattern works perfectly well as a simple crochet water bottle holder. You can leave the band plain, work stripes, alternate colors, embroider a small motif, or add another decorative idea. The animal face is simply an optional way to personalize the design.
Why is gauge important for this project?
Crochet gauge tells you how many stitches and rows your yarn, hook, and individual tension produce within a particular measurement. Even when two crocheters follow exactly the same stitch count, their finished pieces can differ in size. Checking the holder directly against the bottle is therefore just as important as following the written instructions.
How can I make the animal features look neat?
Use small amounts of yarn and keep embroidery stitches consistent. Position the eyes and muzzle temporarily before permanently sewing them down. Counting crochet stitches from the center toward each side can help you position matching features symmetrically.
Can leftover yarn be used for this pattern?
Yes. This Crochet Bottle Holder Pattern can be an excellent scrap-yarn project, especially for the smaller decorative pieces. Just make sure the main yarn provides enough strength and that different yarns used together have reasonably compatible thicknesses.
Video Tutorial:
The Crochet Bottle Holder Pattern combines simple crochet construction with plenty of room for creativity. By learning how to work a foundation chain (ch), rows of single crochet (sc), neat slip stitch (sl st) joins, a reinforced strap, and small decorative details, you can create a practical handmade accessory inspired by the charming bottle holders in the photo.
The most important lesson is to customize the project according to the bottle rather than depending on one universal stitch count. Measure carefully, test the band repeatedly, keep the fit comfortably snug, and reinforce the strap attachment points. From there, colors and decorative features can transform the same basic construction into a bear bottle holder, cat bottle holder, frog bottle holder, chick bottle holder, or a completely original design.
This project is also a useful way to practice fundamental U.S. crochet stitches while creating something functional. Once you have finished your Crochet Bottle Holder Pattern, feel free to leave your sincere opinion about the project and share suggestions for colors, animal characters, strap styles, or other creative variations you would love to try.