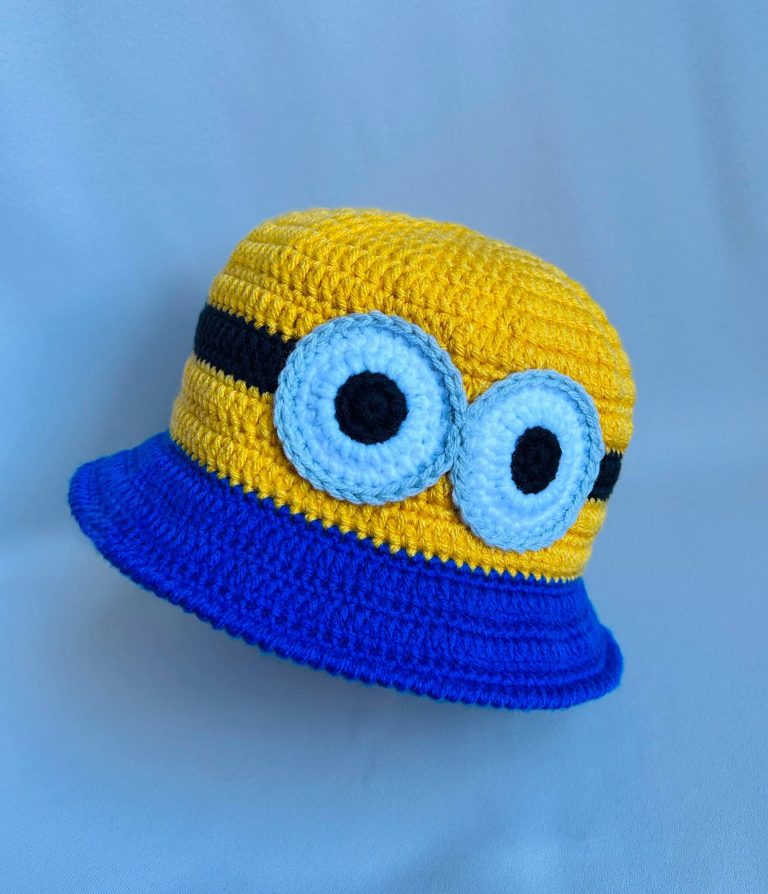
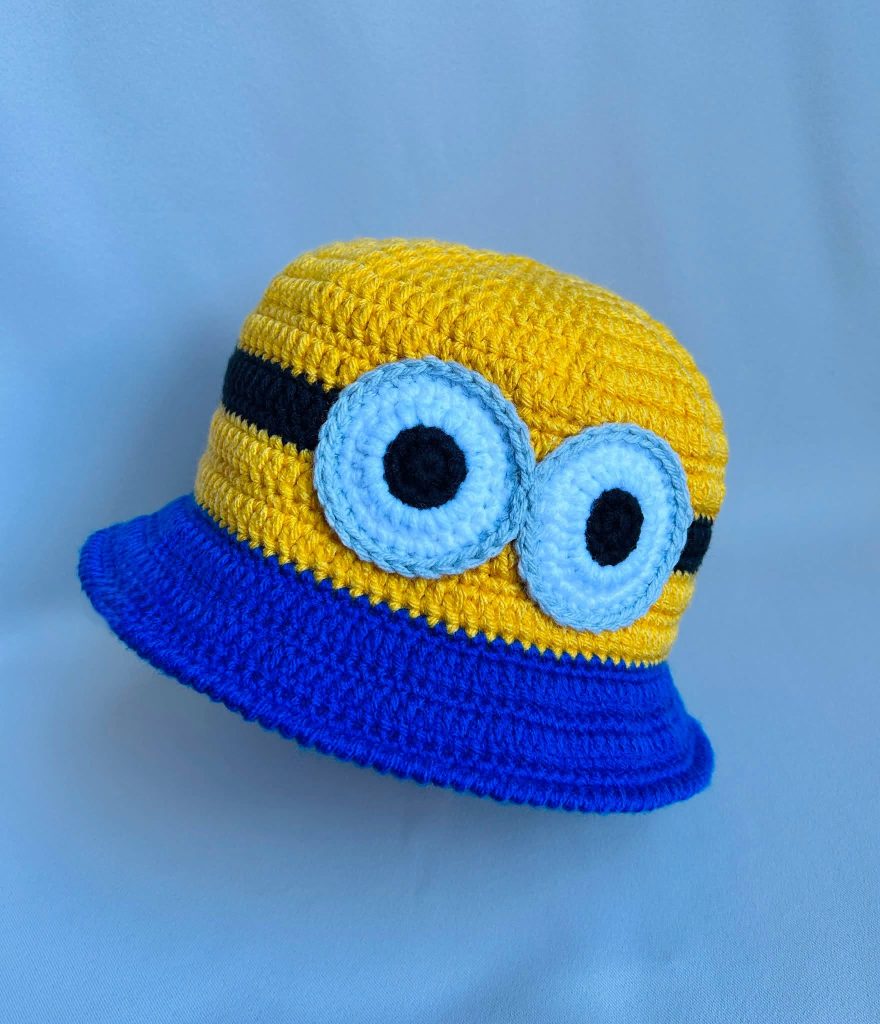
Crochet Minions Bucket Hat Pattern
Crochet Minions Bucket Hat Pattern is a fun and creative project that combines the timeless appeal of crochet with the playful charm of one of the most recognizable cartoon-inspired designs. Whether you are making this hat for yourself, a child, a family member, or as a handmade gift, this project offers an enjoyable experience from the very first stitch.
The cheerful combination of bright yellow, blue, black, white, and gray creates a vibrant accessory that immediately stands out while allowing you to practice several useful crochet techniques. Throughout this guide, you will learn every step needed to create a beautiful Crochet Minions Bucket Hat Pattern using standard US crochet terminology.
Crocheting wearable accessories is one of the best ways to improve your skills while creating something practical. A bucket hat is especially rewarding because it is worked primarily in rounds, making it suitable for confident beginners as well as experienced crocheters. This project introduces shaping, color changes, stitch counting, and decorative details that come together naturally without becoming overwhelming. By following the instructions carefully and checking your stitch count after each round, you will build a hat that maintains a smooth shape and comfortable fit while capturing the playful inspiration behind this adorable design.
One of the greatest advantages of making your own Crochet Minions Bucket Hat Pattern is the freedom to personalize every detail. You can adjust the circumference, change the brim width, experiment with different yarn textures, or even create matching hats for family members in various sizes. Handmade accessories carry a unique personality that cannot be found in mass-produced items, and each completed project becomes a reflection of your creativity. As you progress through this tutorial, you’ll discover techniques that can also be applied to many other bucket hat designs in the future.
Choosing quality materials is the first step toward creating a durable and comfortable Crochet Minions Bucket Hat Pattern. A worsted weight cotton or cotton-blend yarn works particularly well because it provides excellent stitch definition while helping the hat maintain its structure. Acrylic yarn may also be used if you prefer a softer and lighter accessory.
Prepare the following colors before beginning: yellow for the main body, royal blue for the lower section, black for decorative details, white for the eyes, gray for the goggles, and a small amount of brown if you would like to embroider the iris. A 4.5 mm (G/7) or 5.0 mm (H/8) crochet hook is suitable for most worsted weight yarns.
Additional supplies include scissors, yarn needles for weaving in ends, locking stitch markers, measuring tape, and optional fiberfill if you decide to add raised decorative features. Keeping all materials organized before starting makes the process much smoother.
Before beginning, crochet a small gauge swatch using single crochet stitches. A typical gauge is approximately 16–18 single crochet stitches and 18–20 rows over a 4-inch (10 cm) square. Adjust your hook size if your stitches are significantly tighter or looser than expected.
The following US crochet abbreviations are used throughout this Crochet Minions Bucket Hat Pattern:
MR = Magic Ring
ch = chain
sl st = slip stitch
sc = single crochet
hdc = half double crochet
dc = double crochet
inc = increase (2 sc in one stitch)
dec = invisible decrease
st = stitch
sts = stitches
rep = repeat
FO = fasten off
Carefully reading the abbreviations before starting helps maintain a consistent rhythm while crocheting. Even experienced crocheters benefit from reviewing the stitch key to avoid confusion during color changes and shaping rounds.
Begin with yellow yarn and create a Magic Ring (MR). Work 6 sc into the ring and pull it closed securely. Place a stitch marker into the first stitch of the round since this pattern is worked continuously without joining unless otherwise noted.
Round 2: Work inc into every stitch around. You should now have 12 sts. Maintaining an even tension at this stage ensures the top of the hat remains perfectly centered.
Round 3: (1 sc, inc) around. Total: 18 sts. Count your stitches carefully before moving to the next round. Accurate stitch counts are essential for creating a symmetrical bucket hat.
Round 4: (2 sc, inc) around. Total: 24 sts. Flatten the work gently after completing the round. It should form a smooth circle without curling or rippling.
Round 5: (3 sc, inc) around for 30 sts. Continue increasing each successive round by adding one additional single crochet between every increase. Repeat this expansion until the crown reaches the desired diameter for the intended size.
For an average adult size, continue increasing until the circle measures approximately 17–18 cm (6¾–7 inches) across. Once the correct diameter is achieved, stop increasing and begin working one sc in every stitch around. This transition naturally forms the sides of the Crochet Minions Bucket Hat Pattern, creating the classic bucket hat silhouette without requiring complicated shaping.
Continue working one sc in each stitch around without increasing. This is the stage where the flat circle begins to transform into the recognizable bucket hat shape. The sides will naturally curve downward as the rounds build upon one another. Keep using a stitch marker at the beginning of every round to avoid losing your place.
For an adult-sized Crochet Minions Bucket Hat Pattern, work approximately 14 to 18 rounds of plain sc, depending on the desired depth. Try the hat on occasionally or measure from the crown to ensure the sides reach just above the ears. If you are making the hat for a child, simply reduce the number of rounds while maintaining the same construction method.
Once the yellow section reaches the appropriate height, switch to the royal blue yarn without fastening off the yellow. Make the color change during the final yarn-over of the last yellow stitch to achieve a clean transition. Crochet 4 to 6 rounds of sc using the blue yarn. This section creates the playful overalls-inspired band that gives the Crochet Minions Bucket Hat Pattern its instantly recognizable appearance.
Now begin shaping the brim. Round 1 of the brim: (7 sc, inc) around. This gentle increase allows the brim to begin flaring outward naturally without becoming wavy. Continue maintaining even tension throughout the round for a smooth finish.
Round 2: Work one sc in every stitch. This stabilizes the brim and keeps the increase balanced. If you prefer a wider brim for additional sun protection, alternate one increase round with one plain round until the brim reaches your preferred width, usually between 5 and 8 cm (2–3 inches).
Finish the brim with one decorative round of reverse single crochet (crab stitch) or a simple round of sl st if you prefer a cleaner edge. The reverse single crochet creates a sturdy border that helps the brim hold its shape while giving the finished hat a polished, professional appearance.
The playful facial features are what make this Crochet Minions Bucket Hat Pattern so charming. Start by making the goggles. Using gray yarn, create a MR, work 8 sc, join with a sl st, then continue increasing evenly until the circle measures approximately 5 to 6 cm (2–2½ inches) in diameter. Make one large goggle or two smaller goggles depending on the style you prefer.
For each eye, switch to white yarn and crochet a smaller flat circle. Begin with 6 sc in a MR, then increase evenly over several rounds until the eye fits neatly inside the gray goggle frame. Embroider a brown iris and a black pupil in the center using duplicate stitch or simple satin embroidery for a neat finish.
Attach the completed eye pieces to the front of the hat using a yarn needle and matching sewing thread or yarn. Position them approximately halfway between the crown and the blue section. Before securing them permanently, pin the pieces in place and check that they are centered and level.
Using black yarn, crochet a narrow strip of foundation single crochet or a simple chain with a row of sc worked back across it. This strip becomes the elastic-style band that wraps around the hat behind the goggles. Sew the strip carefully so that both ends disappear underneath the gray circles, creating a seamless appearance.
To create the cheerful smile, embroider a gentle curved line using black yarn. A small smile gives the hat a friendly personality without overwhelming the facial design. You may also embroider tiny eyebrows or add subtle expression lines if desired, but keeping the features simple often produces the cleanest result.
Finally, weave in every loose yarn end on the inside of the hat. Take your time during this finishing step, weaving each tail through several stitches before trimming the excess. Proper finishing not only improves the appearance of your Crochet Minions Bucket Hat Pattern but also increases its durability, ensuring it remains secure after repeated wear and gentle washing.
Once your Crochet Minions Bucket Hat Pattern is fully assembled, take a few moments to inspect every stitch and seam. Check that all decorative elements are securely attached and that there are no loose ends visible from either the inside or outside of the hat. A careful inspection at this stage ensures your finished project looks polished and lasts much longer with regular use.
One of the best features of this project is how easily it can be customized. You can make the brim slightly wider for extra sun protection or keep it narrow for a modern, casual style. You can also experiment with different shades of yellow and blue or add additional embroidered details to give each hat its own unique personality while preserving the classic inspiration behind the design.
If you are creating this hat for children, consider using soft, breathable cotton yarn to maximize comfort. Cotton fibers help reduce heat buildup, making the hat comfortable to wear during spring and summer. For cooler weather, a cotton-acrylic blend provides additional warmth while maintaining excellent stitch definition.
Proper blocking helps the finished Crochet Minions Bucket Hat Pattern achieve its best shape. Lightly dampen the hat with clean water, gently reshape the crown and brim, and allow it to dry naturally over an upside-down bowl or hat form that matches the desired size. Avoid stretching the stitches excessively, as this may affect the overall fit.
To keep your handmade hat looking beautiful, hand wash it in cool water using a mild detergent. Gently squeeze out excess water without wringing the fabric, then lay it flat to dry. Proper care helps preserve the colors, maintains the structure of the brim, and prevents unnecessary stretching.
After completing your first Crochet Minions Bucket Hat Pattern, you’ll likely feel confident enough to create additional versions in different sizes for family members and friends. Every project helps improve your stitch consistency, color-changing technique, and finishing skills, making each new hat even better than the last.
1. Is this Crochet Minions Bucket Hat Pattern suitable for beginners?
Yes. Beginners who are comfortable with basic US crochet stitches such as sc, sl st, ch, and simple increases can successfully complete this project by following each step carefully.
2. What type of yarn works best?
A worsted weight cotton or cotton-blend yarn is highly recommended because it provides excellent stitch definition, durability, and breathability while helping the bucket hat maintain its shape.
3. Can I adjust the size?
Absolutely. Increase or decrease the diameter of the crown before working the sides, then adjust the number of body rounds to achieve the correct depth. This method allows you to make toddler, child, teen, or adult sizes.
4. Which crochet hook should I use?
Most crocheters achieve excellent results using a 4.5 mm (G/7) or 5.0 mm (H/8) crochet hook with worsted weight yarn. Always make a gauge swatch before beginning the full project.
5. How do I make the brim stiffer?
You can use a slightly smaller crochet hook for the brim, crochet with tighter tension, or add a round of reverse single crochet around the edge to provide additional structure.
6. Can I use different colors?
Certainly. While the traditional yellow and blue color combination creates the recognizable appearance, you can personalize your Crochet Minions Bucket Hat Pattern by experimenting with different color palettes to match your own style.
7. How long does this project usually take?
The average crocheter can complete the hat in approximately one afternoon or over a relaxing weekend, depending on experience and the amount of decorative detail added.
8. Is this pattern suitable as a handmade gift?
Yes. A handmade bucket hat is a thoughtful gift for birthdays, family gatherings, themed celebrations, vacations, or simply as a fun surprise for someone who appreciates creative handmade accessories.
Video Tutorial:
Creating a Crochet Minions Bucket Hat Pattern is a rewarding project that combines practical crochet techniques with a cheerful and playful design. Throughout this tutorial, you learned how to select the appropriate materials, understand essential US crochet abbreviations, crochet the crown, shape the sides, build the brim, create the decorative goggles and facial features, finish the hat professionally, and care for it properly so it can be enjoyed for years to come.
This project is an excellent opportunity to strengthen your crochet skills while producing a comfortable, durable, and eye-catching accessory that reflects your creativity. Whether you make one for yourself, for a child, or as a thoughtful handmade gift, every completed hat represents the time, patience, and care invested in every stitch.
Thank you for following this step-by-step guide for the Crochet Minions Bucket Hat Pattern. I hope this tutorial inspires you to continue exploring new crochet projects and to enjoy every stage of the creative process. If you made this pattern, please leave your honest opinion in the comments and share your suggestions, favorite customization ideas, or helpful tips. Your feedback may inspire and encourage other crocheters to begin their own handmade bucket hat journey.
