Yankee Puzzle Block Pattern Tutorial: A Step-by-Step Guide
Advertising
Creating a Yankee Puzzle Block Pattern is an exciting and rewarding project for quilt enthusiasts. This timeless design is a favorite among quilters, known for its dynamic geometric style and versatility in quilting projects.
Whether you’re a seasoned quilter or just starting out, this tutorial will guide you through the process of crafting this classic quilt block. With clear instructions, detailed fabric measurements, and practical tips, you’ll have all the tools to make your quilting project a success.
Advertising
Quilting is more than just sewing fabric pieces together; it’s an art form that allows for creativity and expression. The Yankee Puzzle quilt block is a perfect example of this, as its interlocking triangles create a sense of movement and depth. This pattern’s rich history and eye-catching design make it a must-try for anyone looking to expand their repertoire of quilt patterns.
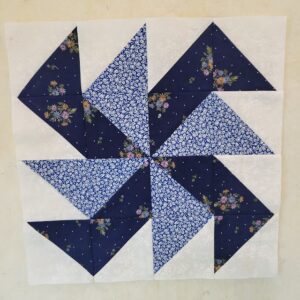
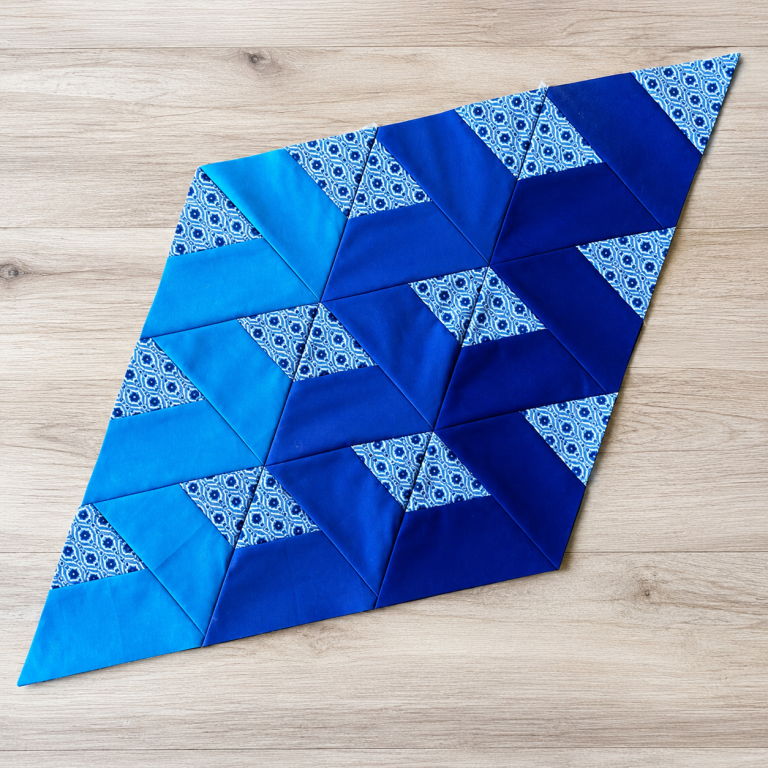
Image From Pinterest
In this tutorial, we’ll explore the step-by-step process to create your own Yankee Puzzle block. From fabric selection to precise cutting and assembly, you’ll learn how to master this design. So, gather your materials and let’s get started on this engaging quilting journey.
The Yankee Puzzle Block is a traditional quilt pattern that features a series of triangles arranged in a pinwheel-like formation. Its intricate design creates a striking visual effect, making it a popular choice for both beginners and experienced quilters.
History of the Pattern: The Yankee Puzzle Block has roots in early American quilting traditions. Its name is thought to reflect its intricate, puzzle-like appearance. This pattern gained popularity due to its ability to make use of fabric scraps, a hallmark of traditional quilting practices.
Design Elements: The block’s design consists of half-square triangles (HSTs) arranged in a way that forms a dynamic, spinning motif. The interplay of light and dark fabrics enhances the sense of movement in the pattern.
Why Choose This Pattern?: This block is not only visually appealing but also an excellent skill-building exercise. It helps quilters refine their accuracy in cutting, piecing, and pressing, all essential skills for creating beautiful quilts.
Versatility in Quilts: The Yankee Puzzle Block can be used as a standalone design or combined with other blocks for a more complex quilt. It works well in both modern and traditional quilting styles.
Fabric Choices: Selecting the right fabrics is key to making your Yankee Puzzle Block shine. Opt for contrasting colors or patterns to highlight the design’s geometry.
Finished Size: Typically, the finished size of a Yankee Puzzle Block is 12 inches, but you can adjust the measurements to suit your project.
Materials and Tools You’ll Need
Before diving into the assembly, it’s essential to gather all the necessary materials and tools. Having everything ready will make the process smoother and more enjoyable.
Advertising
Fabric Requirements: For a 12-inch finished block, you’ll need:
Light fabric: Two 5-inch squares
Dark fabric: Two 5-inch squares
Cutting Tools: A rotary cutter, self-healing cutting mat, and quilting ruler are essential for precise cuts.
Sewing Machine: A reliable sewing machine with a quarter-inch foot for consistent seam allowances is ideal.
Thread: Use high-quality cotton thread in a neutral color to ensure durability and a clean finish.
Iron and Pressing Board: Pressing seams is crucial for accuracy and a polished look.
Optional Tools: Fabric markers or pencils, pins, and a seam ripper can be handy during the process.
Step-by-Step Instructions to Make the Yankee Puzzle Block
Creating a Yankee Puzzle quilt block involves a series of straightforward steps. Follow these instructions carefully to achieve a beautiful result.
Cutting the Fabric:
From the light fabric, cut two 5-inch squares.
From the dark fabric, cut two 5-inch squares.
Mark a diagonal line on the back of the two light squares using a fabric pencil.
Creating Half-Square Triangles (HSTs):
Pair one light square with one dark square, right sides together.
Sew a quarter-inch seam on both sides of the marked diagonal line.
Cut along the marked line to create two HST units from each pair.
Press the seams toward the darker fabric.
Trimming the HSTs:
Trim each HST unit to measure 4.5 inches square, ensuring precise edges.
Use a quilting ruler to align the diagonal seam for accurate trimming.
Arranging the Pieces:
Lay out the HST units to form the Yankee Puzzle pattern.
Ensure the triangles’ colors alternate to create the pinwheel effect.
Sewing the Units Together:
Sew the HSTs in pairs to create two rows.
Press the seams of each row in opposite directions to reduce bulk.
Join the rows together, carefully matching the seams.
Final Pressing and Finishing:
Press the entire block to ensure it lays flat.
Check the final dimensions to confirm the block measures 12.5 inches, allowing for seam allowances.
Tips for Success
Mastering the Yankee Puzzle quilt pattern can take practice, but these tips will help you achieve professional results:
Test Your Seam Allowance: Accurate seam allowances are crucial for maintaining block size. Test your sewing machine’s quarter-inch setting before starting.
Chain Piecing: To save time, sew multiple HST units in a continuous chain rather than individually.
Use Starch: Lightly starching your fabric before cutting can prevent stretching and improve precision.
Press, Don’t Iron: Use a pressing motion rather than sliding the iron to avoid distorting the fabric.
Double-Check Layout: Before sewing the rows, double-check the arrangement to ensure the pattern is correct.
Practice Makes Perfect: If you’re new to quilting, consider practicing on scrap fabric before working with your chosen materials.
By following these steps and tips, you’ll create a stunning Yankee Puzzle quilt block that showcases your skills and creativity. Enjoy the process and take pride in your work as you bring this classic pattern to life.


