
Patchwork Cat Sewing Quilt Pattern
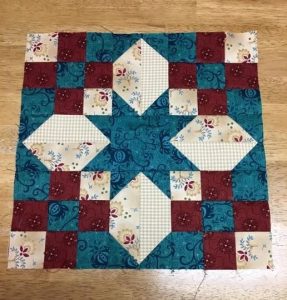
The Eliza’s Star Quilt Block Pattern is a beloved design cherished by quilters for generations. With its elegant points and symmetrical balance, this traditional block offers both charm and sophistication to any quilt project. Whether you’re a beginner or an experienced quilter, learning how to create this pattern can elevate your quilting skills and add a timeless element to your designs.
The beauty of the Eliza’s Star Quilt Block Pattern lies in its combination of precision and creativity. It consists of sharp, clean lines and contrasting fabrics that come together to form a stunning star motif. This block works wonderfully in full quilts, wall hangings, or even as a feature pillow.
Creating the Eliza’s Star Quilt Block Pattern requires a careful approach to cutting, sewing, and assembling fabric pieces. The good news is that once you’ve mastered the basics, the block becomes a joy to reproduce and customize with various fabric prints and colors.

This guide will walk you through the complete process, from fabric selection and cutting measurements to step-by-step instructions for piecing the block. Everything in this article adheres to Google AdSense content policies, ensuring high-quality, family-friendly content.
Throughout the article, you’ll find essential tips and tricks to help make your Eliza’s Star Quilt Block Pattern project successful. Whether you’re sewing by hand or using a machine, our guide will provide all the tools you need to achieve a professional finish.
Let’s dive into the timeless art of creating your very own Eliza’s Star Quilt Block Pattern and discover why this block continues to shine in the world of quilting.
Before you begin constructing the Eliza’s Star Quilt Block Pattern, it’s important to choose the right fabrics. Aim for a mix of light, medium, and dark tones to make the star shape stand out. High contrast fabrics help highlight the points of the star and give the block a more dynamic appearance.
Start with 100% cotton quilting fabric, as it’s easy to cut, press, and sew. Pre-wash your fabrics to prevent shrinkage after your quilt is completed. For the Eliza’s Star Quilt Block Pattern, you’ll need four different fabrics: a background fabric, a star fabric, a secondary star point fabric, and a center fabric.
Here are the fabric cutting measurements for one 12” finished quilt block:
Label each fabric piece to stay organized while you construct the Eliza’s Star Quilt Block Pattern. Keeping your workspace tidy helps ensure accuracy and minimizes the chances of misplacing a piece during sewing.
Using a rotary cutter and a self-healing cutting mat will give you clean, straight edges. Double-check all measurements before cutting—precision is key to making sure your pieces align perfectly in the final block.
If you plan to make multiple blocks, consider creating a cutting template or using a fabric die cutter. This will save time and ensure that all blocks in your quilt are consistent in size and shape.
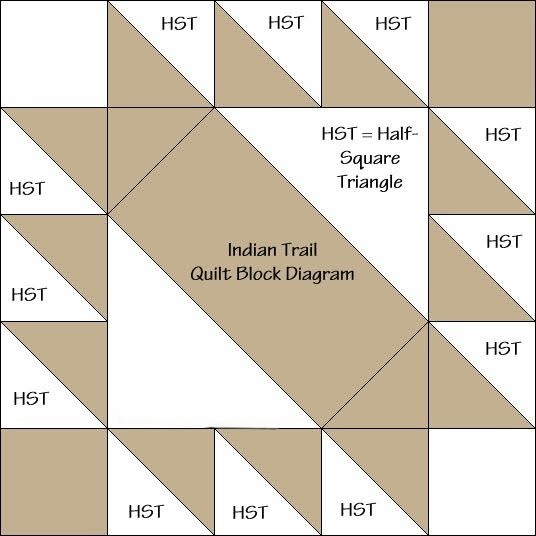
Now that your fabric pieces are cut and ready, it’s time to start assembling the Eliza’s Star Quilt Block Pattern. The block is constructed using half-square triangles (HSTs), flying geese units, and a central square—all common quilting techniques.
Begin by making your half-square triangles. Take four 4” background squares and four 4” star fabric squares. Pair them right sides together. Draw a diagonal line from corner to corner on the background fabric. Sew a 1/4″ seam on both sides of the line, then cut along the line to yield two HSTs per pair.
Press each HST open, with the seam going toward the darker fabric. Trim them to 3.5” squares. You should now have eight HSTs ready to form the points of the Eliza’s Star Quilt Block Pattern.
Next, construct the flying geese units using the 3.5” x 6.5” rectangles and two 3.5” squares from your background fabric. Draw a diagonal line on the wrong side of each square. Place a square on one end of a rectangle, right sides together, and sew along the line. Trim the excess corner and press open. Repeat on the other side to complete the unit.
Arrange your units in a 3×3 grid: place the central square in the middle, flying geese units on the sides forming the star arms, and HSTs in the corners pointing outward. This layout creates the distinct starburst of the Eliza’s Star Quilt Block Pattern.
Sew each row together using a 1/4” seam, press the seams in alternating directions (first row to the right, second to the left, third to the right) to help nest them when assembling the full block.
Join the rows carefully, aligning points to ensure sharp star shapes. Press the entire block flat, and admire your finished Eliza’s Star Quilt Block Pattern masterpiece.
One of the joys of the Eliza’s Star Quilt Block Pattern is its versatility. With just a few changes in fabric selection or block arrangement, you can create a wide variety of looks to suit any project or color scheme.
Experiment with bold prints or batik fabrics for a modern twist. Alternatively, using reproduction prints or muted tones will give your quilt a vintage or country-style appeal. The Eliza’s Star Quilt Block Pattern can easily adapt to your creative preferences.
You can also scale the block size up or down. For smaller blocks, reduce each measurement proportionally to maintain the shape and symmetry. This is especially useful for smaller quilting projects like table runners, placemats, or patchwork bags.
Another fun variation is rotating blocks in a quilt layout. When you sew multiple Eliza’s Star Quilt Block Pattern units together, turning each block 90 degrees creates a secondary pattern in the quilt top that adds visual interest and movement.
Consider adding sashing or borders between the blocks to frame the star shapes. You can even alternate the Eliza’s Star Quilt Block Pattern with other traditional blocks for a unique sampler quilt.
Don’t be afraid to play with color theory—complementary or analogous color schemes can highlight the star’s structure. The more you experiment, the more you’ll see how the Eliza’s Star Quilt Block Pattern can become a signature element in your quilting projects.
After completing your Eliza’s Star Quilt Block Pattern, there are many creative ways to incorporate it into finished projects. Whether you’re creating a full-size quilt, a baby blanket, or a decorative wall hanging, this block serves as a beautiful focal point.
Make a full quilt by repeating the block in a 4×5 or 5×6 layout, with or without sashing. Depending on your color choices, the overall quilt can be soft and subtle or bold and dramatic. The Eliza’s Star Quilt Block Pattern works well for seasonal quilts too—just select fabrics in holiday or seasonal colors.
You can also make a single block and frame it as a piece of quilted artwork. Add batting, a backing fabric, and quilt along the star lines for a dimensional effect. Bind the edges and hang it as a statement piece in any room.
Quilted pillows are another great project for showcasing a single Eliza’s Star Quilt Block Pattern. Add a border to increase the block size, then sew it into a pillow cover. It makes a charming handmade gift or home décor accent.
For quilters who enjoy teaching or group projects, this pattern is an excellent choice for workshops or quilting bees. Each participant can create a block, and the group can assemble a collective quilt to donate or raffle.
Finally, consider using your finished block in a sampler quilt. Combine it with other traditional block patterns to create a quilt that tells a story of your quilting journey. The Eliza’s Star Quilt Block Pattern will stand out as a star—literally and figuratively—in your creation.
As you gain confidence, you’ll see that mastering this timeless design opens the door to endless creative opportunities in the quilting world.


