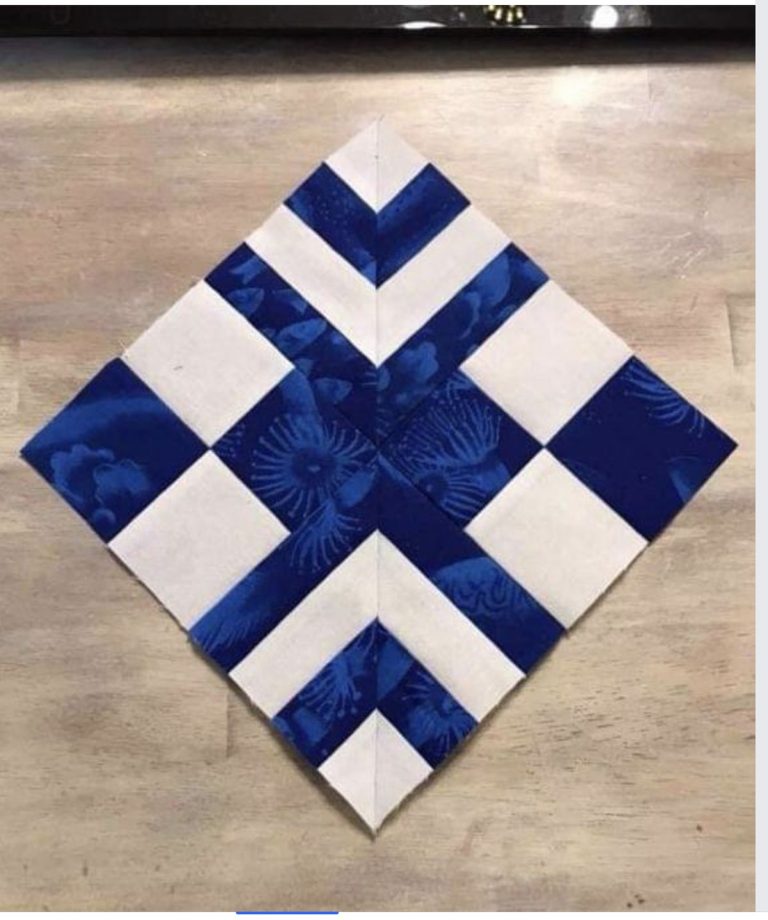
Navy Squares Quilt Block Pattern
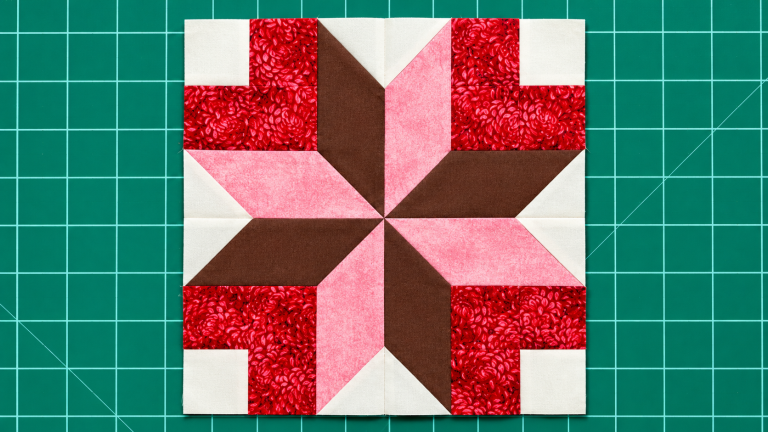
When it comes to adding timeless charm and intricate beauty to your quilting projects, few designs match the appeal of the Star Sashed Nine Patch Block. This unique block combines the classic simplicity of the nine patch with striking star sashing, resulting in a quilt that looks both traditional and sophisticated. For quilters looking to elevate their skills, learning how to create the Star Sashed Nine Patch Block is both rewarding and surprisingly approachable.
In this article, we’ll walk you through everything you need to know about making your own Star Sashed Nine Patch Block. From selecting fabrics and making precise cuts to sewing the star points and assembling the finished block, every step will be clearly explained. Whether you’re a seasoned quilter or a passionate beginner, you’ll find helpful tips to ensure your project looks professional and polished.
By the end of this guide, you’ll be ready to include the Star Sashed Nine Patch Block in your next quilt, turning an ordinary piece into a stunning showcase of craftsmanship and creativity. Let’s begin this creative journey and explore why this pattern has captured the hearts of so many quilters worldwide.

The secret to a beautiful Star Sashed Nine Patch Block often begins with thoughtful fabric selection and careful cutting. Choose three main fabrics: one for the center nine patch, one for the star points, and one for the sashing background. Balance is key, so aim for contrast between the fabrics to let the star shape stand out clearly against the patchwork.
For the nine patch center, cut five squares measuring 2.5” x 2.5” from your main print fabric, and four squares measuring 2.5” x 2.5” from a contrasting fabric. These nine squares will form the classic nine patch that sits at the heart of your Star Sashed Nine Patch Block. Arrange them in a checkerboard pattern to highlight the contrast.
Next, prepare the star points. You’ll need eight squares measuring 2” x 2” from your chosen star point fabric, and eight squares measuring 2” x 2” from the sashing background fabric. These small squares will be sewn into flying geese units that create the star shape around the nine patch.
The sashing strips bring the entire Star Sashed Nine Patch Block together. Cut four rectangles measuring 2” x 6.5” from your sashing background fabric for the horizontal and vertical sashing. Additionally, cut four 2” x 2” squares from the star point fabric for the cornerstones where the sashing meets.
Finally, prepare four rectangles measuring 2” x 10.5” from the sashing background fabric. These will complete the outer edges of your Star Sashed Nine Patch Block, framing the star for a finished, balanced look. Once all your pieces are cut, you’re ready to start assembling.
The heart of the Star Sashed Nine Patch Block is the classic nine patch unit. This block is loved for its simplicity, and sewing it carefully sets the stage for the rest of the design. Lay out your five main fabric squares and four contrasting squares in three rows of three, ensuring the colors alternate.
Start by sewing each row of three squares together using a quarter-inch seam allowance. Press the seams of the first and third rows in one direction, and the seams of the middle row in the opposite direction. This technique, known as “nesting” seams, will help the corners line up perfectly.
After pressing, join the three rows together. Carefully align the seams at each intersection, pinning if necessary to keep everything precise. Sew with the same quarter-inch seam allowance, and then press the completed nine patch block flat. You now have the central piece of your Star Sashed Nine Patch Block ready.
The quality of this center unit makes a noticeable difference in your final quilt block. Even slight misalignments can throw off the balance of the surrounding star sashing. Take your time with these first seams to ensure a professional look.
While simple, the nine patch design holds a special place in quilting history, and in the Star Sashed Nine Patch Block, it becomes even more eye-catching thanks to the added star elements. With your center prepared, it’s time to add those beautiful stars.
To create the signature star points of the Star Sashed Nine Patch Block, you’ll make flying geese units. Pair each 2” star point square with a 2” sashing background square. Place them right sides together on opposite ends of a 2” x 6.5” sashing strip. Mark a diagonal line on the back of each star point square and sew along the marked line.
Trim away the excess fabric, leaving a quarter-inch seam allowance. Press the seams toward the star points. Repeat this step for the other sashing strips so that you end up with four strips, each with two star points—one on each end.
Once the star points are sewn, it’s time to join the sashing to the center nine patch. Sew a star-pointed sashing strip to the top and bottom of the nine patch block, and press seams outward. These two strips add the top and bottom arms of your star.
Now add the two remaining sashing strips with star points to the sides of the block. The cornerstones—the small 2” x 2” squares cut from your star point fabric—will meet at each corner, visually completing the star shape around the center.
This step requires careful alignment to keep the star looking crisp and symmetrical. Pin generously to prevent shifting while sewing. With patience and precision, you’ll see the beautiful Star Sashed Nine Patch Block star appear around the nine patch.
Once the sashing and star points are added, press your block flat again. This will help ensure the final assembly looks sharp and professional.
With the star sashing complete, it’s time to frame your Star Sashed Nine Patch Block with the final outer sashing strips. Sew the two 2” x 10.5” sashing strips to the top and bottom of the block. Then, add the two remaining strips of the same size to the left and right sides.
Press your completed Star Sashed Nine Patch Block carefully, using steam to flatten any bulky seams. Your finished block should measure approximately 10.5” x 10.5”, ready to be incorporated into a larger quilt design.
Remember that precision at every step—from cutting to piecing—makes the difference between a good quilt block and a truly beautiful one. Double-check your measurements and take your time aligning seams.
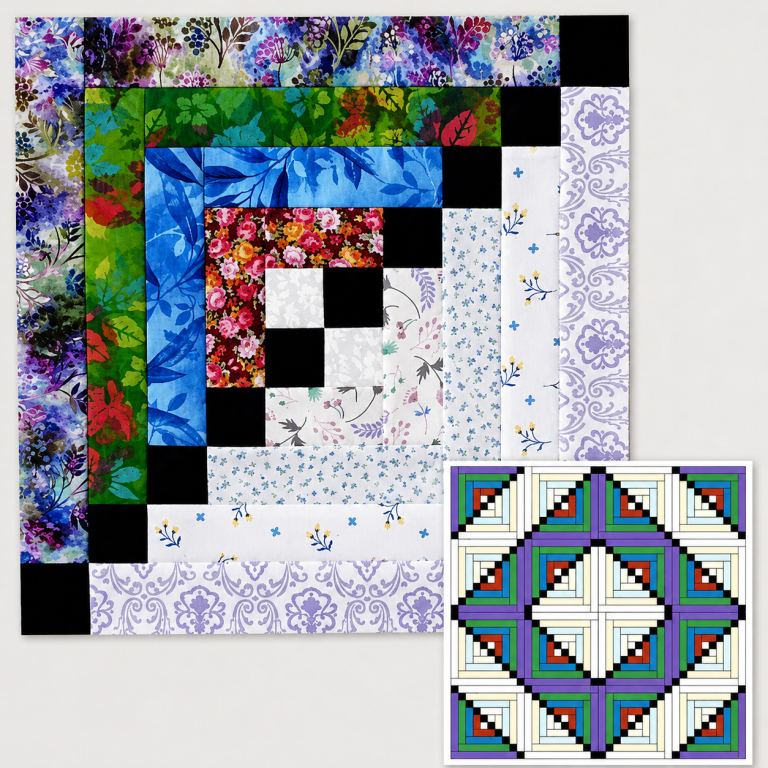
This block isn’t just about technique; it’s also about creativity. Experiment with color placement and fabric patterns to see how the Star Sashed Nine Patch Block changes character. Light star points on a dark background create a dramatic look, while softer pastels feel vintage and delicate.
Finally, quilting should always be enjoyable. The Star Sashed Nine Patch Block might look intricate, but once broken down into simple steps, it’s manageable for most skill levels and deeply rewarding to finish.
By following these instructions, you’ll have a block that not only looks impressive but also honors the classic tradition of patchwork quilting in a fresh and modern way.
