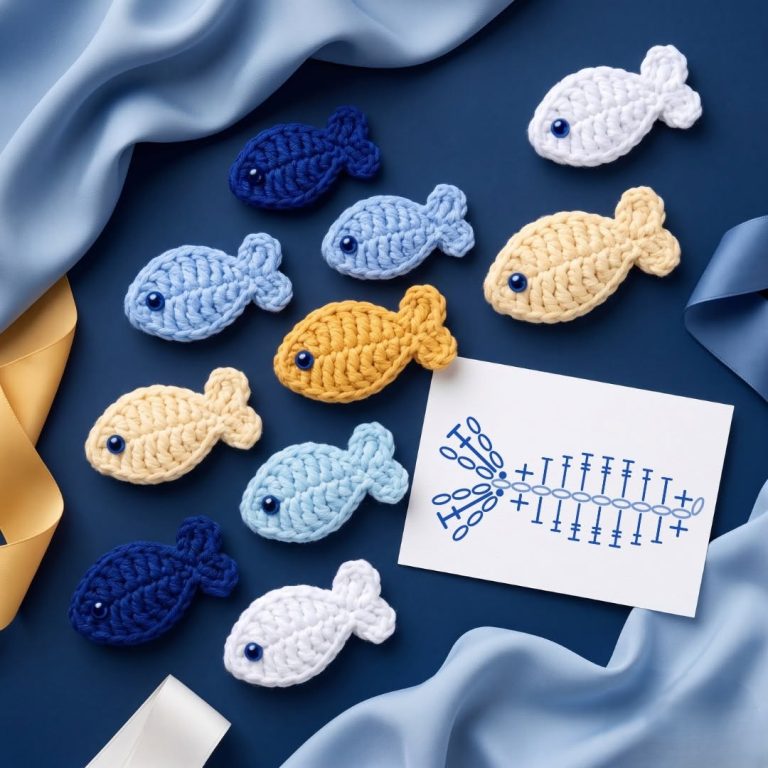
Crochet Easy Mini Fish Pattern
The Russian Rug in Escudo Crochet – Step-by-Step pattern is a beautiful and intricate design that brings traditional Eastern European aesthetics into your home through the art of crochet. This decorative piece is known for its rich texture, bold motifs, and cozy, luxurious feel. Whether you are an experienced crocheter or a passionate beginner, this guide will walk you through every step needed to create a handmade treasure that can brighten up any room.
By combining vibrant yarn colors and the unique escudo stitch style, the Russian Rug in Escudo Crochet – Step-by-Step process introduces techniques that are both rewarding and visually stunning. The escudo stitch, known for its shield-like appearance, adds depth and complexity to the finished rug. When paired with traditional Russian color palettes and layout patterns, it creates a masterpiece that is sure to become a focal point in your décor.
In this comprehensive guide, we’ll cover every aspect of this project: choosing the right materials, planning your color scheme, understanding the escudo stitch, and completing your rug with confidence. From the first foundation chain to the final edge stitch, you’ll find this Russian Rug in Escudo Crochet – Step-by-Step tutorial both informative and inspiring. Let’s begin this creative journey and bring a little piece of Russian tradition into your craft room.

The first step in any successful crochet project is choosing the right materials. For the Russian Rug in Escudo Crochet – Step-by-Step, the texture and color of your yarn are crucial. Opt for medium to bulky weight yarns made of natural fibers such as wool or cotton. These yarns hold the escudo stitch well and add weight to your finished rug, helping it lay flat and look professional.
Pick colors that reflect traditional Russian rug patterns. Deep reds, indigo blues, forest greens, and warm golds are often found in Eastern European textiles. You can choose a three-color palette or go bold with five or six shades. Just make sure the tones contrast enough to highlight the intricate escudo design.
Next, gather your tools. You’ll need a crochet hook size 6.0 mm (J-10) or larger, depending on your yarn’s thickness. A yarn needle and sharp scissors are also essential. Make sure to have stitch markers handy if you’re new to complex stitch placement.
For this project, you’ll need:
You’ll also want a flat, clean surface to block your rug once finished. Blocking helps even out the stitches and gives your rug a crisp, finished look.
Before beginning the pattern, swatch a 4×4 inch test square using the escudo stitch to confirm your gauge. This ensures your rug finishes at the intended size and the stitches remain uniform throughout.
The centerpiece of this pattern is the escudo stitch. To master the Russian Rug in Escudo Crochet – Step-by-Step, understanding this stitch is essential. The escudo stitch is a combination of single crochet, front post double crochet, and cluster stitches arranged in a geometric format that resembles shields—hence its name.
Start by chaining a multiple of 10 plus 1 to establish the width of your rug. For a rug measuring approximately 36″ x 48″, chain 111. This includes 110 stitches for the base pattern and one turning chain.
Row 1: Single crochet in the second chain from the hook and in each chain across. Turn.
Row 2: [FPdc (Front Post Double Crochet) around next st, sc in next 3 stitches, skip 2, 3dc cluster in next stitch, skip 2, sc in next 3]. Repeat from * to * until the end of the row. Turn.
Row 3 and all odd rows: Single crochet across.
Row 4: Shift the placement of the cluster stitch so that it sits between the cluster from the previous row. This creates a staggered shield pattern, giving the escudo its iconic look.
Continue repeating Rows 3 and 4 until your rug reaches the desired length, usually about 48 inches. End on a single crochet row.
Practice on a small swatch before starting the full rug. Once you feel comfortable, you can increase the width or length by adjusting the number of chains and rows.
The escudo stitch requires tension consistency, so keep your hand relaxed and your yarn flow even. Take your time to ensure each stitch is uniform for a clean, professional finish.
Now that you’re confident with the stitch, let’s build the Russian Rug in Escudo Crochet – Step-by-Step from the base up. Begin by chaining your foundation row as discussed. This step determines the width of your rug, so measure carefully as you go.
Begin crocheting the rows, alternating your color choices. Use Color A as the base, Color B for the front post stitches, and Color C for the cluster stitches. This creates a vivid and traditional Russian-style contrast that enhances the rug’s elegance.
After every 8 rows, switch the position of your accent colors. This staggered change brings rhythm and movement to the pattern. Be sure to carry your yarn neatly along the sides or cut and weave in as needed to avoid bulk.
Each section should measure around 6 inches in height. Repeat the pattern sections until you reach the 48-inch mark. You’ll typically work about 64 rows for a standard-size rug.
To create the border, switch back to Color A and work three rounds of single crochet evenly around all sides of the rug. At each corner, add three single crochets into the same stitch to maintain the square shape.
For a fancier finish, you may add one round of reverse single crochet (crab stitch) around the outermost row. This will give your Russian Rug in Escudo Crochet – Step-by-Step a more polished and decorative edge.
Once all rows are complete, fasten off and weave in all ends using a yarn needle. Carefully stretch out your Russian Rug in Escudo Crochet – Step-by-Step on a flat surface. Use rust-proof pins to secure the edges and spray lightly with water to block.
Allow the rug to dry completely, which could take 24 to 48 hours. Blocking is essential to help set the escudo stitch design and flatten any curl or uneven tension in your work.
If you wish, you can line the back of your rug with felt or non-slip fabric. This helps the rug stay in place and adds durability for long-term use.
You can also personalize your rug by attaching tassels or fringe to the short edges. Use leftover yarn in your accent colors for a cohesive finish.
Maintenance for your finished rug is simple. Spot clean with mild soap and water or hand wash if necessary. Lay flat to dry. Do not wring or machine wash, as this can distort the stitches.
By adding this handcrafted rug to your living space, you’re not only decorating with a piece of textile art but also showcasing your skill and love for crochet tradition.
Creating a Russian Rug in Escudo Crochet – Step-by-Step is a rewarding experience that blends rich tradition, detailed craftsmanship, and practical home décor. This beautiful project allows you to explore advanced stitches, experiment with color, and produce a rug that is as durable as it is decorative.
With the escudo stitch as your foundation, you’ll bring texture and character to your design. The use of traditional Russian motifs combined with a modern crochet approach gives your rug timeless appeal.
Remember, the key to success lies in your preparation—selecting the right yarn, practicing the stitch, and planning your layout before beginning. Take your time with each step, and don’t be afraid to customize colors to match your own style.
Whether you’re making this rug for yourself or as a gift, the final result will be a handcrafted masterpiece that reflects your creativity and attention to detail.
By following this Russian Rug in Escudo Crochet – Step-by-Step guide, you’re not just making a rug—you’re weaving a story in yarn, one stitch at a time. Let your hands and heart guide you as you bring this traditional art to life.
Q: What skill level is required for this pattern?
A: Intermediate. Basic crochet knowledge and ability to follow pattern repeats are necessary.
Q: Can I resize the rug?
A: Yes. Adjust the starting chain in multiples of 10 plus 1 to change width, and add or reduce rows for length.
Q: What yarn works best for this rug?
A: Medium to bulky weight natural fiber yarns like wool or cotton provide texture and structure.
Q: Is blocking necessary?
A: Yes. Blocking helps even out the stitches and makes the rug lay flat.
Q: Can I use different stitches for the border?
A: Absolutely. Reverse single crochet or a simple shell border adds extra elegance.
Q: How do I clean the rug?
A: Spot clean or hand wash with mild soap. Always lay flat to dry.


