Crochet Dangling Opossum Pattern
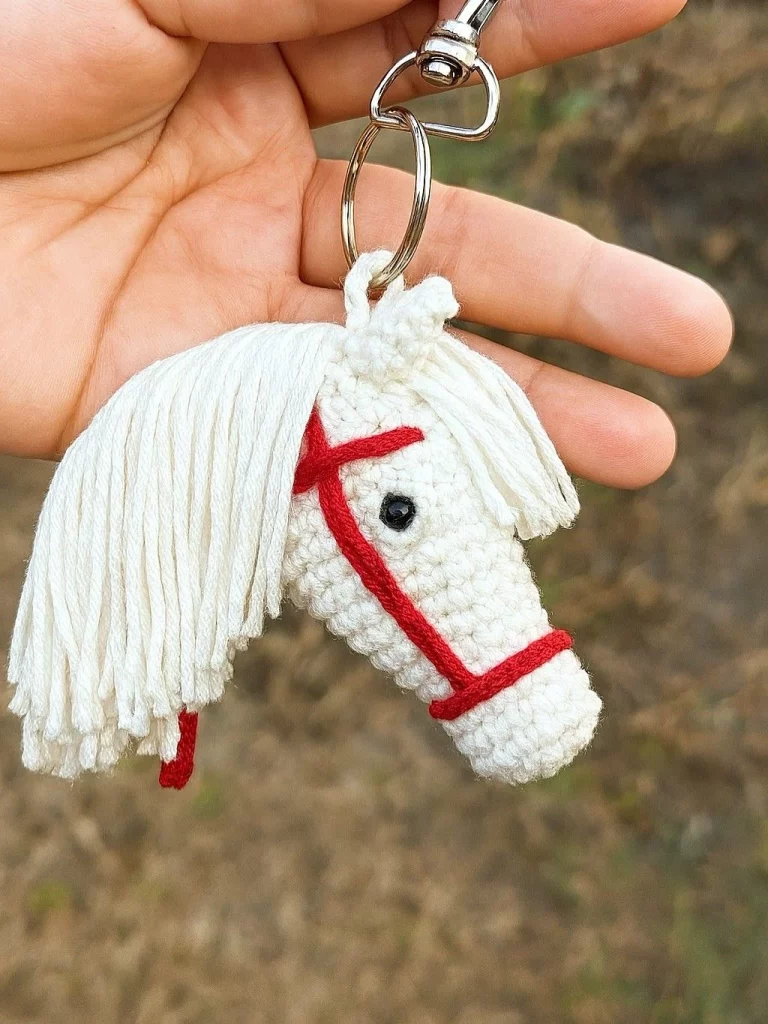
Crochet Of Horse Face Pattern is a charming and creative project that blends artistry, patience, and craftsmanship into a unique handmade piece.
Whether you are a beginner exploring the world of crochet or an experienced crafter looking for a new challenge, mastering a Crochet Of Horse Face Pattern can be both rewarding and relaxing.
This pattern allows you to create a detailed horse face design that can be used in blankets, appliqués, wall art, or even as part of amigurumi projects. The beauty of crochet lies in its versatility, and this pattern is a perfect example of how simple stitches can transform into something visually stunning.Creating a Crochet Of Horse Face Pattern is not only about following instructions but also about understanding the structure and flow of stitches. Each loop and stitch contributes to the overall shape and expression of the horse face, making it essential to pay attention to detail. As you progress, you will notice how different yarn textures, hook sizes, and stitch techniques can influence the final look. This makes every project unique and personalized, allowing crafters to express their creativity in countless ways.
In addition, working on a Crochet Of Horse Face Pattern can be a therapeutic activity. The repetitive motion of crocheting helps reduce stress and improve focus, while the satisfaction of completing a detailed design boosts confidence. This pattern is also a great opportunity to expand your crochet skills, as it often involves techniques like color changes, shaping, and embroidery details. By the end of this article, you will have a complete understanding of how to approach, create, and refine your own horse face crochet design.
Before starting your Crochet Of Horse Face Pattern, it is important to understand the foundational elements of crochet. Basic stitches such as chain, single crochet, and double crochet form the building blocks of most patterns. These stitches are combined in different ways to create texture, shape, and depth, which are essential when forming the contours of a horse’s face.
Yarn selection plays a crucial role in the outcome of your project. For a Crochet Of Horse Face Pattern, choosing the right yarn weight and texture can enhance the details of the design. Medium-weight yarn is often recommended for beginners because it is easier to handle and provides good stitch definition. Softer yarns can give the horse face a more realistic and gentle appearance.
Hook size is another key factor to consider. Using a hook that matches your yarn weight ensures consistent tension and neat stitches. If your stitches are too tight, the fabric may become stiff, while loose stitches can make the design look uneven. Finding the right balance is essential for achieving a polished result in your Crochet Of Horse Face Pattern.
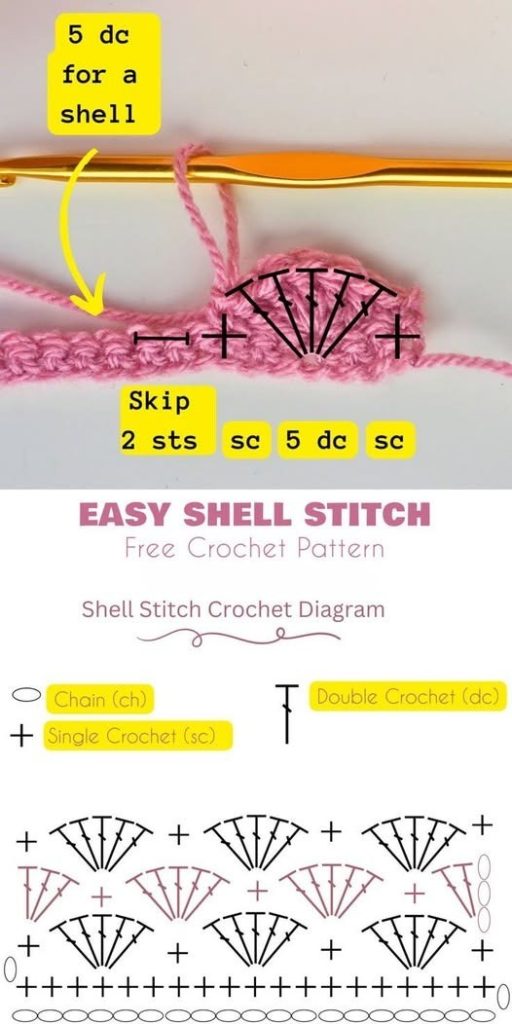
Understanding pattern reading is also vital. Crochet patterns use abbreviations and symbols to represent stitches and techniques. Taking the time to learn these notations will make it easier to follow instructions and avoid mistakes. Many Crochet Of Horse Face Pattern designs include charts or diagrams that visually represent the stitches, which can be especially helpful for complex sections.
Color changes are often used to define features such as the eyes, nose, and mane. Learning how to switch colors seamlessly will help you create a more realistic and visually appealing horse face. Practice this technique before starting your main project to ensure smooth transitions.
Finally, patience is key when working on a detailed pattern. A Crochet Of Horse Face Pattern may take time to complete, but the end result is worth the effort. Taking breaks and working at your own pace will help you enjoy the process and produce a high-quality piece.
To begin your Crochet Of Horse Face Pattern, start with a foundation chain that matches the width of your design. This will serve as the base for your project. From there, you will build rows or rounds depending on whether your pattern is flat or three-dimensional.
The first few rows are crucial for establishing the shape. Use consistent stitches and maintain even tension to create a solid base. As you progress, you will begin to shape the contours of the horse’s face by increasing and decreasing stitches where necessary.
Adding facial features is one of the most exciting parts of the process. Eyes, nostrils, and mouth details can be created using different stitch techniques or embroidered afterward. These elements bring the Crochet Of Horse Face Pattern to life and give it character.
Shaping the ears and mane requires careful attention. These features often involve separate pieces that are attached to the main design. Using the same yarn and consistent stitches ensures that all parts blend seamlessly together.
Blocking your finished piece can significantly improve its appearance. This process involves gently shaping the crochet fabric and allowing it to dry in the desired form. Blocking helps even out stitches and enhances the overall look of your Crochet Of Horse Face Pattern.
Finally, assemble all components and secure loose ends. Take your time during this step to ensure that everything is firmly attached and neatly finished. A well-assembled project not only looks better but also lasts longer.
One of the best ways to improve your Crochet Of Horse Face Pattern is to practice regularly. Repetition helps you refine your technique and develop muscle memory, making your stitches more consistent over time.
Using stitch markers can be incredibly helpful, especially when working on complex sections. They allow you to keep track of your progress and prevent mistakes. This is particularly useful when shaping the horse’s face or adding intricate details.
Experimenting with different yarn colors can add depth and dimension to your design. Subtle variations in shade can create a more realistic effect, especially for features like the mane and facial contours.
Maintaining even tension is essential for achieving a professional finish. Try to keep your stitches uniform throughout the project. If you notice inconsistencies, take the time to adjust your technique before continuing.
Learning advanced techniques such as tapestry crochet can enhance your Crochet Of Horse Face Pattern. This method allows you to create detailed colorwork within the stitches, resulting in a more intricate design.
Lastly, don’t be afraid to make adjustments to the pattern. Personalizing your project can make it more meaningful and unique. Whether it’s changing colors or modifying features, your creativity is what makes each piece special.
A Crochet Of Horse Face Pattern can be used in a variety of creative ways. One popular option is incorporating it into blankets or afghans. This adds a unique and personalized touch to your home décor.
Another idea is to use the pattern as an appliqué. You can attach it to clothing, bags, or accessories to create a custom look. This is a great way to showcase your crochet skills and add a handmade element to everyday items.
Wall art is another excellent use for this pattern. Framing your finished piece turns it into a decorative artwork that can be displayed in any room. It’s a wonderful way to celebrate your craftsmanship.
For those interested in toys, the Crochet Of Horse Face Pattern can be adapted into amigurumi projects. By adding a body and limbs, you can create a complete horse figure that is both adorable and functional.
Gifts are another meaningful application. Handmade items carry sentimental value, and a crocheted horse face can be a thoughtful present for animal lovers or craft enthusiasts.
Finally, this pattern can be used for educational purposes. Teaching others how to create a Crochet Of Horse Face Pattern is a great way to share your knowledge and inspire creativity in others.
What skill level is required for a Crochet Of Horse Face Pattern
Most patterns are suitable for intermediate crocheters, but beginners can also try simpler versions with basic stitches and minimal detailing.
How long does it take to complete a Crochet Of Horse Face Pattern
The time varies depending on complexity and skill level, but most projects can take anywhere from a few hours to several days.
What materials are needed for a Crochet Of Horse Face Pattern
You will need yarn, a crochet hook, scissors, a yarn needle, and optional items like stitch markers and stuffing if making a 3D version.
Can I customize my Crochet Of Horse Face Pattern
Yes, customization is highly encouraged. You can change colors, add details, or modify the size to suit your preferences.
Why does my pattern look uneven
Uneven tension or incorrect hook size can cause inconsistencies. Practice and adjustments will help improve your results.
Is blocking necessary for a Crochet Of Horse Face Pattern
Blocking is not mandatory but highly recommended as it enhances the shape and overall appearance of your project.
Can I sell items made from this pattern
In most cases, yes, but it’s important to check the specific pattern’s terms if you are using a designer’s instructions.
Conclusion
In this article, we explored everything you need to know about creating a Crochet Of Horse Face Pattern, from understanding the basics to mastering advanced techniques and discovering creative uses. You learned how to select the right materials, follow step-by-step instructions, and refine your skills to achieve a professional-looking result. This pattern is not only a fun and rewarding project but also a great way to express your creativity and improve your crochet abilities.
Now it’s your turn to bring your own Crochet Of Horse Face Pattern to life. Take your time, enjoy the process, and don’t be afraid to experiment with new ideas. I would love to hear your honest opinion about this guide and see your suggestions for future improvements.


